1. Introduction
This manual provides detailed instructions for the installation of the NuIth Double DIN Radio Dash Kit and the Add-an-Amplifier Adapter. These components are designed to facilitate the installation of an aftermarket double DIN radio and an external amplifier in compatible Volkswagen vehicles. Please read all instructions carefully before beginning the installation process.
2. Product Overview
The NuIth Double DIN Radio Dash Kit is constructed from durable ABS plastic, designed to seamlessly integrate an aftermarket double DIN radio into your vehicle's dashboard. It ensures a precise fit and matches the factory dash color, covering any gaps between the dash and the new stereo.
The Add-an-Amplifier Adapter allows for the integration of an aftermarket amplifier into your factory audio system, typically for adding a subwoofer. It provides a connection for RCA cables to deliver an audio signal to the external amplifier.
3. Compatibility
3.1. Double DIN Dash Kit Compatibility
This double DIN installation dash kit is compatible with the following Volkswagen models:
- Beetle: 2012-2019
- CC: 2009-2017
- EOS: 2007-2016
- Golf: 2010-2014
- GTI: 2006-2014
- Jetta: 2005-2018
- GLI: 2006-2018
- Jetta SportWagen: 2010-2014
- Passat: 2006-2018
- Rabbit: 2007-2009
- Tiguan: 2009-2017
- Tiguan Limited: 2018-2018
- Scirocco: 2008-2017
- Touran: 2003-2009
- R32: 2007-2008

Image: A table listing various Volkswagen models and their compatible year ranges for the dash kit.
3.2. Amplifier Adapter Compatibility
The amplifier adapter is compatible with the following Volkswagen models:
- Beetle: 2016-2019
- Golf Series: 2015-2017
- Jetta: 2016-2020
- Jetta GLI (with 6.5-inch color display): 2016-2020
- Passat: 2016-2019
- Tiguan: 2016-2017
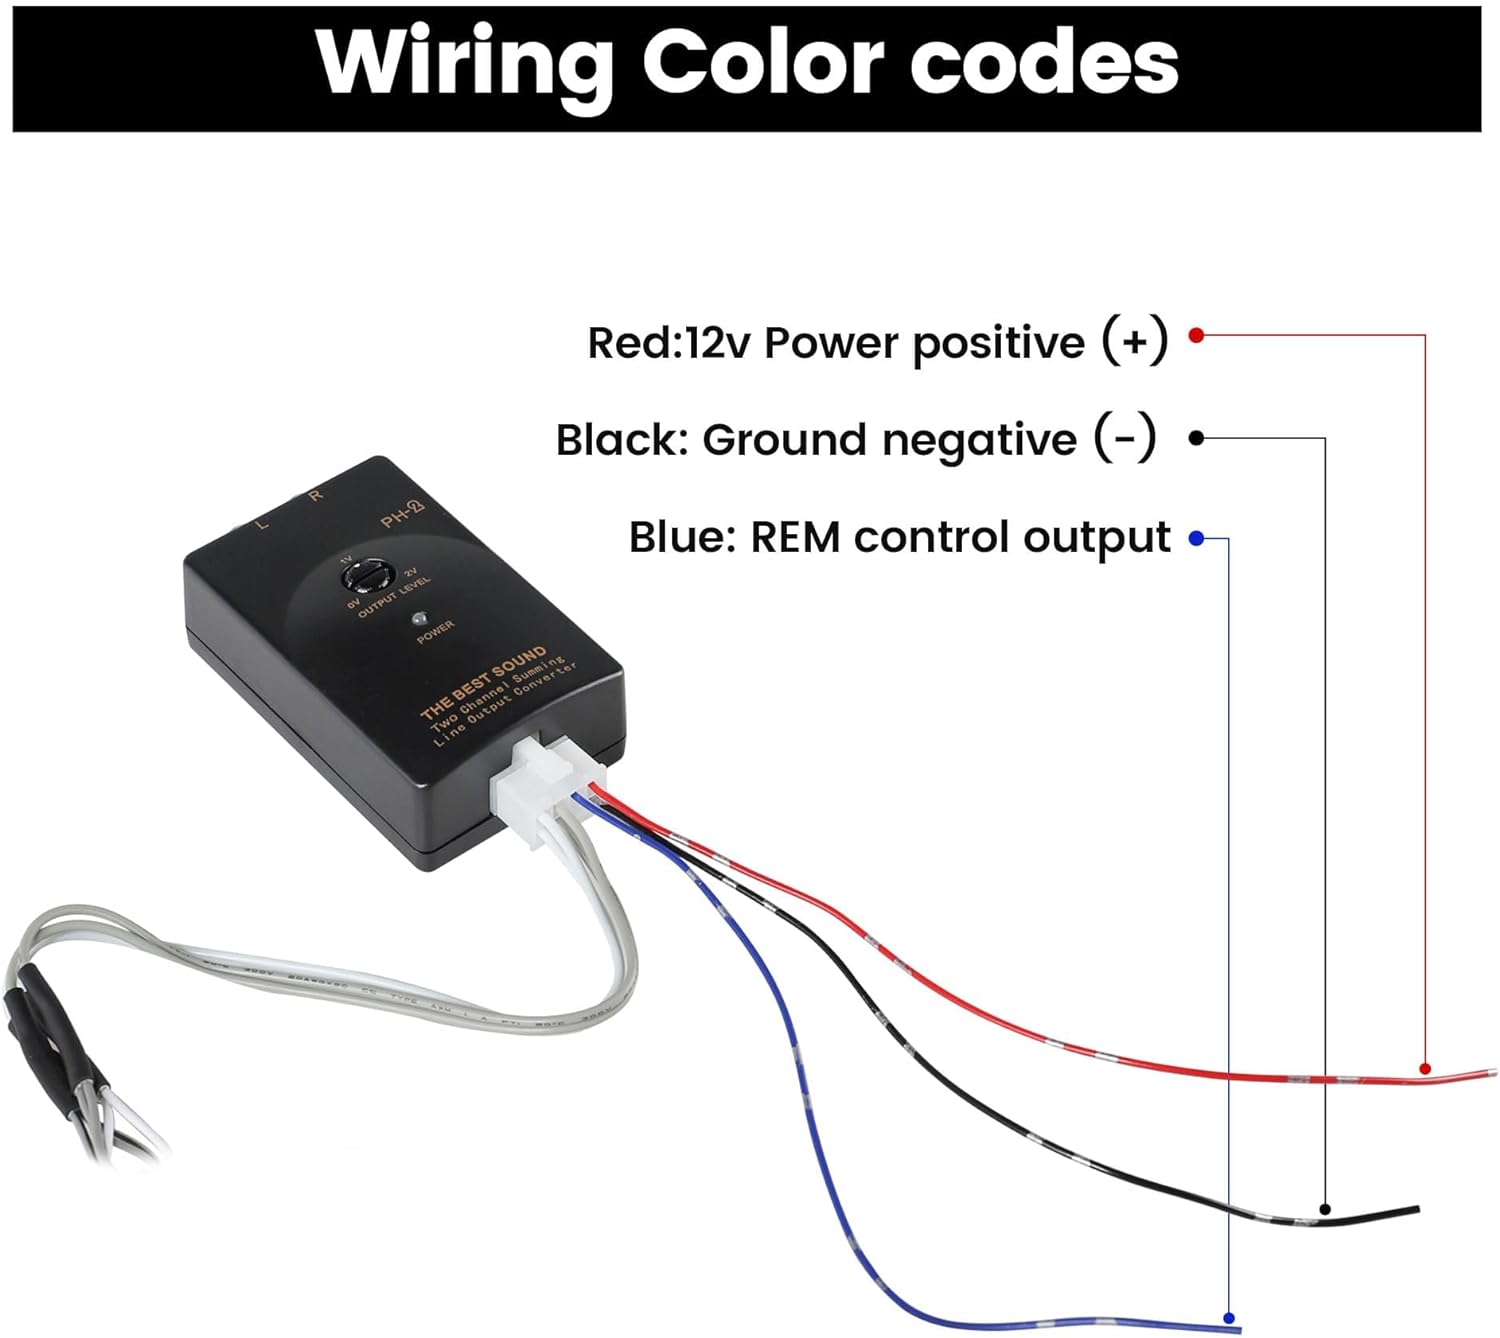
Image: A list of Volkswagen models and their compatible year ranges for the amplifier adapter.
4. Installation of Double DIN Dash Kit
Follow these steps to install your new aftermarket double DIN radio using the dash kit:
- Prepare the Radio: Attach the factory mounting brackets and the double DIN trim plates to your aftermarket double DIN radio. Use the screws provided with your head unit or the factory radio bracket screws. Ensure they are snug.
- Assemble the Dash Kit: Insert the radio housing into the inner bracket frame. Then, fit the DDIN trim plate over the radio housing. A non-slip rubber belt may be used for a secure fit.
- Install into Dashboard: Once the radio and dash kit are assembled, carefully slide the entire unit into the factory location in your vehicle's dashboard. Ensure all connections are made before securing the unit.

Image: A diagram illustrating the assembly process of the DDIN Trim Plate, Radio Housing, Inner Bracket Frame, and Non-slip Rubber Belt for radio installation.

Image: A view of an aftermarket radio precisely installed in a Volkswagen dashboard, alongside the separate dash kit trim plate and mounting brackets.
5. Amplifier Adapter Installation and Wiring
The amplifier adapter facilitates the addition of an external amplifier, typically for a subwoofer, to your factory audio system.
5.1. Adapter Components

Image: The amplifier adapter unit, its associated wiring harness, and a blue RCA cable.
5.2. Wiring Connections
This adapter provides a connection for one set of RCA cables to deliver an audio signal to your external amplifier. The wiring harness is designed for direct replacement, plugging into your radio stereo without requiring modifications to the factory wiring.

Image: The radio wiring harness shown connecting directly to a car stereo, emphasizing its plug-and-play design.
5.3. Wiring Color Codes
Refer to the following color codes for proper connection:
- Red: 12V Power positive (+)
- Black: Ground negative (-)
- Blue: REM control output (Remote Turn-On)

Image: A diagram illustrating the wiring color codes for the amplifier adapter, indicating Red for 12V Power, Black for Ground, and Blue for REM control output.
6. Product Specifications and Dimensions
The double DIN dash kit is designed to accommodate standard double DIN head units. Key dimensions are as follows:
- Overall Width: Approximately 8.5 inches
- Overall Height: Approximately 5 inches
- Inner Opening Width: Approximately 7.48 inches
- Inner Opening Height: Approximately 4.33 inches

Image: A diagram detailing the dimensions of the double DIN dash kit, including overall width and height, and the inner opening measurements.
7. Troubleshooting
If you encounter any issues during or after installation, please review the following general troubleshooting tips:
- No Power to Radio/Amplifier: Check all power and ground connections. Ensure fuses are intact.
- No Audio Output: Verify all speaker and RCA connections. Ensure the amplifier is powered on and receiving a remote turn-on signal.
- Poor Fitment of Dash Kit: Double-check that the dash kit is correctly aligned with the dashboard opening and that all mounting brackets are securely fastened.
- Interference/Noise: Ensure all wiring is properly shielded and routed away from power cables to prevent interference. Check for proper grounding.
For persistent issues, consult a professional car audio installer or contact NuIth customer support.
8. Warranty and Support
For information regarding product warranty, returns, or technical support, please refer to the documentation included with your purchase or visit the official NuIth website. You may also contact NuIth customer service directly for assistance with installation or product-related inquiries.