Introduction
This manual provides detailed instructions for the operation and maintenance of your SMARTKLIK DC06 Digital Camera. Please read this manual thoroughly before using the camera to ensure proper function and to maximize your photography experience. This camera is designed for ease of use, offering 4K FHD video recording and 44MP still image capture with 16X digital zoom and autofocus capabilities.
Package Contents
Verify that all items listed below are included in your package:
- 1 x SMARTKLIK DC06 Digital Camera
- 2 x Rechargeable Li-ion Batteries (1200mAh each)
- 1 x 64GB SD Card
- 1 x USB Cable (Type-C)
- 1 x User Manual
- 1 x Cleaning Cloth
- 1 x Camera Cloth Bag
- 2 x Lanyards

Figure 1: Contents of the SMARTKLIK DC06 Digital Camera package, including the camera, batteries, SD card, cables, and accessories.
Camera Overview
Familiarize yourself with the camera's buttons and ports for efficient operation.

Figure 2: Front and rear view of the camera with labeled buttons and indicators.
- Power Button: Long press to turn the camera on or off.
- Shutter Button: Half-press to focus, fully press to take a picture.
- Zoom Out / Zoom In: Adjusts the digital zoom level.
- Battery Door: Access for battery and SD card.
- Charging Indicator: Light indicates charging status.
- Working Indicator: Light indicates camera operation.
- Mode Button: Cycles through different camera modes.
- UP (Flash Light): Activates or adjusts the flash.
- LEFT (Timer): Sets the self-timer function.
- RIGHT (Continuous Shoot): Enables continuous shooting mode.
- DOWN: Navigation button.
- OK Button: Confirms selections.
- Parameters Display / Menu / Settings: Accesses camera settings and menu.
- Delete Button: Deletes selected files.
Setup
1. Battery and SD Card Installation
Proper installation of the battery and SD card is crucial for camera operation.
- Push down the side button to open the battery compartment cover.
- Toggle the battery clasp downward.
- Insert the SD card along the side of the camera until it clicks into place. Ensure the metal contacts face the correct direction.
- Insert the battery into the battery compartment, ensuring the correct orientation. Press down so that the battery clasp locks the battery in place.
- After installing the battery and SD card, lock the battery compartment button by flicking it upward, then close the cover.

Figure 3: Visual guide for battery and SD card installation.
2. Charging the Battery
Use the provided USB cable to charge the camera. The charging indicator light will show the charging status.
- Connect the camera to a power source (e.g., computer USB port, USB wall adapter) using the USB Type-C cable.
- The charging indicator will illuminate during charging.
- Charging is complete when the indicator light changes or turns off (refer to the camera's display for exact status).
Operating the Camera
1. Power On/Off
Press and hold the Power Button for a few seconds to turn the camera on or off.
2. Taking Photos
To capture a still image:
- Frame your shot using the LCD screen.
- Half-press the Shutter Button to activate autofocus. The focus frame will appear on the screen.
- Once focused, fully press the Shutter Button to take the picture.
3. Recording Videos
To record a video:
- Press the Mode Button to switch to video recording mode.
- Press the Shutter Button to start recording. A recording indicator will appear on the screen.
- Press the Shutter Button again to stop recording.
4. Zoom Function
The camera supports 16X digital zoom.
- Use the Zoom In button to magnify the subject.
- Use the Zoom Out button to widen the view.
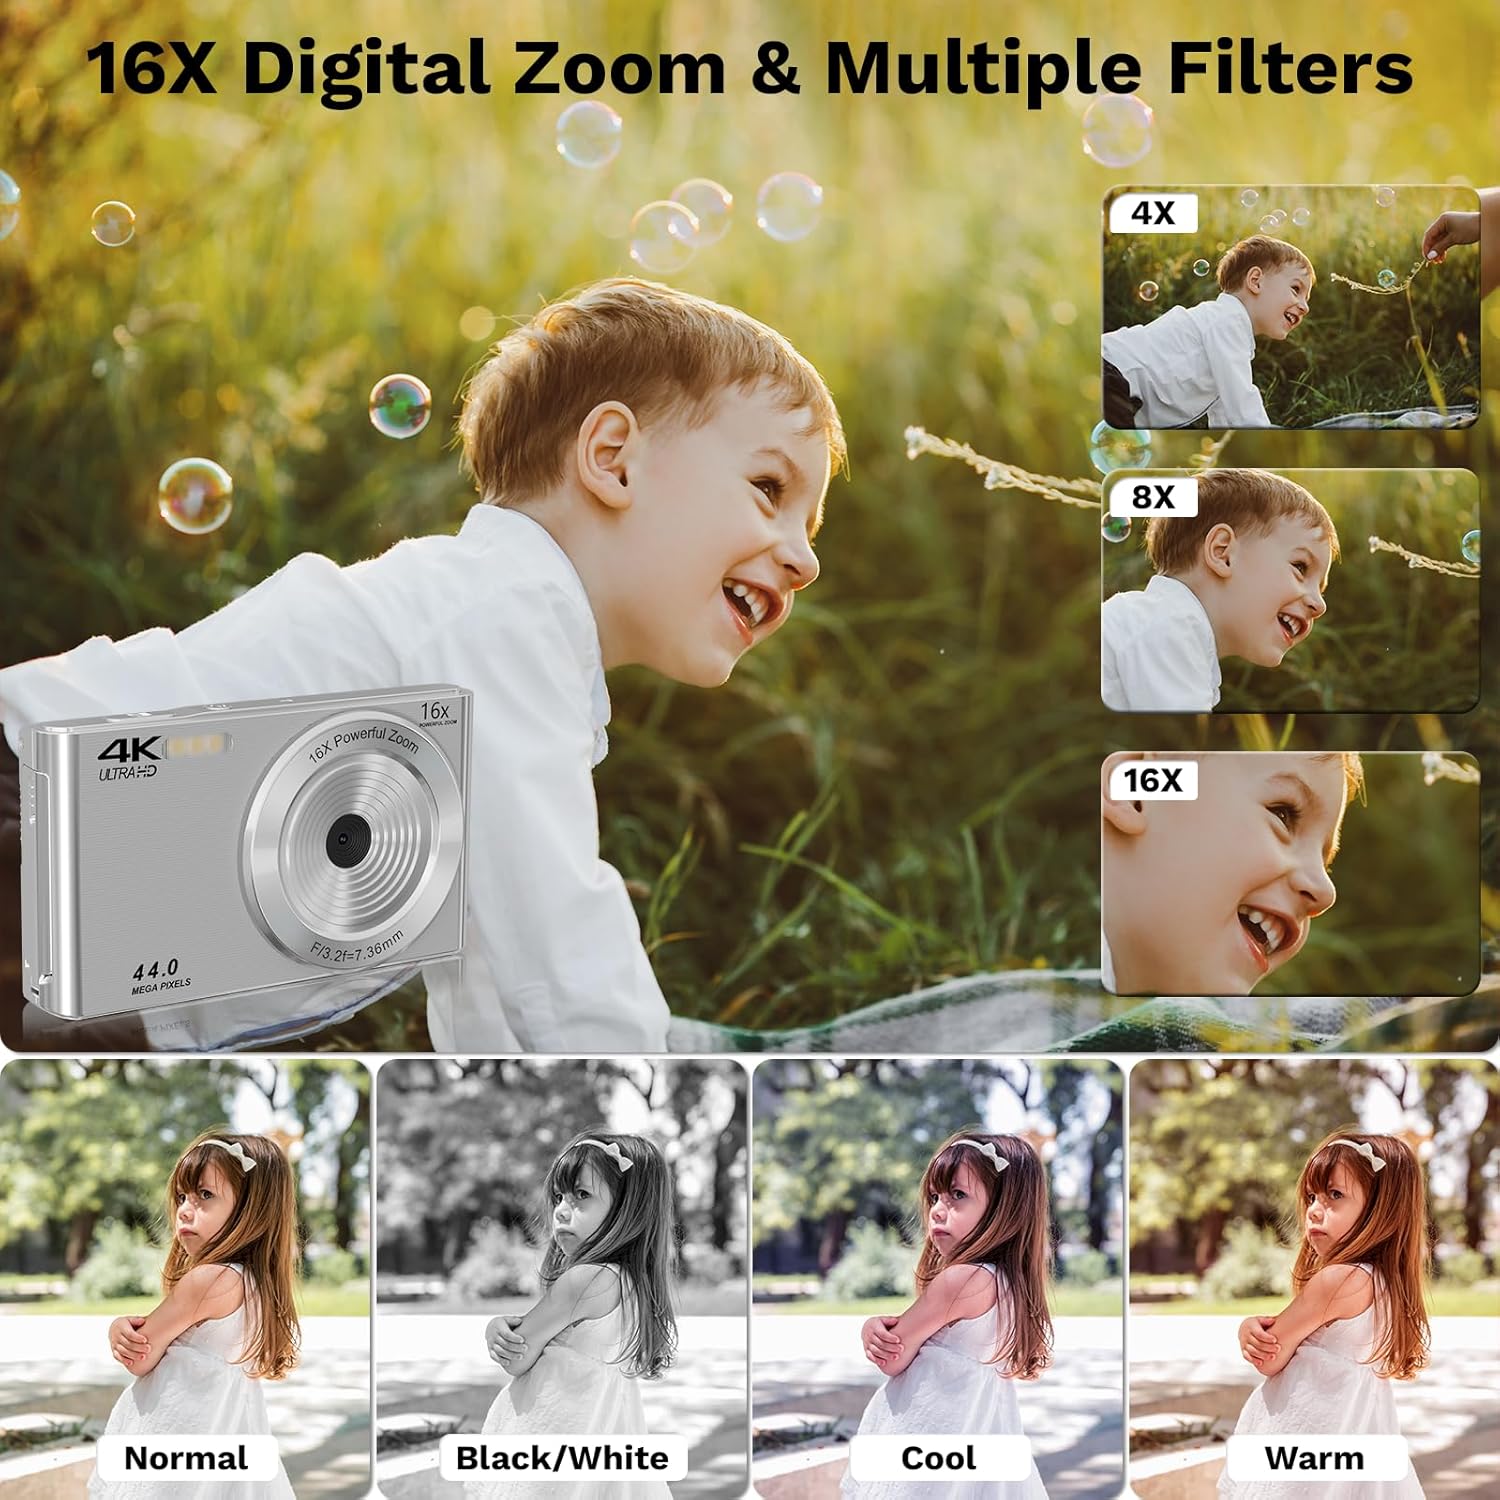
Figure 4: Digital zoom levels and creative filters.
5. Using Filters and Special Modes
The camera offers various filters and shooting modes to enhance your photos and videos.
- Filters: Access multiple filters (e.g., Normal, Black/White, Cool, Warm) through the camera's menu to apply different visual styles.
- Timed Photos (Self-timer): Use the LEFT (Timer) button to set a delay (e.g., 3s, 5s, 10s) before a photo is taken, allowing you to be in the shot.
- Continuous Shooting: Activate this mode via the RIGHT (Continuous Shoot) button to capture a rapid sequence of photos.
- Slow Motion Video: Select this option in the video settings to record videos at a slower playback speed.
- Video Pause: Pause and resume video recording without creating multiple files.
- Triple Shot: Capture three consecutive images with a single press of the shutter.

Figure 5: Continuous shooting and self-timer in action.
Advanced Features
1. Webcam Mode
The camera can function as a webcam for video calls or live streaming.
- Connect the camera to your computer using the USB cable.
- Select "PC Camera" mode on the camera's screen when prompted.
- Your computer should recognize the camera as a webcam.
2. Connecting to a Computer (Data Transfer)
Transfer photos and videos to your computer for viewing, editing, or backup.
- Connect the camera to your computer using the USB cable.
- Select "USB Mode" on the camera's screen when prompted.
- The camera's storage (SD card) will appear as a removable drive on your computer, allowing you to copy files.

Figure 6: Camera multifunctions, including USB mode for data transfer and PC camera mode.
Maintenance
1. Cleaning the Camera
Keep your camera clean for optimal performance.
- Use the provided cleaning cloth to gently wipe the camera body and screen.
- For the lens, use a specialized lens cleaning solution and cloth to avoid scratches.
- Do not use harsh chemicals or abrasive materials.
2. Battery Care and Storage
Proper battery care extends battery life.
- Always use the original or certified replacement batteries.
- Charge batteries fully before first use.
- Store batteries in a cool, dry place when not in use.
- If storing for extended periods, charge batteries periodically to prevent deep discharge.
Troubleshooting
This section addresses common issues you might encounter.

Figure 7: Common troubleshooting scenarios and solutions.
Q: Why do camera pictures look blurry?
A: Blurry images can be caused by several factors:
- Resolution Setting: When taking photos or recording, the default resolution might not be the highest. Select 44MP in the settings menu for photos to ensure maximum clarity. For videos, ensure you are recording in FHD 4K for best quality.
- Autofocus: Always half-press the shutter button to allow the camera to focus before fully pressing to capture the image. If recording video, ensure the subject is in focus.
- Viewing Quality: The image quality on the camera's small screen may appear lower. Transfer images to a computer or phone for a true representation of their quality.
Q: Why does the camera only work when plugged in, or why doesn't it work at all?
A: This issue typically stems from battery-related problems:
- No Battery Installed: If no battery is installed, the camera will only operate when connected via USB for charging. Ensure a battery is correctly inserted for portable use.
- Incorrect Battery Installation: The battery might be inserted incorrectly, preventing contact with the camera's terminals. Check that the battery is inserted with the correct polarity and that the metal contact points are aligned.
- Depleted Battery: Due to long transportation or storage, the battery might be completely discharged. Use the included second battery to test if the issue persists, or fully charge the primary battery.
Specifications
Detailed technical specifications for the SMARTKLIK DC06 Digital Camera:
| Feature | Specification |
|---|---|
| Model Name | N-DC06 |
| Photo Sensor Resolution | 44 MP |
| Video Resolution | 2160p (4K FHD) |
| Digital Zoom | 16 x |
| Autofocus | Yes (Contrast Detection) |
| Screen Size | 2.8 Inches (LCD) |
| Supported File Format | JPEG (Photos), MP4 (Videos) |
| Memory Storage Capacity | 64 GB (SD Card included) |
| Battery Type | Lithium Ion (2 x 1200 mAh) |
| Connectivity Technology | HDMI, USB |
| Special Features | Auto-focus, Self Timer, Flashing Light, Webcam Function |
| Item Weight | 3.68 Ounces |
| Color | Silver |
Warranty Information
SMARTKLIK products are manufactured to high quality standards. For specific warranty details, including coverage period and terms, please refer to the warranty card included in your product packaging or visit the official SMARTKLIK website. Keep your purchase receipt as proof of purchase for any warranty claims.
Customer Support
If you encounter any issues or have questions not covered in this manual, please contact SMARTKLIK customer support. Contact information can typically be found on the product packaging, the official SMARTKLIK website, or through your retailer.
For online resources, visit the SMARTKLIK Store on Amazon.