1. Introduction
Thank you for choosing the DOBE TY-3835 VR Charging Cradle. This charging station is designed to provide a convenient and efficient way to charge your Meta Quest 3 VR headset and its accompanying controllers simultaneously. It also functions as a stable storage and display solution for your VR equipment. This manual provides essential information for proper setup, operation, and maintenance of your charging cradle.
2. Product Overview and Package Contents
Familiarize yourself with the components of your DOBE TY-3835 VR Charging Cradle.
2.1 Package Contents
- DOBE TY-3835 VR Charging Dock
- Type-C Charging Cable
- 4 x 600mAh Nickel-Hydrogen Rechargeable Batteries (for controllers)
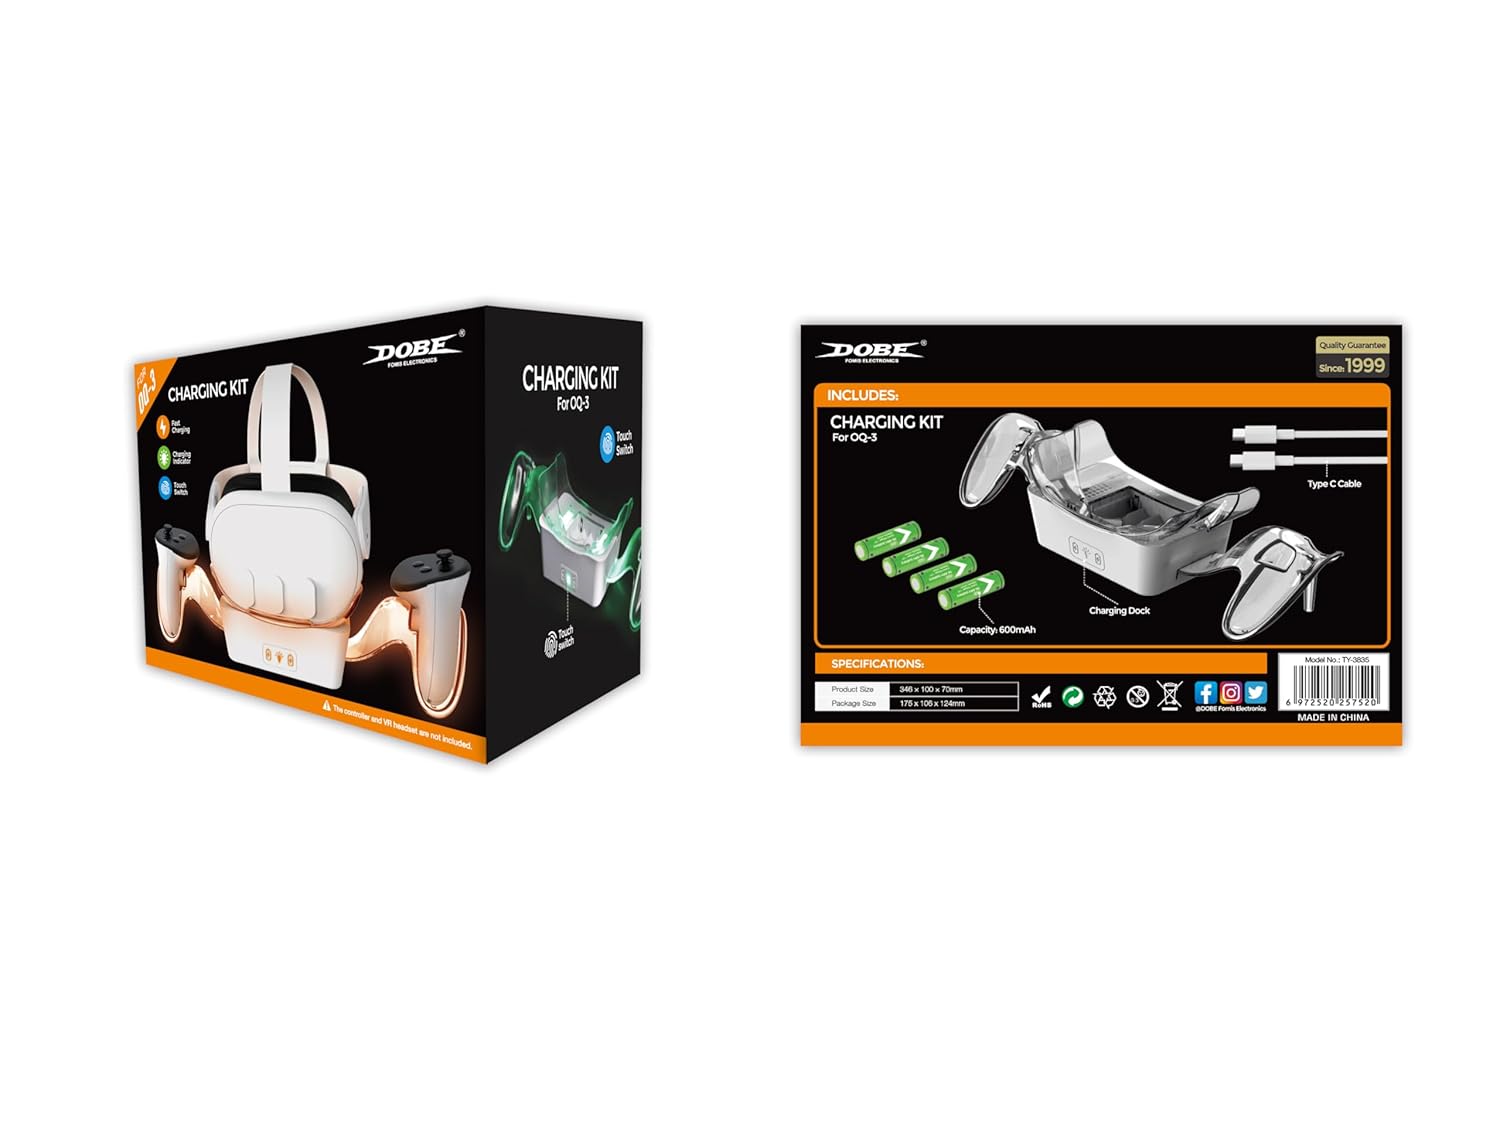
Image: Contents of the DOBE TY-3835 VR Charging Kit packaging.
2.2 Product Components
The following diagram illustrates the main parts of the charging cradle:

Image: Labeled components of the VR Charging Dock.
- VR Headset Charging Placement Tray: Area for placing the Meta Quest 3 headset.
- VR Headset Charging Pins: Connectors for the headset's charging port.
- Nickel-Hydrogen Battery Charging Position: Slots for charging the included rechargeable batteries.
- VR Left/Right Controller Light Emitting Bracket: Transparent brackets that illuminate during charging.
- VR Charging Light Touch Switch: Button to control the ambient lighting.
- Nickel-Hydrogen Battery Charging Indicator: Lights indicating battery charging status.
3. Setup Instructions
Follow these steps to set up your DOBE TY-3835 VR Charging Cradle:
- Connect Power: Connect the provided Type-C charging cable to the "TYPE-C Power Input" port on the back of the charging dock. Connect the other end to a suitable USB power adapter (not included) or a powered USB port.

Image: Connecting the Type-C power cable to the charging dock.
- Insert Controller Batteries: Open the battery compartments of your Meta Quest 3 controllers. Insert the included 600mAh Nickel-Hydrogen rechargeable batteries into each controller, ensuring correct polarity.

Image: Inserting rechargeable batteries into controllers.
- Place Headset and Controllers: Carefully place your Meta Quest 3 headset onto the designated tray on the charging dock, ensuring the charging pins align. Place the left and right controllers into their respective light-emitting brackets.

Image: Meta Quest 3 headset and controllers placed on the charging dock.
4. Operating Instructions
4.1 Charging Indicators
The charging cradle features indicator lights to show the charging status of your devices:

Image: Charging indicator light legend.
- Orange Light: Indicates that the VR headset or controller batteries are currently charging.
- Green Light: Indicates that the VR headset or controller batteries have completed charging.
4.2 Charging Process and Times
Once the headset and controllers are correctly placed, charging will begin automatically. The ambient lighting on the controller brackets will also illuminate.

Image: VR headset and controllers charging on the dock.
- VR Headset Charging Time: Approximately 3 hours (when using the original power supply for the headset).
- Nickel-Hydrogen Battery Charging Time: Approximately 2 hours.
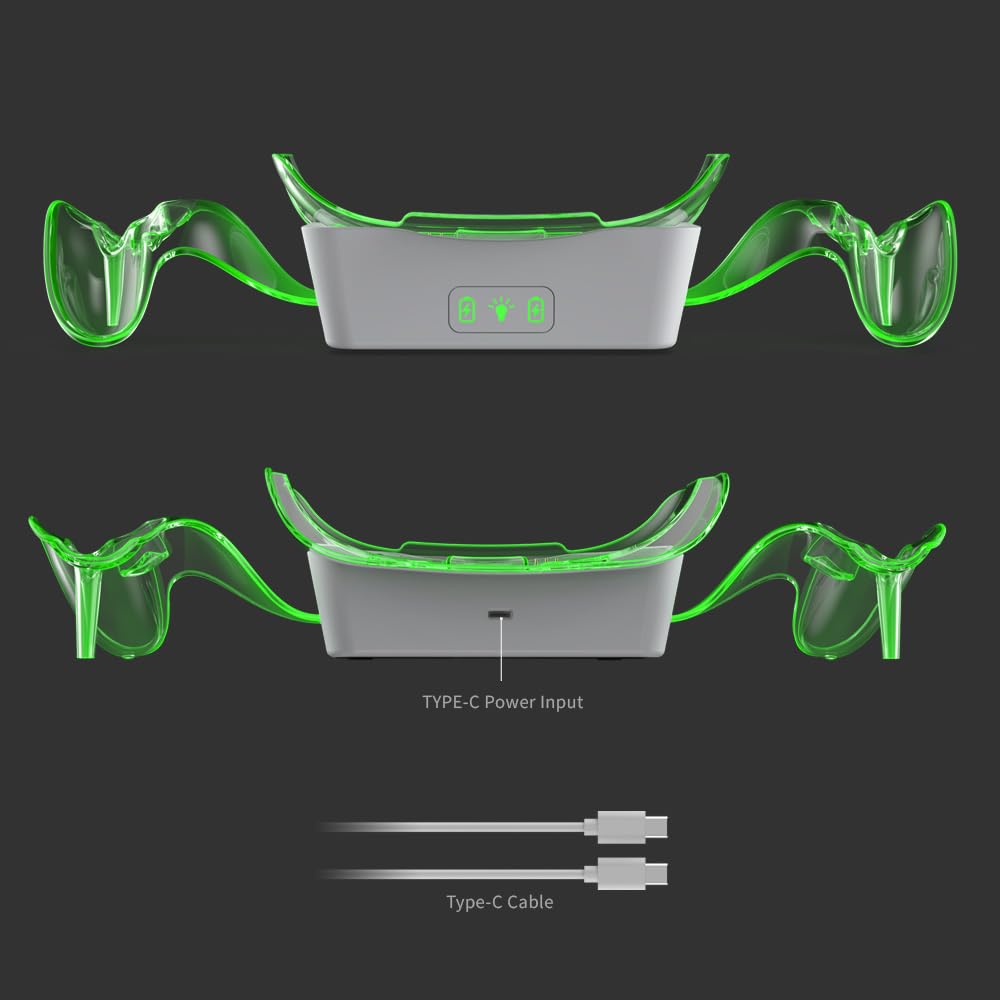
Image: VR Headset charging time indication.

Image: Nickel-Hydrogen battery charging time indication.
4.3 Touch Switch Functionality
The charging dock includes a touch switch to control the ambient lighting of the controller brackets.

Image: Location of the Touch Switch.
- Single Touch: Toggles the ambient lighting on/off.
5. Maintenance
To ensure the longevity and optimal performance of your charging cradle:
- Keep the charging cradle clean and free from dust. Use a soft, dry cloth for cleaning.
- Avoid exposing the device to extreme temperatures, humidity, or direct sunlight.
- Do not attempt to disassemble or repair the charging cradle yourself. Contact customer support if issues arise.
- Ensure the charging pins are free from obstruction and debris to maintain proper contact with the headset.
6. Troubleshooting
If you encounter problems with your charging cradle, refer to the following common issues and solutions:
| Problem | Possible Cause | Solution |
|---|---|---|
| Device not charging | Power cable not connected properly; device not seated correctly; faulty power adapter. | Ensure the Type-C cable is securely connected to both the dock and the power source. Re-seat the headset and controllers, ensuring charging pins align. Try a different USB power adapter. |
| Indicator lights not working | No power; device not charging; light switch off. | Check power connection. Ensure devices are properly placed for charging. Press the VR Charging Light Touch Switch to toggle ambient lighting. |
| Slow charging | Low-power USB adapter. | Use a USB power adapter with sufficient output (e.g., 5V/2A or higher) for optimal charging speed. |
7. Specifications
- Model Number: TY-3835
- Product Dimensions: 6.89 x 4.88 x 4.21 inches
- Item Weight: 1.34 Pounds
- Input: Type-C (specific voltage/current not provided, typically 5V)
- Compatibility: Meta Quest 3 VR Headset and Controllers
- Battery Capacity (included): 600mAh Nickel-Hydrogen (x4)
8. Warranty and Support
For warranty information or technical support, please refer to the documentation included with your purchase or contact DOBE FOMIS ELECTRONICS customer service directly. You can often find contact information on the manufacturer's official website or through the retailer where the product was purchased.