Introduction
This manual provides detailed instructions for the safe and efficient operation, installation, and maintenance of your Gardtech CURRY-DA929 Electric Garage Heater. Please read all instructions carefully before use and retain this manual for future reference.
Important Safety Information
Always follow basic safety precautions to reduce the risk of fire, electric shock, and injury to persons, including the following:
- Read all instructions before using this heater.
- This heater is hot when in use. To avoid burns, do not let bare skin touch hot surfaces.
- Keep combustible materials, such as furniture, pillows, bedding papers, clothes, and curtains at least 3 feet (0.9m) from the front of the heater and keep them away from the sides and rear.
- The heater is not to be used in wet or moist locations.
- Risk of fire. Do not use as a residential or household heater.
- Plug receptacle configuration of appliances must be 6-30P, 250V, 30A.
- Always plug heaters directly into a wall outlet/receptacle. Never use with an extension cord or relocatable power tap (outlet/power strip).
- Ensure all wiring is securely tightened.
- Use copper wire only for electrical connections.
For detailed safety information, consult the full product manual.
Product Overview
The Gardtech CURRY-DA929 is a powerful electric garage heater designed for efficient heating in workshops, garages, and other enclosed spaces. It features a robust steel construction, digital controls, and a remote for convenient operation.

Image: Front view of the Gardtech CURRY-DA929 Electric Garage Heater with its remote control.
Key Features:
- High Heat Output: 7500W for effective heating of large spaces.
- Digital Touch Panel & Remote Control: Easy temperature and mode adjustments.
- Adjustable Louvers: Direct heat flow as needed.
- Variable Mounting Angles: Allows for ceiling or wall installation.
- Safety Features: ETL Certified with Overheat Protection.
- ECO Mode: For energy-efficient operation.
- Timer Function: Schedule operation for convenience.
Setup and Installation
1. Electrical Connection
The Gardtech CURRY-DA929 heater requires a 240V electrical supply. It is recommended to have a licensed electrician perform the installation to ensure compliance with local electrical codes and safety standards.
- Access Wiring Compartment: Remove the screws securing the bottom panel of the heater to access the internal wiring.
- Select Knockout: Choose an appropriate knockout on the side of the heater based on your wiring size and conduit fittings. Remove the knockout.
- Install Strain Relief: Insert a grommet with integral strain relief into the chosen knockout to protect the wiring.
- Connect Wires: Connect the ground wire (green) to the designated grounding screw. Connect the black wire to L1 and the red wire to L2 on the power block. Ensure all connections are secure and insulation is not under the terminals. Use a minimum of 8 AWG copper wire.
- Secure Panel: Close the bottom panel and tighten the screws.
Video: This video demonstrates the process of connecting the electrical wiring to the heater's internal power block. It shows how to access the wiring compartment, remove a knockout, install a strain relief, and connect the red, black, and green wires to their respective terminals. The video emphasizes ensuring secure connections and using appropriate wire gauge.
2. Mounting the Heater
The heater can be mounted to a ceiling or wall using the provided mounting bracket. Ensure the mounting surface is structurally sound to support the heater's weight (21.9 pounds).
- Attach Mounting Bracket: Secure the mounting bracket to the heater using the large knobs on the sides.
- Position Heater: Identify a suitable location on your ceiling or wall, ensuring adequate clearance from combustible materials (at least 3 feet).
- Secure Bracket to Surface: Use lag bolts (included) to securely fasten the mounting bracket to the framing of your ceiling or wall.
- Adjust Angle: The heater offers multiple angle positions (typically 3 or 4) to direct heat where needed. Adjust the small knobs on the side to set the desired angle.
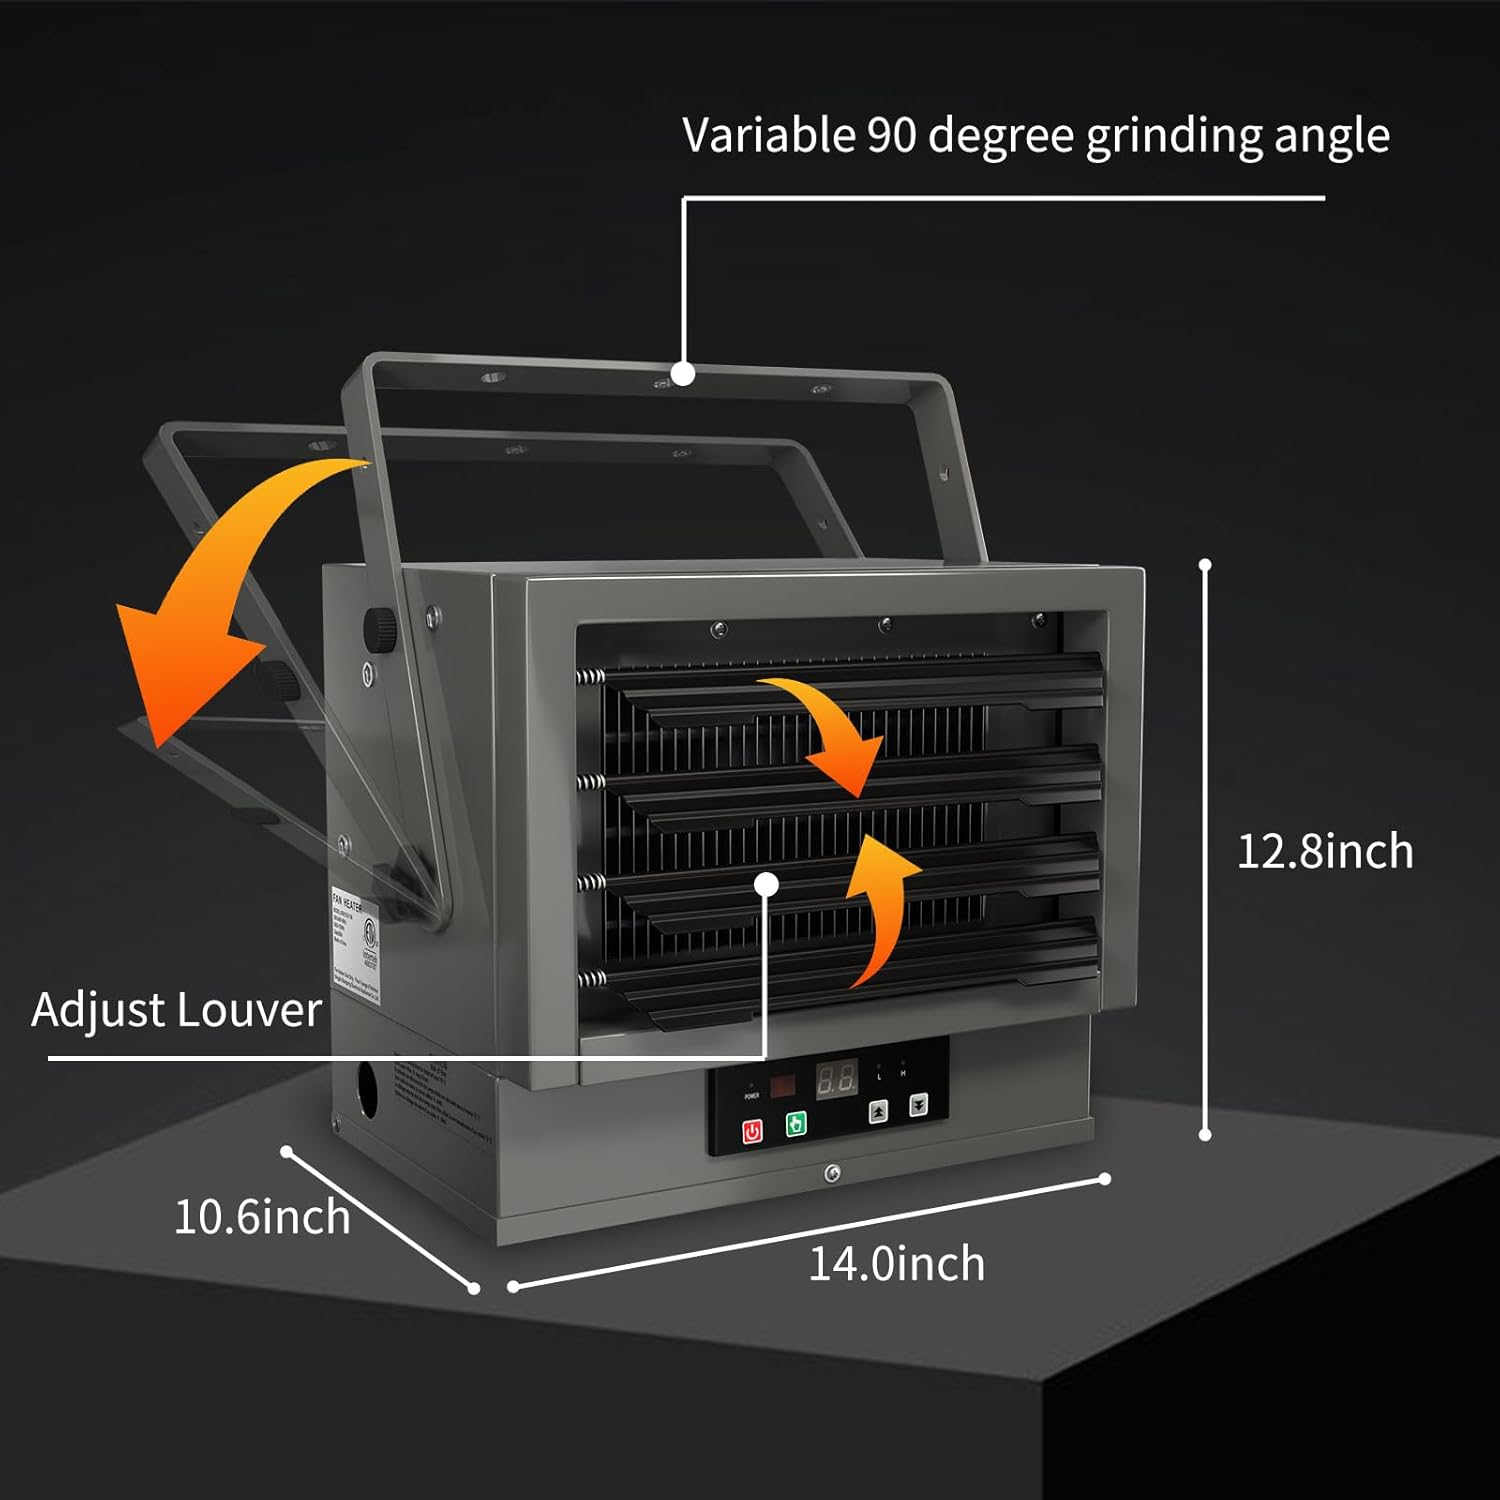
Image: This image illustrates the dimensions of the heater (14.0 inches wide, 10.6 inches deep, 12.8 inches high) and shows the adjustable louvers and variable 90-degree grinding angle for directing heat.

Image: The heater is shown mounted in a garage setting, highlighting its adjustable louvers, variable mounting angles, and single-screw mounting hole for flexible installation.
Operating Instructions
Your Gardtech CURRY-DA929 heater can be operated via the digital touch panel on the unit or the included remote control.
1. Controls Overview

Image: This diagram labels the components of the digital touch panel and the remote control, including Power Button, Mode Button, UP/DOWN Control Buttons, Display Window, Low/High Power Indicators, and Air Outlet.

Image: A hand holding the remote control, with labels pointing to the corresponding buttons on the heater's control panel, illustrating how the remote can be used to operate the unit.
2. Basic Operation
- Power On/Off: Press the ON/OFF button on the panel or remote to turn the heater on or off.
- Set Temperature: Use the TEMP+ and TEMP- buttons to adjust the desired temperature. The heater will automatically maintain this temperature.
- Select Mode: Press the MODE button to cycle through different operating modes (e.g., Low, High, ECO, Fan Only).
- ECO Mode: Activate ECO mode for energy-efficient heating. The green light indicates ECO mode is active.
- Timer Function: Use the TIMER button to set an operating duration from 1 to 12 hours. The heater will automatically shut off after the set time. To disable the timer, scroll to 0 hours.
- Temperature Unit: Switch between Celsius (°C) and Fahrenheit (°F) using the dedicated button on the panel or remote.

Image: This graphic illustrates the different wattage outputs for High (7,500 watts), Medium (5,300 watts), and Low settings, indicating powerful heat and directed air output.
Maintenance
Regular maintenance ensures optimal performance and longevity of your heater. Always disconnect power before performing any maintenance.
- Cleaning: Periodically clean the exterior of the heater with a soft, damp cloth. Do not use abrasive cleaners or solvents.
- Inspect Air Vents: Ensure air intake and outlet vents are free from dust, debris, or obstructions.
- Check Electrical Connections: Annually, have a qualified electrician inspect all electrical connections for tightness and signs of wear.
Troubleshooting
If your heater is not operating correctly, refer to the following common issues before contacting support.
| Problem | Possible Cause | Solution |
|---|---|---|
| Heater does not turn on. | No power supply; circuit breaker tripped; incorrect thermostat setting. | Check power connection; reset circuit breaker; adjust thermostat to a higher setting than ambient temperature. |
| Heater runs but no heat. | Fan-only mode selected; heating elements malfunction. | Ensure a heating mode (Low/High/ECO) is selected; contact qualified service personnel. |
| Heater overheats and shuts off. | Overheat protection activated; obstructed air vents. | Clear any obstructions from air vents; allow unit to cool down before restarting. |
Specifications
| Feature | Detail |
|---|---|
| Model Number | SG665238 |
| Product Dimensions | 16 x 14 x 13 inches |
| Item Weight | 21.9 pounds |
| Form Factor | Ceiling |
| Power Output | 7500W (High), 5300W (Medium) |
| Voltage | 240V |
| Certifications | ETL Certified |
Warranty and Support
For warranty information or technical support, please refer to the documentation included with your product or visit the official Gardtech website. Keep your purchase receipt as proof of purchase.
You can visit the Gardtech Store for more products and information.