
1. Introduction
The SUIDEK HDMI KVM Switch (Model SJW-KM202B) is designed to allow two computers to share two monitors, a single set of keyboard and mouse, and other USB 3.0 peripherals. This device supports high-definition video output up to 4K@60Hz and offers both extended and mirror display modes. It is an ideal solution for managing multiple systems efficiently in a workspace.
2. Package Contents
Please check the package contents upon unboxing to ensure all items are present:
- 1 x SUIDEK USB HDMI KVM Switch
- 1 x Desktop Controller
- 2 x USB A to B Cable
- 1 x DC 5V Power Adapter
- 1 x User Manual (this document)
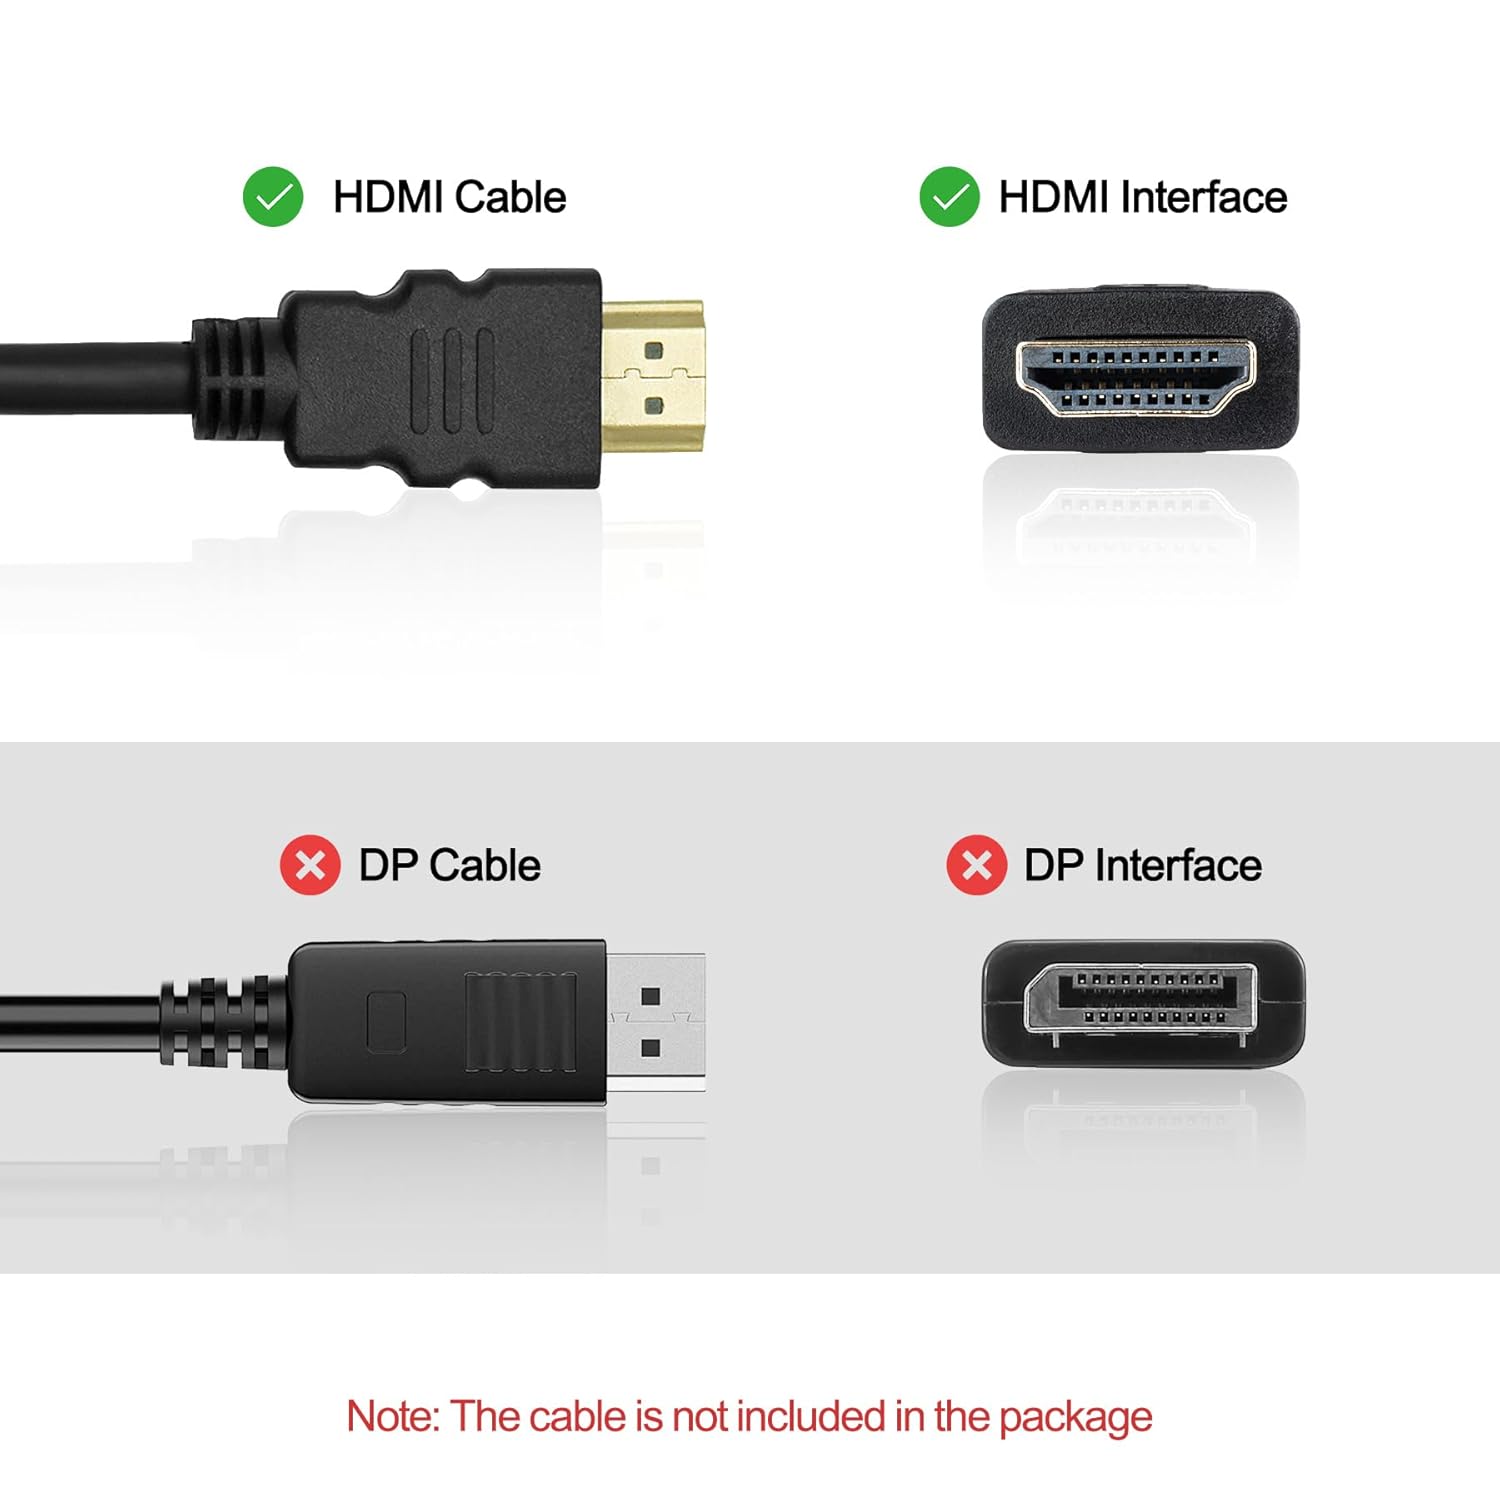
Image: Contents included in the SUIDEK HDMI KVM Switch package.
3. Specifications
| Feature | Description |
|---|---|
| Model Number | SJW-KM202B |
| Video Input | 2 x HDMI IN (for PC1), 2 x HDMI IN (for PC2) |
| Video Output | 2 x HDMI OUT (for Monitor 1, Monitor 2) |
| USB Ports | 3 x USB 3.0 Type-A (for peripherals), 2 x USB 3.0 Type-B (for PC connection) |
| Audio Ports | 1 x 3.5mm Audio Out, 1 x 3.5mm Microphone In |
| Video Resolution | Up to 4K@60Hz (backward compatible with 4K@30Hz, 1080P) |
| USB Data Transfer Speed | Up to 5Gbps (USB 3.0) |
| Switching Methods | Button Switch, Desktop Controller Switch |
| Power Supply | DC 5V (Power Adapter included) |
| Dimensions (L x W x H) | 5.12 x 2.44 x 1.18 inches |
| Material | Aluminum |
4. Setup Instructions
Follow these steps to correctly set up your SUIDEK HDMI KVM Switch:
4.1 Connection Diagram Overview
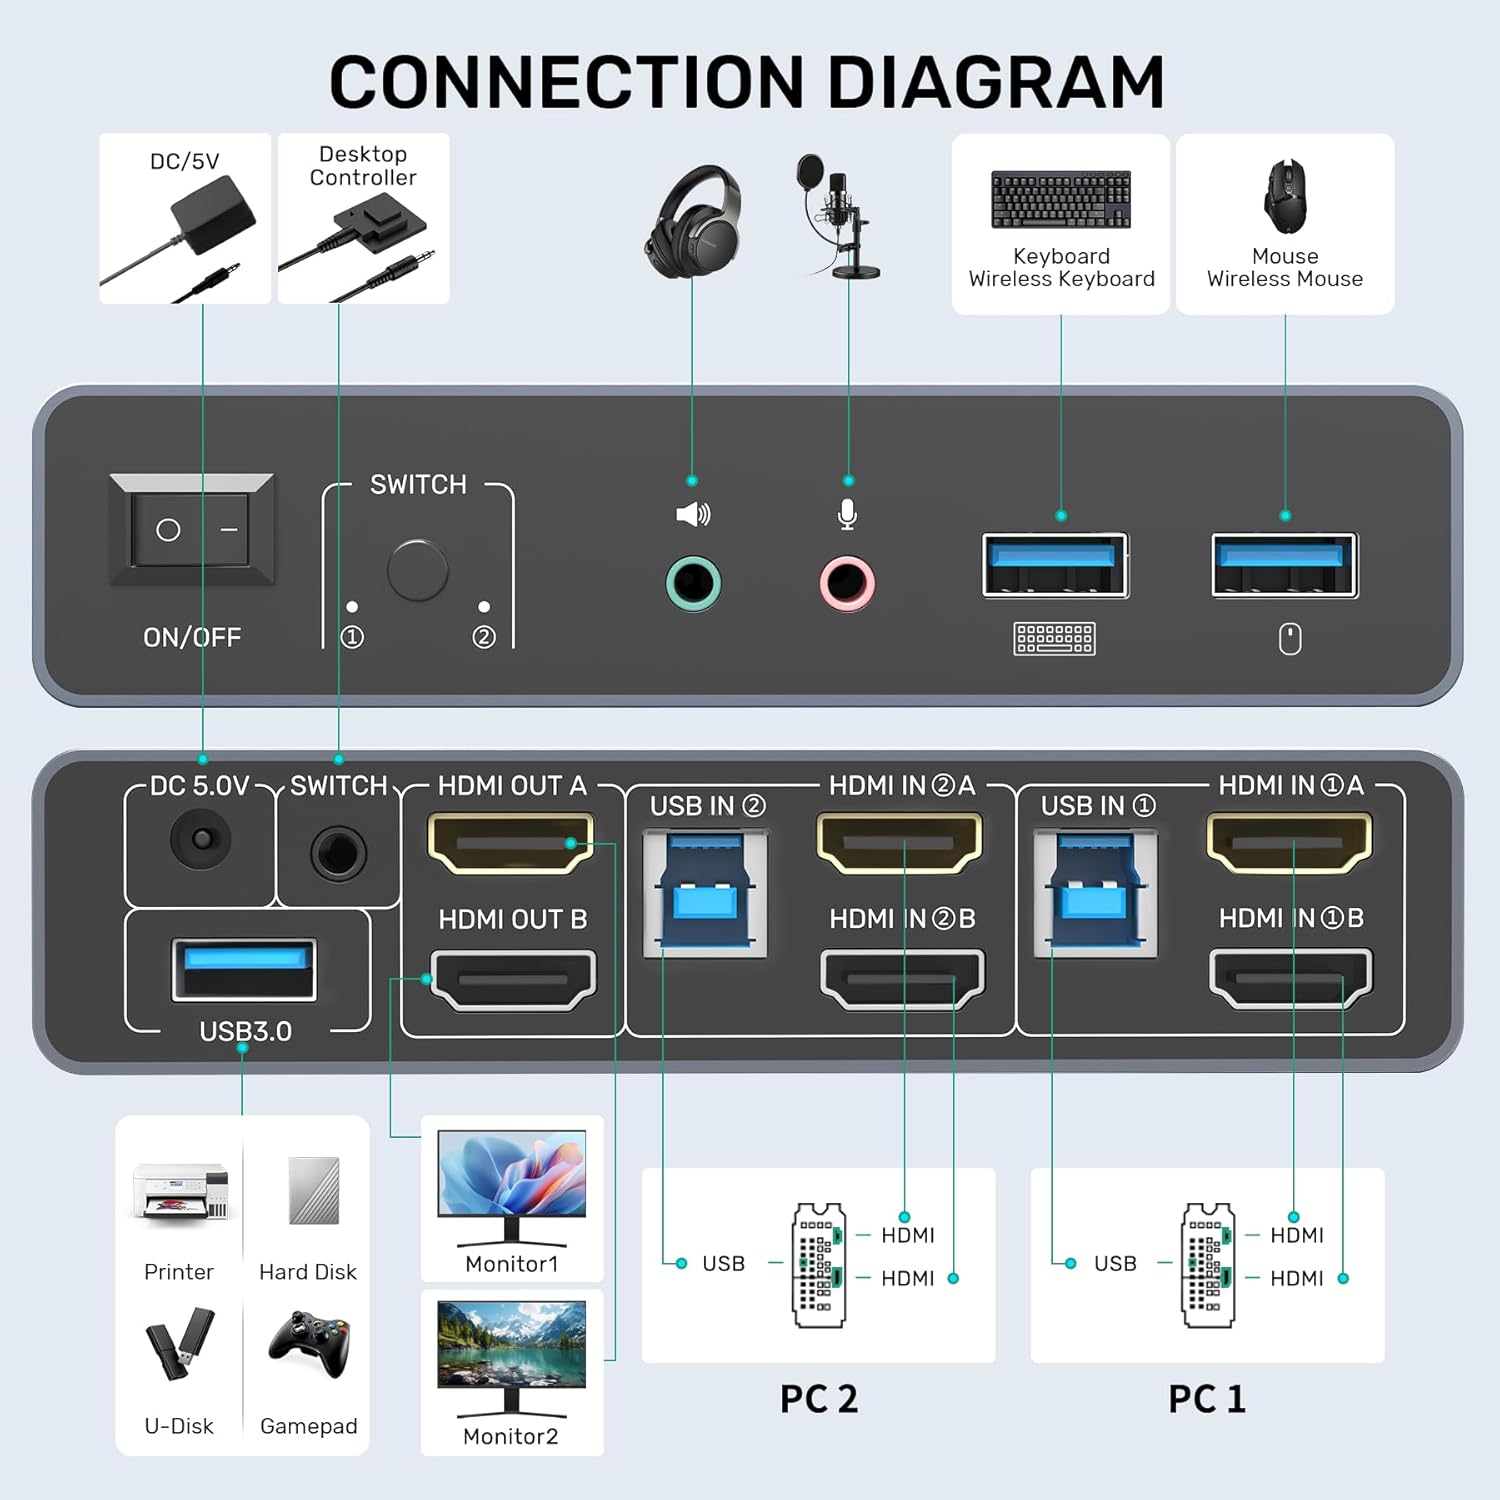
Image: Comprehensive connection diagram for the KVM switch.
This diagram illustrates the various ports on the KVM switch and how to connect your computers, monitors, and peripherals. Pay close attention to the labeling of 'HDMI IN' for computers and 'HDMI OUT' for monitors, as well as 'USB IN' for computers and 'USB 3.0 OUT' for peripherals.
4.2 Step-by-Step Connection
- Power Connection: Connect the provided DC 5V power adapter to the 'DC 5.0V' port on the KVM switch and then plug it into a power outlet. Ensure the KVM switch is powered on using the 'ON/OFF' switch on the front panel.
- Monitor Connections: Connect your two monitors to the 'HDMI OUT A' and 'HDMI OUT B' ports on the KVM switch using HDMI 2.0 or higher standard cables. Ensure the cables are less than 5 meters in length for optimal performance.
- Computer Connections (PC1):
- Connect PC1's first HDMI output to 'HDMI IN 1A' on the KVM switch.
- Connect PC1's second HDMI output to 'HDMI IN 1B' on the KVM switch.
- Connect one end of a USB A to B cable to PC1's USB 3.0 port and the other end to 'USB IN 1' on the KVM switch.
- Computer Connections (PC2):
- Connect PC2's first HDMI output to 'HDMI IN 2A' on the KVM switch.
- Connect PC2's second HDMI output to 'HDMI IN 2B' on the KVM switch.
- Connect the second USB A to B cable to PC2's USB 3.0 port and the other end to 'USB IN 2' on the KVM switch.
- Peripheral Connections: Connect your keyboard, mouse, printer, hard disk, or other USB 3.0 devices to the 'USB 3.0 OUT' ports on the front panel of the KVM switch.
- Audio/Microphone Connections: If desired, connect your headphones to the green 3.5mm audio output port and your microphone to the pink 3.5mm microphone input port on the front panel.
- Desktop Controller: Plug the desktop controller into the 'SWITCH' port on the rear of the KVM switch. This allows for convenient remote switching between computers.

Image: Front and back panel port layout for product installation.
4.3 Important Setup Notes
- Ensure both computers can support dual-screen displaying simultaneously. Test this before connecting to the KVM switch.
- Each computer must be connected with two HDMI cables and one USB A to B cable for proper keyboard, mouse, and dual monitor functionality.
- The KVM switch only supports HDMI interface devices. It does NOT support DP interface devices, and using DP to HDMI conversion cables is not recommended.
- To achieve 4K@60Hz resolution, ensure your HDMI cables, computers, and monitors all support 4K@60Hz. The resolution of input and output must be the same.
- Always keep the 5V power adapter connected during use. Do not use any power adapter over 5V.
- This KVM switch does not support EDID.

Image: Important attention points for KVM switch installation and usage.

Image: Correct versus incorrect connection methods for the KVM switch.
4.4 Video Overview of Setup
Video: This video provides a visual guide to connecting the HDMI KVM Switch to two computers and two monitors, demonstrating the port layout and basic setup steps.
5. Operating Instructions
Once the KVM switch is set up, you can easily switch between your connected computers and manage your display modes.
5.1 Switching Between Computers
The SUIDEK HDMI KVM Switch offers two convenient methods for switching between PC1 and PC2:
- Button Switch: Press the 'SWITCH' button on the front panel of the KVM unit to toggle between PC1 and PC2.
- Desktop Controller: Press the button on the external desktop controller to switch between PC1 and PC2. This allows you to keep the KVM unit out of sight while maintaining easy access to the switching function.

Image: Two methods for switching between connected computers.
5.2 Display Working Modes
The KVM switch supports two primary display modes for your dual monitor setup:
- Extended Mode: Each monitor displays a different part of your desktop, extending your workspace.
- Mirror Mode: Both monitors display the same content, mirroring your desktop.
To select the desired mode, navigate to your computer's "System - Screen Settings" (or equivalent display settings) and choose between Extended or Mirror mode.

Image: Extended and Mirror display modes for dual monitors.
5.3 USB 3.0 Functionality
The KVM switch features 3 USB 3.0 Type-A ports on the front panel, allowing you to share high-speed peripherals like external hard drives, USB flash drives, gamepads, and printers between your two computers. Data transfer speeds can reach up to 5Gbps.

Image: USB 3.0 ports for high-speed data transfer and peripheral sharing.
5.4 Audio and Microphone Support
The integrated audio and microphone ports on the front panel allow you to connect a single headset or separate speakers and microphone, which will switch along with the active computer.

Image: Microphone and headphone ports for versatile audio connectivity.
6. Maintenance
To ensure the longevity and optimal performance of your SUIDEK HDMI KVM Switch, please follow these maintenance guidelines:
- Cleaning: Use a soft, dry cloth to clean the device. Avoid using liquid cleaners or aerosols, as they may damage the unit.
- Environment: Keep the KVM switch in a cool, dry place, away from direct sunlight, heat sources, and excessive moisture.
- Cable Management: Ensure all cables are neatly organized and not excessively bent or strained to prevent damage to the cables and ports.
- Power: Always use the provided 5V power adapter. Disconnect the power adapter if the device will not be used for an extended period.
7. Troubleshooting
If you encounter issues with your SUIDEK HDMI KVM Switch, please refer to the following common problems and solutions:
- No Display or Incorrect Resolution:
- Ensure all HDMI cables are securely connected to both the KVM switch and your computers/monitors.
- Verify that all HDMI cables are HDMI 2.0 standard or higher and are less than 5 meters in length.
- Confirm that your monitors and computers support the desired resolution (e.g., 4K@60Hz) and that the input and output resolutions are matched.
- Ensure the 5V power adapter is correctly connected and providing power to the KVM switch.
- USB Devices (Keyboard/Mouse/Peripherals) Not Working:
- Check that the USB A to B cables are properly connected from each computer to the 'USB IN' ports on the KVM switch.
- Ensure the USB peripherals are connected to the 'USB 3.0 OUT' ports on the front panel.
- Verify that the KVM switch is receiving adequate power from the 5V adapter.
- Switching Not Functioning:
- Switching is not supported when computers are in sleep mode. Wake up the computer before attempting to switch.
- Ensure the desktop controller is securely plugged into the 'SWITCH' port on the KVM unit.
- No DisplayPort (DP) Support:
- This KVM switch is designed for HDMI interfaces only. It does not support DisplayPort devices. Avoid using DP to HDMI conversion cables as they may cause compatibility issues.
- EDID Not Supported:
- This KVM switch does not support EDID (Extended Display Identification Data). This means that when switching between computers, the monitors may briefly re-detect the signal, causing a slight delay or screen flicker. This is normal behavior for this device.
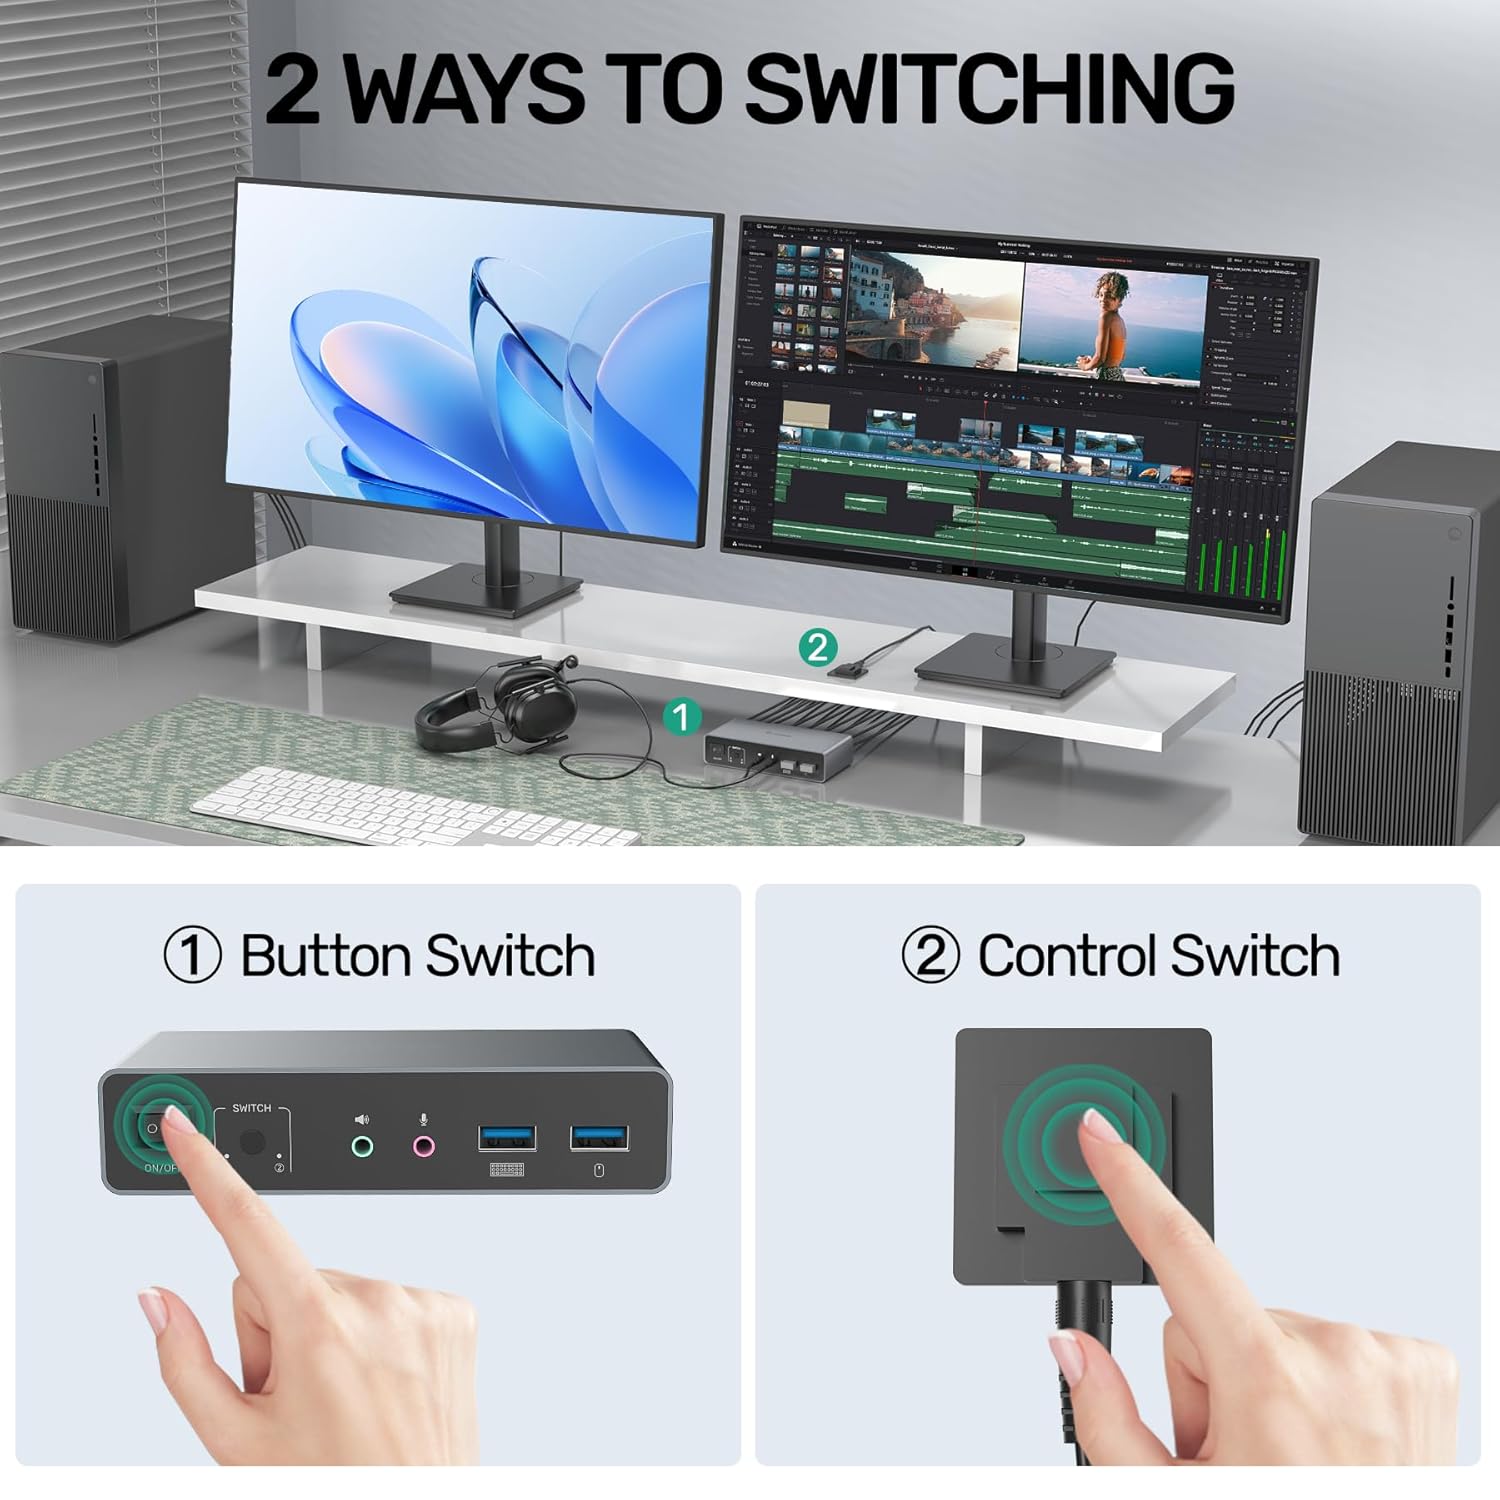
Image: Visual distinction between HDMI and DisplayPort interfaces. This KVM switch is HDMI only.

Image: Recommended HDMI cable lengths based on resolution.
8. Warranty and Support
SUIDEK is committed to providing high-quality products and excellent customer service.
- Warranty: This product typically comes with a 2-year warranty. Please refer to your purchase documentation for specific warranty terms.
- Technical Support: We offer lifetime technical support for our products.
- Customer Service: If you have any questions before purchase or during use, please contact our customer-friendly support service, available 24 hours. Refer to the contact information provided with your product or on the SUIDEK official website.