1. Introduction
The EAZUSE Starlink Mini Sunroof Suction Cup Mount is designed to securely attach your Starlink Mini dish antenna to various smooth, non-porous glass surfaces such as sunroofs, rear windshields, and front windshields of vehicles. This manual provides essential information for the safe and effective installation and use of your suction cup mount.
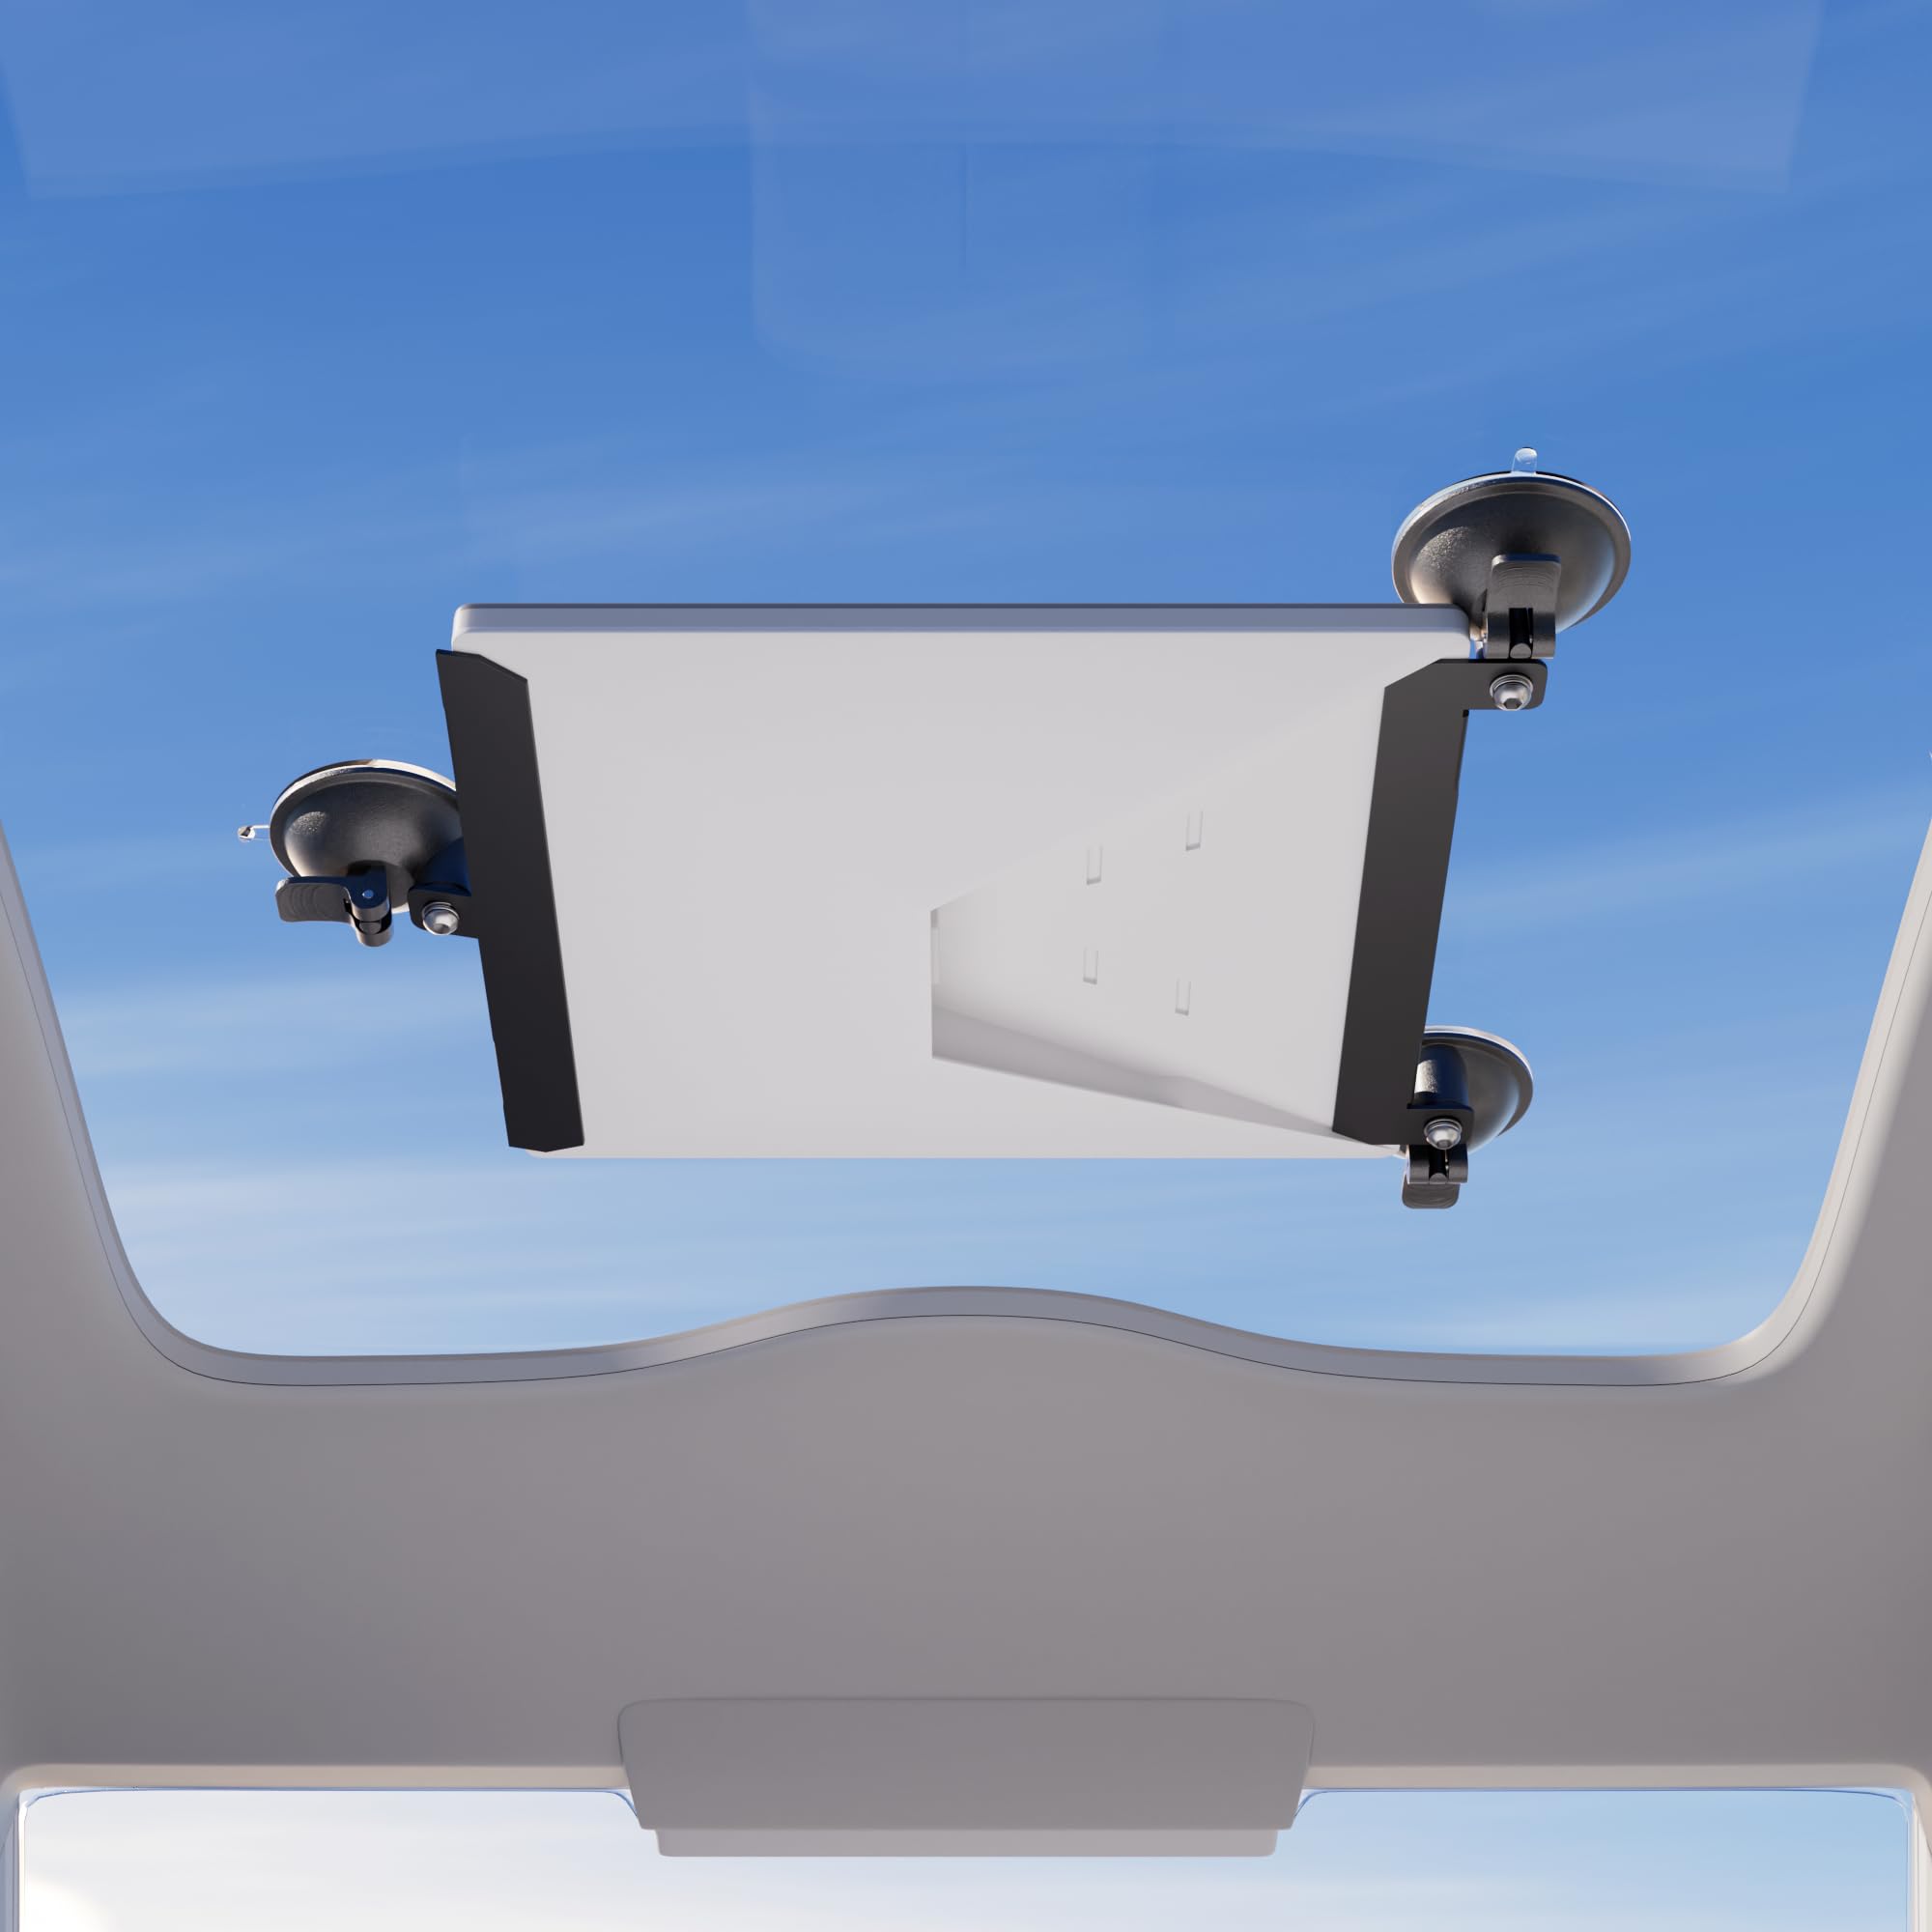
Image: The EAZUSE Starlink Mini Suction Cup Mount securely attached to a Starlink Mini dish.
2. Safety Information
- Surface Preparation: Always ensure the mounting surface (glass) is clean, dry, and free from dust, grease, or any residues before attaching the suction cups. A dirty or wet surface can compromise adhesion.
- Secure Attachment: Verify that all suction cups are fully engaged and holding firmly before placing the Starlink Mini dish. Periodically check the adhesion, especially before and during vehicle movement.
- Visibility: Do not install the mount in a location that obstructs the driver's view of the road or interferes with the deployment of airbags.
- Temperature Limits: The mount is designed to function perfectly under 80° Celsius (176° Fahrenheit). Avoid prolonged exposure to temperatures outside this range, as extreme heat or cold can affect the material properties and suction performance.
- Cable Management: Secure any cables connected to the Starlink Mini to prevent them from interfering with vehicle operation or becoming a hazard.
- Weight Limit: This mount is specifically designed for the Starlink Mini dish antenna. Do not use it for heavier devices.
3. Package Contents
The package includes the following components:
- 1 x Starlink Mini Car Suction Mount for Sunroof (consisting of two metal bars with pre-attached suction cups)
- Rubber stickers for padding and protection
- Screws for assembly
4. Setup Instructions
Follow these steps to assemble and install your EAZUSE Starlink Mini Sunroof Suction Cup Mount:
- Prepare the Metal Bars: Stick the provided rubber stickers onto the four short pads of the metal bars. These stickers provide padding and protection for your Starlink Mini Dish.
- Attach Suction Cups: Mount the suction cups to the designated holes on both metal bars using the provided screws. Ensure they are tightened securely.
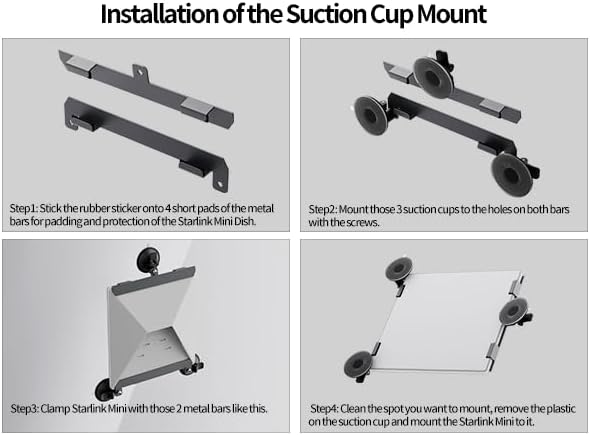
Image: Step-by-step installation guide for the suction cup mount.
- Clamp Starlink Mini: Position your Starlink Mini dish between the two assembled metal bars. The metal bars are designed to snugly fit into the slots of the Starlink Mini.

Image: Detail of metal bars fitting into Starlink Mini slots with protective rubber.
- Mount to Surface: Clean the desired spot on your sunroof, windshield, or other smooth glass surface. Remove the protective plastic film from the suction cups. Press each suction cup firmly against the clean surface and engage the locking levers to create a strong vacuum seal. Ensure all suction cups are securely attached before releasing the Starlink Mini.

Image: Detail of the sticky suction cup design for sturdy and firm attachment.
5. Operating Instructions
Once the mount is securely installed with the Starlink Mini, ensure the dish is positioned for optimal signal reception. The mount allows for flexible placement on various glass surfaces. Regularly check the suction cups for secure attachment, especially during travel or after significant temperature changes.

Image: Examples of the mount's wide application scenarios on vehicle sunroofs, rear, and front windshields.
To remove the mount, release the locking levers on each suction cup. Gently peel the suction cups away from the surface. Do not force removal, as this may damage the suction cups or the mounting surface.
6. Maintenance
- Cleaning: Clean the suction cups and the mounting surface with a damp, lint-free cloth. Avoid using abrasive cleaners or solvents, as these can damage the rubber and plastic components.
- Storage: When not in use, store the mount in a clean, dry place away from direct sunlight and extreme temperatures. Re-attach the protective plastic films to the suction cups if available to prevent dust accumulation and maintain their integrity.
- Inspection: Periodically inspect the mount for any signs of wear or damage. Ensure all screws are tight and the rubber components are intact.
7. Troubleshooting
- Problem: The mount is not sticking to the surface.
Solution: Ensure the mounting surface is perfectly clean, dry, and smooth. Wipe both the surface and the suction cups with a damp cloth and allow them to dry completely. Re-apply the suction cups, pressing firmly and engaging the levers. - Problem: The Starlink Mini dish feels unstable after mounting.
Solution: Verify that all screws connecting the suction cups to the metal bars are tightened. Ensure all suction cup locking levers are fully engaged and that the metal bars are securely clamping the Starlink Mini dish. - Problem: Difficulty removing the mount.
Solution: Ensure all suction cup locking levers are fully released. Gently lift the edge of each suction cup to break the vacuum seal. Do not pull forcefully, as this can damage the suction cups. - Problem: Suction cups lose grip over time.
Solution: This can happen due to dust, temperature changes, or surface imperfections. Clean the suction cups and surface thoroughly. If the problem persists, consider repositioning the mount to a different spot or inspecting the suction cups for damage.
8. Specifications
| Feature | Detail |
|---|---|
| Brand | EAZUSE |
| Model Number | ZQ-MINI-BR8 |
| Item Weight | 13.1 ounces |
| Product Dimensions | 9.4 x 3.1 x 4.2 inches |
| Size | 2 Pieces Suction Mount |
| Color | Gray |
| Material | Metal, Rubber |
| Mounting Type | Sunroof Mount |
| Compatible Devices | Starlink Mini |
9. Warranty and Support
For information regarding product warranty, returns, or technical assistance, please refer to the official EAZUSE website or contact EAZUSE customer service directly. Contact details are typically available on the product packaging or the manufacturer's website.