1. Important Safety Information
Please read and understand all instructions before beginning installation. Failure to follow these instructions could result in electric shock, fire, or personal injury.
- Ensure the power is turned off at the circuit breaker before installation or servicing.
- All wiring must be in accordance with national and local electrical codes.
- The mounting structure must be capable of supporting the fan's weight (approximately 43.4 lbs).
- Do not operate the fan with damaged blades or housing.
- Maintain a minimum clearance of 7 feet from the floor to the bottom of the fan blades.
2. Package Contents
Verify that all components are present before proceeding with installation.

Image: Overview of the Maxslak 84-inch ceiling fan and its included components, such as the fan body, six double-layer aluminum blades, three downrod options (6", 12", 24"), a remote control, and a smart home device for voice control.
- Fan Motor Housing with Integrated LED Light
- 6 Double-Layer Aluminum Blades
- Downrods (6-inch, 12-inch, 24-inch)
- Mounting Bracket
- Remote Control with Wall Mount
- Safety Rope
- Hardware Pack (screws, washers, wire nuts)
3. Installation Guide
3.1 Pre-Installation
- Turn off power at the main circuit breaker.
- Ensure the ceiling joist or support structure can hold the fan's weight.
3.2 Mounting Bracket Installation
Attach the mounting bracket securely to the ceiling outlet box. The fan supports sloped ceilings up to a 12-degree angle.

Image: Detailed diagram illustrating the dimensions and installation process for the hanging bracket, including tips for aligning with the ceiling box and the option to contact support for simplified brackets if needed. The disc-shaped brackets support up to 35 lbs.
3.3 Downrod Selection and Assembly
Choose the appropriate downrod (6", 12", or 24") for your ceiling height. Insert the downrod through the canopy and connect it to the fan motor housing.
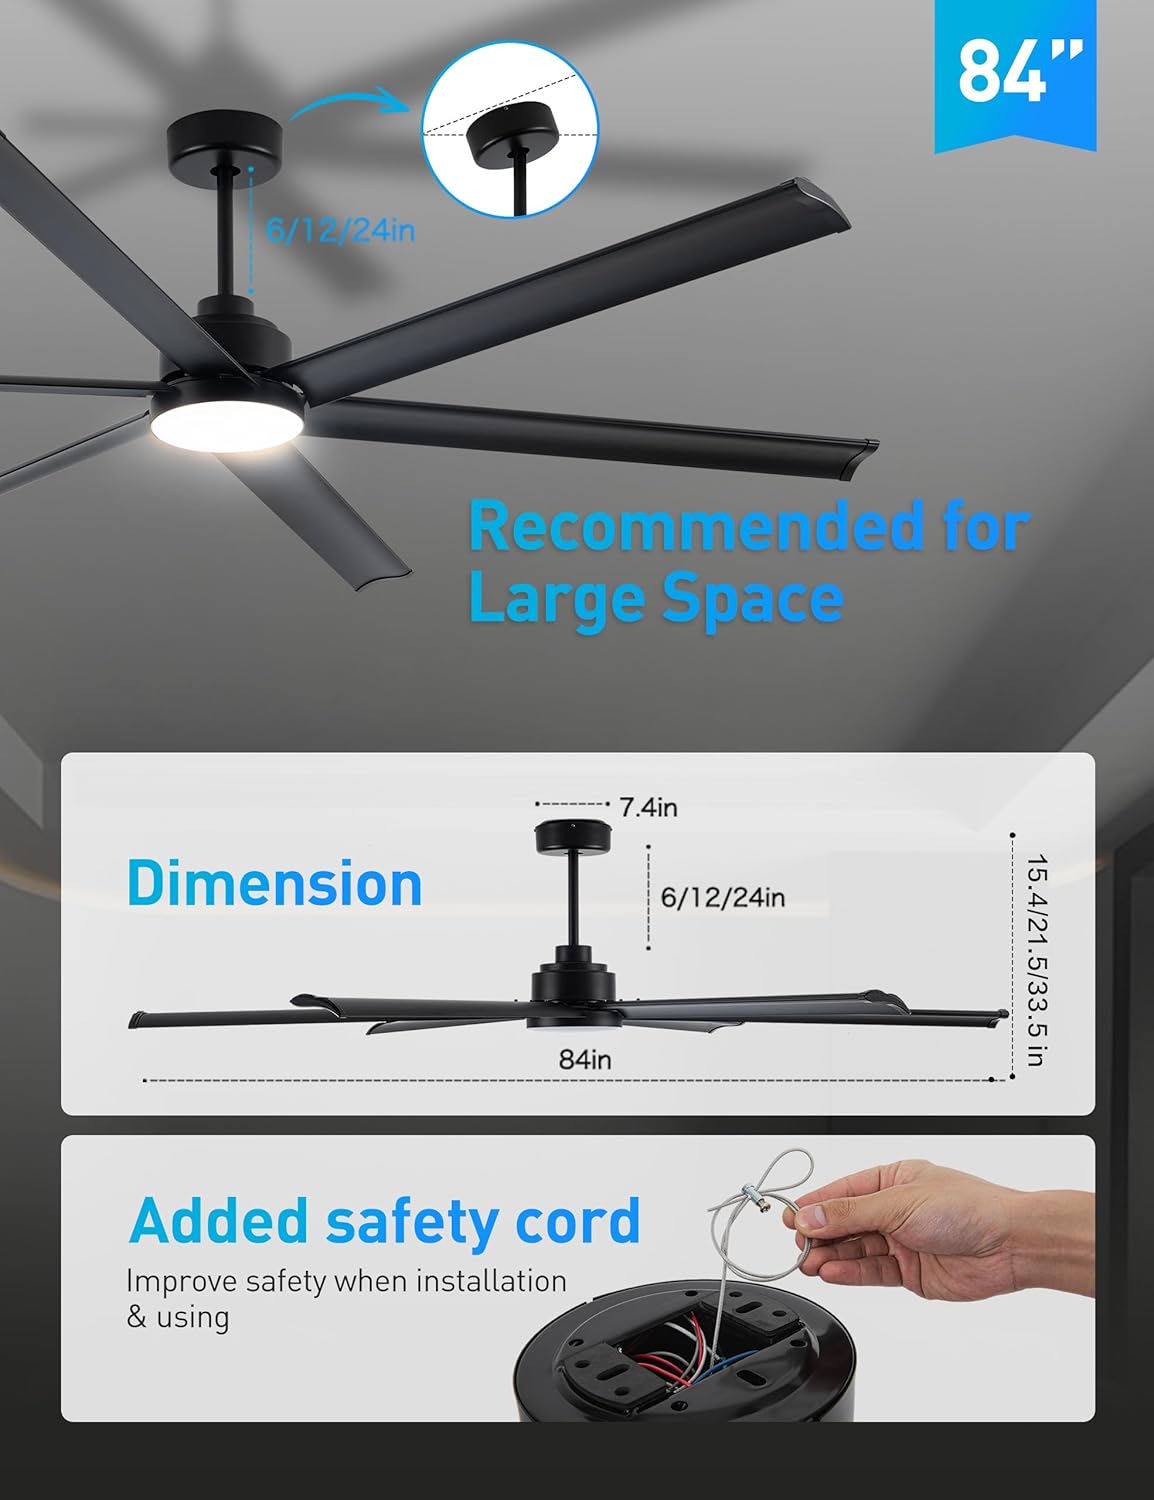
Image: Visual representation of the fan's dimensions (84-inch diameter, 7.4-inch motor housing width, 15.4 to 33.5-inch height depending on downrod), available downrod lengths (6, 12, 24 inches), and the process of attaching the safety cord for enhanced security during installation and use.
3.4 Wiring Connections
Connect the fan's electrical wires to the household wiring according to the provided wiring diagram. Ensure all connections are secure with wire nuts.
3.5 Blade Attachment
Carefully attach each of the six double-layer aluminum blades to the fan motor housing using the provided screws. Ensure they are firmly secured.
3.6 Safety Rope Installation
Attach the safety rope from the fan to a secure point on the ceiling structure to prevent accidental falling.
4. Operating Instructions
4.1 Control Methods
The Maxslak 84-inch ceiling fan offers three control options: remote control, Smart Life APP, and voice control via Alexa.

Image: The Maxslak 84-inch ceiling fan being controlled through various methods, including voice commands via an Alexa device, the 'Smart Life' mobile application, and the included handheld remote control. This highlights the fan's smart capabilities and user convenience.
4.2 Remote Control Operation
Use the included handheld remote to adjust fan settings.
- Power Button: Turns the fan and light on/off.
- Fan Speed (1-6): Adjusts fan speed from low (1) to high (6).
- Light On/Off: Toggles the light.
- Brightness Adjustment: Dims or brightens the light (10% to 100%).
- Color Temperature (3000K/4000K/6000K): Changes light color from warm white to cool white.
- Timer (1H/4H/8H): Sets the fan to turn off automatically after 1, 4, or 8 hours.
- Reverse Function: Changes blade rotation direction for summer or winter mode.

Image: A close-up of the remote control displaying options for adjusting light brightness from 10% to 100% and selecting color temperatures (3000K warm white, 4000K neutral white, 6000K cool white). The fan's light provides up to 2000 lumens.
4.3 Smart Life App Control
Download the 'Smart Life' app from your device's app store. Follow the in-app instructions to connect your fan using a 2.4GHz Wi-Fi connection. The app allows for comprehensive control of fan speed, light settings, and scheduling.
4.4 Voice Control (Alexa)
Integrate your fan with Amazon Alexa for convenient voice commands. Ensure your fan is connected to the Smart Life app and linked to your Alexa account.

Image: A reference guide for Alexa voice commands, demonstrating how to control the fan and light. Commands include turning the fan/light on/off, setting fan mode (Normal/Sleep/Natural), changing rotation direction (forward/reverse), adjusting fan speed (1-6), and adjusting light brightness (percentage).
- "Alexa, turn on/off the [device name] fan/light."
- "Alexa, set the [device name] fan speed to 1-6."
- "Alexa, set the [device name] light to [percentage]%."
- "Alexa, set the [device name] to forward/reverse."
4.5 Reversible Motor Function
The fan features a reversible DC motor for year-round comfort.

Image: A visual explanation of the reversible motor function. In summer, the fan blades rotate counter-clockwise to create a downward cooling breeze. In winter, the blades rotate clockwise to circulate warm air downwards, improving heat distribution.
- Summer Mode: Downward airflow creates a cooling effect.
- Winter Mode: Upward airflow circulates warm air trapped near the ceiling.
5. Maintenance
Regular maintenance ensures optimal performance and longevity of your ceiling fan.
- Cleaning: Dust the fan blades and motor housing periodically with a soft, damp cloth. Do not use abrasive cleaners or solvents.
- Blade Inspection: Check blades for any cracks or damage. Ensure all blade screws are tight.
- Tighten Fasteners: Periodically check all screws and fasteners on the fan and mounting hardware to ensure they are secure.
6. Troubleshooting
If you encounter issues with your fan, refer to the following common problems and solutions.
- Fan Does Not Start:
- Check if the power is on at the circuit breaker.
- Ensure all wire connections are secure.
- Verify remote control batteries are functional.
- Light Does Not Work:
- Check light wiring connections.
- Ensure the light function is enabled on the remote or app.
- Excessive Wobbling:
- Ensure all blade screws are tightened.
- Verify the mounting bracket is securely installed.
- Check if the downrod is properly seated.
- Remote Control Not Responding:
- Replace remote control batteries.
- Ensure there are no obstructions between the remote and the fan receiver.
7. Specifications
Detailed technical specifications for the Maxslak 84-inch Industrial Black Ceiling Fan.
| Feature | Specification |
|---|---|
| Brand | Maxslak |
| Model Number | CA84BK-LK |
| Color | Matt Black |
| Electric Fan Design | Ceiling Fan |
| Power Source | DC |
| Style | Industrial |
| Product Dimensions | 84"D x 84"W x 35"H |
| Room Type | Home Office, Farmhouse, Gym, Patio |
| Special Features | LED Light, Remote Controlled, Timer, Wi-Fi Enabled, Works with Alexa |
| Recommended Uses | Air Circulation |
| Noise Level | 35 dB |
| Wattage | 52 watts |
| Number of Blades | 6 |
| Air Flow Capacity | 13000 Cubic Feet Per Minute (CFM) |
| Voltage | 120 Volts |
| Included Components | Light Kit, Remote |
| Indoor/Outdoor Usage | Indoor, Outdoor |
| Certifications | DOE, FCC |
| Control Method | App, Remote, Voice |
| Item Weight | 43.4 pounds |
| Assembly Required | Yes |
| Batteries Required | No (for fan, remote requires batteries) |

Image: Documentation showing DOE Intertek certification for airflow performance, including a report with air delivery test results and an EnergyGuide label indicating an estimated yearly energy cost of $9 and an airflow efficiency of 310 CFM/W.
8. Warranty and Support
Maxslak provides comprehensive warranty coverage and customer support for your product.

Image: Maxslak's warranty details, indicating a 2-year full fan warranty and a 5-year motor warranty. It also highlights 24/7 after-sales support and the availability of replacement parts.
- Full Fan Warranty: 2 Years
- Motor Warranty: 5 Years
- Customer Support: 24 Hours / 7 Days a Week
For warranty claims, replacement parts, or technical assistance, please contact Maxslak customer service. Refer to the product packaging or the official Maxslak website for contact details.