Introduction
This manual provides detailed instructions for the setup, operation, and maintenance of your XREXS Digital Wall Clock. Please read thoroughly to ensure optimal performance and longevity of your device. This clock features a large LED display, multi-color night lights, automatic Daylight Saving Time (DST) adjustment, and versatile timer functions, all controllable via a convenient remote.
Package Contents
Before proceeding, please verify that all items listed below are included in your package:
- XREXS Digital Wall Clock
- Remote Control (with batteries included)
- Power Adapter (Corded Electric)
- Mounting Hardware (screws and drywall anchors)
- User Manual
Setup
1. Power Connection
The XREXS Digital Wall Clock operates on corded electric power. It is not battery operated for primary function. The included batteries serve as a memory backup to retain settings during power outages.
- Connect the power adapter to the clock's power input port, located on the back.
- Plug the power adapter into a standard electrical outlet. The clock display will illuminate.
2. Remote Control Setup
The remote control requires two AAA batteries, which are included. Ensure the plastic tab is removed from the battery compartment before first use.
3. Mounting Options
The clock offers versatile placement options:
- Desktop Placement: Utilize the integrated folding stand on the back of the clock to place it securely on any flat surface, such as a desk, table, or shelf.
- Wall Mounting: Use the provided mounting hardware (screws and drywall anchors) to securely attach the clock to a wall. A mounting template may be included to assist with accurate hole placement.

Figure 1: Large 16.5-inch LED display with remote control for easy adjustments.

Figure 2: Clock positioned on a table using its integrated stand.

Figure 3: Clock mounted on a wall, illustrating its wall-hanging feature.
Operating Instructions
1. Setting Time and Date
The clock can display time in 12-hour or 24-hour format, and temperature in Celsius or Fahrenheit. It also features automatic Daylight Saving Time (DST) adjustment.
- Press the 'SET' button on the remote or on the clock's top panel to enter setting mode.
- Use the '+' and '-' buttons to adjust values (e.g., hour, minute, year, month, day).
- Press 'SET' again to confirm each setting and move to the next parameter.
- To switch between 12/24-hour format or °C/°F, use the dedicated buttons on the remote or top panel.
2. Alarm Setting
The clock supports setting alarms.
- Press the 'ALARM SET' button on the remote or top panel.
- Use the '+' and '-' buttons to set the desired alarm time.
- Press 'ALARM SET' again to confirm.
- To activate/deactivate the alarm, press the 'ON/OFF ALSET' button.
- The 'SNOOZE' button allows for a temporary pause of the alarm.
3. Timer Functions
The clock includes count-up and count-down timer modes.
- Press the 'TIMER' button on the remote or top panel to switch to timer mode.
- For count-down, use the 'HR', 'MIN', 'SEC' buttons to set the desired duration, then press 'TIMER ST/SP' to start.
- For count-up, simply press 'TIMER ST/SP' to begin counting from zero.
- Press 'RESET' to clear the timer.
4. Adjusting LED Display Brightness
The main LED display has four adjustable brightness levels.
- Press the 'DIMMER LED' button on the remote or top panel to cycle through the brightness levels (L1-L4).
- The clock also features an auto-dimming function that adjusts brightness based on ambient light.
5. Controlling Night Lights
The clock features multi-color night lights at the bottom.
- Press the 'BOTTOM LIGHT' button on the remote or top panel to turn the night light on/off and cycle through different colors (4 monochromatic, 2 dynamic RGB).
- Use the 'DIMMER LIGHT' button to adjust the brightness of the night light.
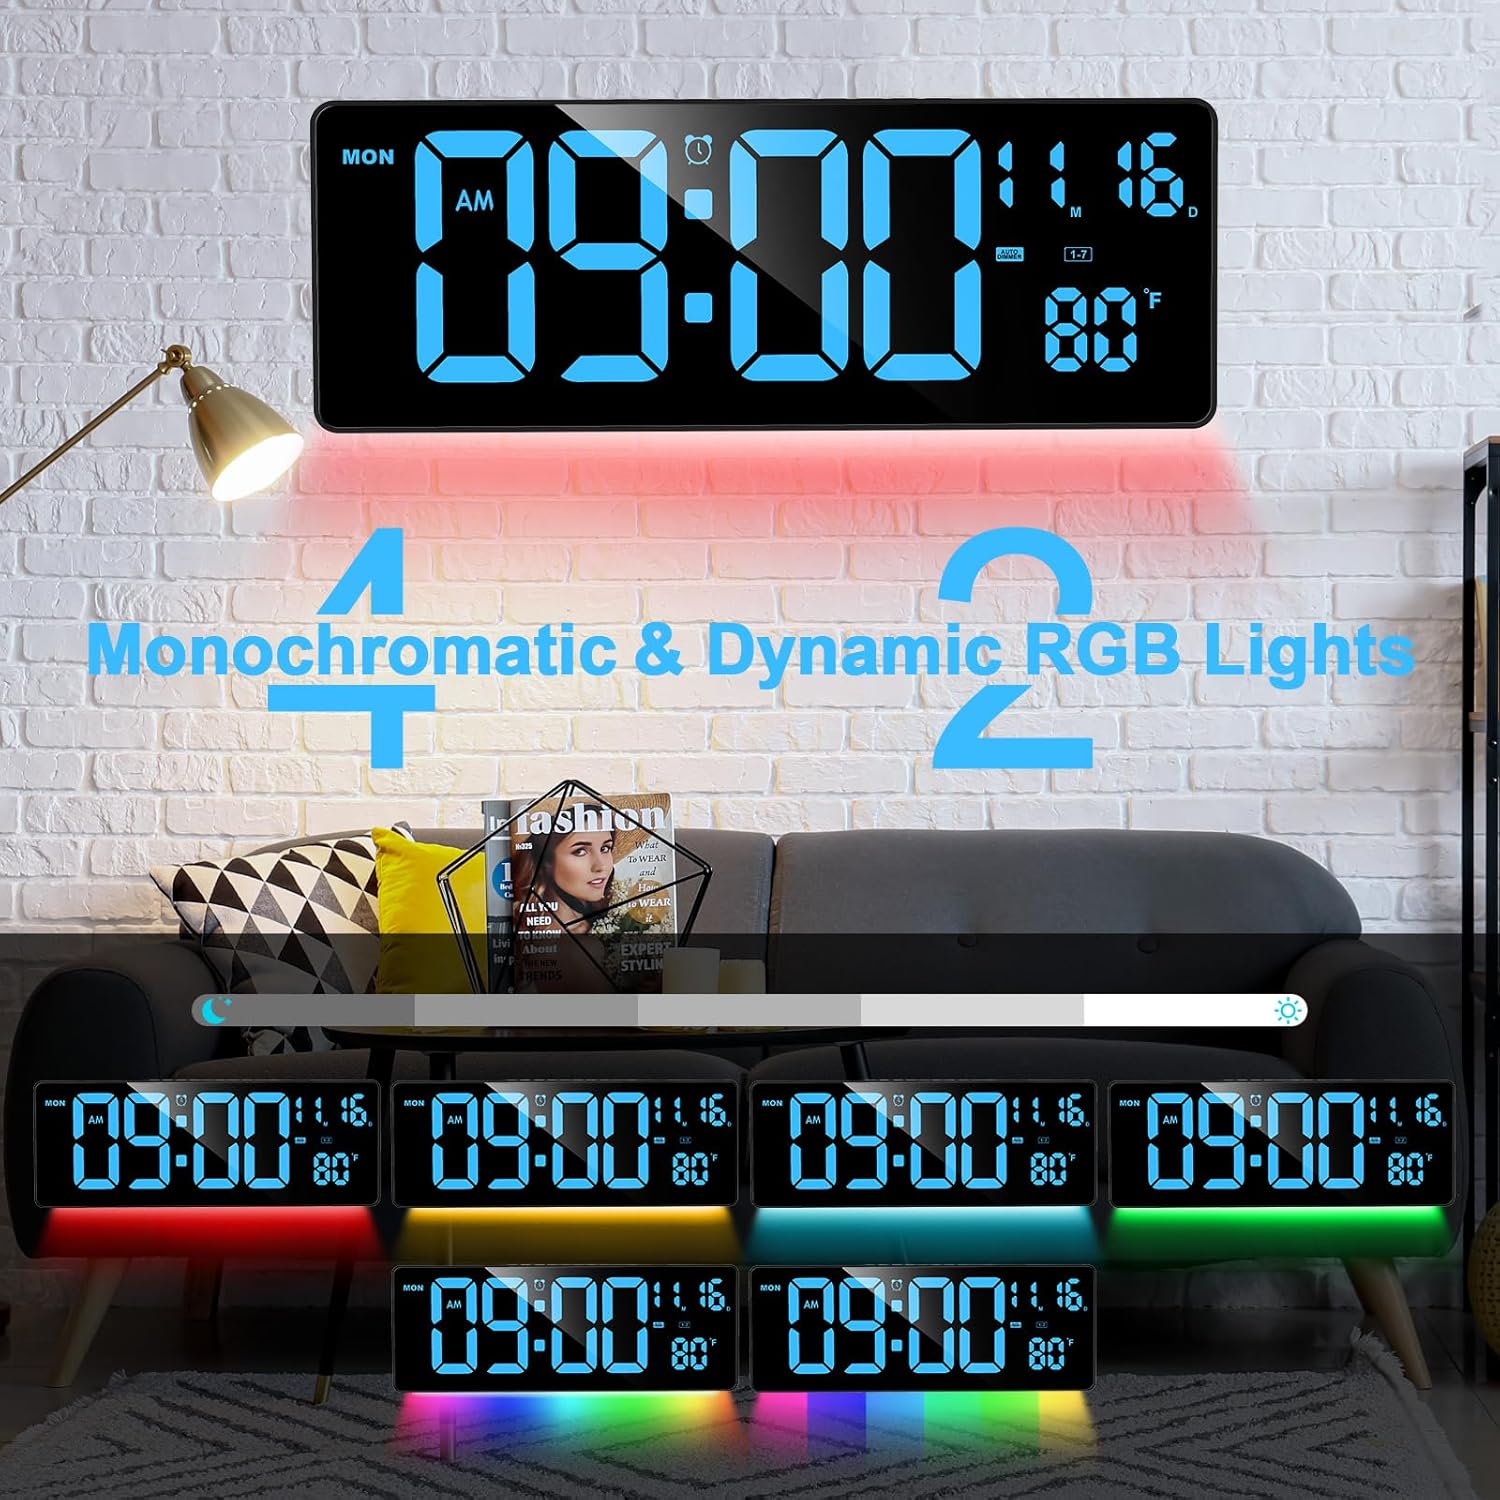
Figure 4: Multiple night light color options and dynamic RGB effects.

Figure 5: Night light brightness levels, from high to low.
Product Features
- Color Modern Night Light: Offers 4 monochromatic lights and 2 dynamic RGB lights with 4 levels of adjustable brightness via remote control, creating a pleasant ambiance.
- 16.5" Large LED Digital Display: Features a high-definition 16.5-inch screen with four adjustable brightness levels for clear readability from any angle and distance.
- Multipurpose Digital Alarm Clock: Includes three modes: count up/down timer, alarm clock, and standard clock. Supports 12 or 24-hour display formats and indoor temperature display in °C or °F.
- Wall-mounted and Desktop: Designed for flexible placement, it can be hung on a wall or placed on a desktop using its folding bracket.
- Convenient Remote Control: The included remote allows operation from up to 32 feet away, providing easy access to all functions.
- Built-in Memory Function: Retains time data even if power is disconnected, thanks to its internal memory and backup batteries.

Figure 6: Three functional modes of the clock: Time, Clock, and Alarm Clock.
Specifications
| Feature | Detail |
|---|---|
| Brand | XREXS |
| Model Number | Digital Wall Clock 3016 |
| Display Type | Digital LED |
| Product Dimensions | 15.6"W x 5.7"H |
| Item Weight | 2.33 pounds |
| Power Source | Corded Electric (Not battery operated for primary function) |
| Special Features | Alarm, Auto Dimmable, Day Mode, LED Display, Large Display, Night Lights, Count Up/Down Timer, Remote Control |
| Material | Plastic |
| Mounting Type | Wall Mount, Desktop |
Troubleshooting
- Clock Not Turning On: Ensure the power adapter is securely connected to both the clock and a working electrical outlet. This clock requires continuous power from the adapter for operation.
- Settings Not Retained: If settings are lost after a power outage, check if the backup batteries are correctly installed and functional. The clock uses internal memory with battery backup to save settings.
- Remote Control Not Responding: Verify that the batteries in the remote control are correctly inserted and have sufficient charge. Ensure there are no obstructions between the remote and the clock's sensor.
- Display Too Bright/Dim: Use the 'DIMMER LED' button on the remote or clock to adjust the main display brightness. For the night light, use the 'DIMMER LIGHT' button.
Warranty and Support
This product comes with a limited warranty. For detailed information regarding warranty coverage, claims, or technical support, please refer to the contact information provided in your product packaging or visit the official XREXS website.