1. Introduction
This manual provides detailed instructions for the installation, operation, and maintenance of your AutoBora 4K 2160P Dash Cam. Please read this manual thoroughly before using the product to ensure proper function and safety.
The AutoBora Dash Cam is designed for Land Rover Range Rover Sport L461 and Land Rover Range Rover L460 models from 2022, 2023, and 2024. It offers 4K 2160P video recording, night vision capabilities, and a discreet, integrated design.

Image 1.1: AutoBora 4K 2160P Dash Cam unit, showing the main camera, connection cables, and a smartphone screen demonstrating the live view feature.
2. Package Contents
- AutoBora 4K 2160P Dash Cam Unit
- Plug and Play Power Cable
- Plastic Pry Bar
- User Manual (this document)

Image 2.1: Package contents, including the dash cam unit, plug and play cable, and plastic pry bar.
3. Installation Guide
The AutoBora Dash Cam is designed for a plug-and-play installation, integrating seamlessly with your vehicle's existing wiring. No cutting or splicing of wires is typically required.
3.1. Compatibility Check
Before proceeding with installation, confirm your vehicle's compatibility:
- Land Rover Range Rover L460 (2022, 2023, 2024)
- Land Rover Range Rover Sport L461 (2022, 2023, 2024)
Please compare your car's rearview mirror cover and installation area with the provided images to ensure a correct fit. If unsure, consult with a professional or contact customer support.
3.2. Pre-Installation Overview

Image 3.1: Views of the vehicle's rearview mirror area before the dash cam is installed, showing the original setup.
3.3. Installation Steps
- Locate the Installation Area: The dash cam is designed to integrate with the existing rearview mirror housing.
- Remove the Original Cover: Carefully use the provided plastic pry bar to remove the vehicle's original rearview mirror cover. Exercise caution to avoid damaging the trim or wiring.
- Connect the Plug and Play Cable: Identify the appropriate power connector behind the rearview mirror or within the overhead console (e.g., rain sensor, reading light panel, anti-glare, or reserved ports). Connect the plug-and-play cable to this port.
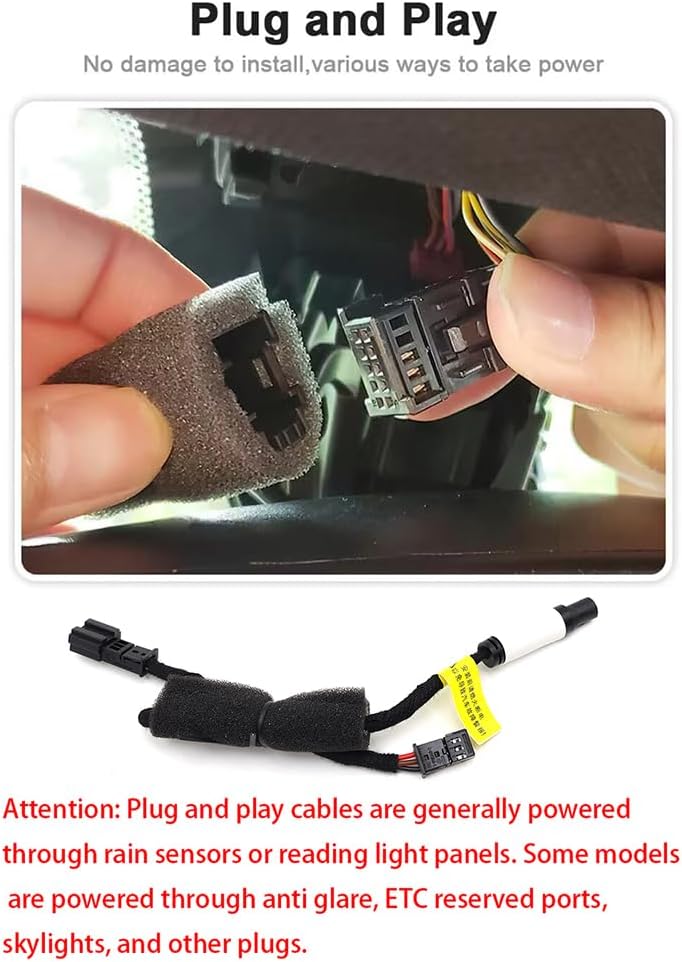
Image 3.2: Connecting the plug and play cable. Ensure a secure connection.
- Install the Dash Cam Unit: Position the AutoBora Dash Cam unit into the space where the original cover was removed. Ensure it fits securely and the camera lens has a clear view of the road.
- Secure Wiring: Route any excess wiring neatly to prevent interference with vehicle operations or visibility.
- Test Functionality: Turn on your vehicle's ignition and verify that the dash cam powers on and begins recording. Check the live view via the Viidure app (see Section 4.1).
3.4. Alternative Wiring (If Plug and Play is Not Applicable)
In some cases, direct wiring to the fuse box may be necessary. The dash cam requires a 10A fuse.

Image 3.3: Fuse box wiring diagram and connection points.
- Black wire (GND): Connect to any metal part of the vehicle chassis for ground.
- Red wire (ACC): Connect to a 12V (+) power source that is active when the ignition is on (e.g., cigarette lighter, radio).
- Yellow wire (B+): Connect to a 12V (+) constant power source that provides power even when the vehicle is off (e.g., for small lights, brake lights).
Note: If the yellow wire loses power when the car is off, the DVR will reset settings including date/time. Professional installation is recommended for fuse box wiring.
3.5. Post-Installation Appearance

Image 3.4: Views of the vehicle's rearview mirror area after the dash cam is installed, demonstrating its integrated and discreet appearance.
4. Operating Instructions
4.1. Power On/Off and Recording
The dash cam powers on automatically when the vehicle's ignition is turned on and begins recording. It powers off automatically when the ignition is turned off.
- Loop Recording: The camera automatically overwrites the oldest footage when the memory card is full. This ensures continuous recording without manual deletion.

Image 4.1: Illustration of automatic loop recording, showing how new videos overwrite older, unlocked footage.
- G-Sensor (Emergency Recording): In the event of a sudden collision or impact, the built-in G-Sensor will trigger the dash cam to automatically record and lock the current video footage. This prevents the footage from being overwritten by loop recording.
4.2. Wi-Fi Connectivity and Viidure App
The dash cam features built-in Wi-Fi for seamless connection to your smartphone via the Viidure app.
- Download the App: Search for "Viidure" in your smartphone's app store (iOS or Android) and install it.
- Connect to Wi-Fi:
- Turn on the dash cam.
- On your smartphone, go to Wi-Fi settings and connect to the dash cam's Wi-Fi network (SSID and password can be found in the app or initial setup instructions).
- App Functions: Once connected, the Viidure app allows you to:
- View live video feed from the dash cam.
- Browse and manage recorded videos.
- Download important footage directly to your phone.
- Adjust dash cam settings.
Note: You do not need to keep your phone connected to the dash cam's Wi-Fi at all times for the dash cam to function.
4.3. Viewing Footage on Computer
To view recorded footage on a computer, remove the MicroSD card from the dash cam and insert it into a compatible card reader connected to your computer.
5. Maintenance
- Cleaning the Lens: Use a soft, lint-free cloth to gently clean the camera lens. Avoid abrasive materials or harsh chemicals.
- Memory Card Management: Periodically format the MicroSD card (via the app or by removing and formatting on a computer) to maintain optimal performance and prevent data corruption. Back up important footage before formatting.
- Firmware Updates: Check the manufacturer's website or the Viidure app for any available firmware updates to ensure your dash cam has the latest features and bug fixes.
6. Troubleshooting
| Problem | Possible Cause | Solution |
|---|---|---|
| Dash cam does not power on. | No power supply; loose connection; vehicle ignition off. | Ensure vehicle ignition is on. Check power cable connections. Verify fuse box connection if applicable. |
| Recording stops or footage is corrupted. | Memory card full; faulty memory card; card speed too low. | Format the MicroSD card. Replace with a high-speed (Class 10 or U3) MicroSD card (up to 256GB supported). |
| Wi-Fi connection issues. | Incorrect Wi-Fi password; too far from dash cam; app issues. | Ensure correct Wi-Fi password. Be within close proximity to the dash cam. Restart the app and dash cam. |
| Date/time resets after vehicle is turned off. | Constant power (B+) connection is lost. | Verify the yellow B+ wire is connected to a constant 12V power source. |
7. Specifications
- Video Resolution: 4K 2160P (30fps)
- Lens: F/1.6 large aperture, 6 sets of 2160P full high-definition glass lenses, Sony Ultra Clear Lens

Image 7.1: Detailed view of the F1.6 large aperture Sony Ultra Clear Lens, highlighting its components and features for clear night vision.
- Image Sensor: Advanced CMOS sensor
- Encoding: H265 intelligent encoding
- Special Features: APP Control, Built-In Microphone, Built-in WiFi, G-Sensor, Loop Recording, HDR Technology, Night Vision
- Connectivity: Wi-Fi
- Storage: Supports MicroSD card up to 256GB (not included with "No SD Card" model)
- Operating Temperature: -20°C to 85°C (-4°F to 185°F)
- Mounting Type: Rearview Mirror Mount
- Product Dimensions: 8 x 8 x 8 inches (approximate)
8. Warranty and Support
AutoBora offers a one-year warranty for this product. For technical support or any queries, please contact AutoBora customer service. We are committed to providing 24/7 technical assistance.
For warranty claims or support, please refer to the contact information provided with your purchase or visit the official AutoBora website.