1. Introduction
This manual provides detailed instructions for the installation, operation, and maintenance of your NUOTIAN 10.26-inch Wireless CarPlay/Android Auto Screen with Backup Camera, Model NT-1026. Please read this manual thoroughly before using the product to ensure proper functionality and safety.

Image 1.1: The NUOTIAN 10.26-inch Wireless CarPlay/Android Auto Screen, showcasing the main unit, included 64GB TF card, adjustable mount, and backup camera.
2. Product Overview and Features
The NUOTIAN NT-1026 is a versatile in-car display system designed to enhance your driving experience with modern connectivity and safety features. Key features include:
- Wireless CarPlay & Android Auto: Seamlessly connect your smartphone via Bluetooth and Wi-Fi for access to navigation, calls, and music.
- 10.26-inch HD Touchscreen: A responsive 1600 x 600P display for clear visuals and intuitive control.
- Mirror Link Functionality: Display content from your iOS or Android smartphone directly onto the screen.
- Multiple Audio Output Modes: Connect to your car's audio system via Bluetooth, built-in speakers, AUX, or FM transmitter.
- Integrated Dash Cam: Features 2K/1080p dual recording with a 64GB TF card for continuous loop recording.
- HD Backup Camera: A 170° ultra-wide angle, waterproof camera with WDR and AHD technology for clear rear views, especially at night.
- Voice Control: Utilize Google or Siri voice assistants for hands-free operation.
- Easy Installation: Designed for universal compatibility with cars, trucks, and RVs, powered via a cigarette lighter.

Image 2.1: The screen demonstrating Apple CarPlay and Android Auto interfaces, along with MirrorLink capability.

Image 2.2: Illustration of the advanced internal chip and responsive touchscreen technology.
3. What's in the Box
Upon unboxing your NUOTIAN NT-1026, please ensure all the following components are present:
- NUOTIAN 10.26-inch Display Unit (with integrated Dash Cam)
- Backup Camera
- 64GB TF Card
- Car Charger (Power Cable with USB)
- AUX Cable
- Adjustable Dashboard Mount
4. Specifications
| Feature | Specification |
|---|---|
| Model Name | NT-1026 |
| Display Size | 10.26 Inches |
| Resolution | 1600 x 600P HD |
| Connectivity Technology | Bluetooth 5.3, USB, Wi-Fi |
| Special Features | Wireless Apple CarPlay, Android Auto, Mirror Link, Touchscreen, Voice Control, Dash Cam, Backup Camera |
| Dash Cam Recording | 2K (Front), 1080p (Rear) |
| Backup Camera Angle | 170° Ultra-Wide Angle |
| Included Storage | 64GB TF Card |
| Audio Output Modes | Bluetooth, Built-in Speakers, AUX, FM Transmitter |
| Mounting Type | Dashboard Mount |
| Vehicle Service Type | Car, RV, Truck |
| Item Weight | 2.95 pounds |
| Package Dimensions | 10.87 x 5.59 x 4.21 inches |

Image 4.1: Rear view of the display unit, highlighting the model number NT-1026.
5. Setup
5.1 Mounting the Display
- Clean the dashboard surface where you intend to mount the display. Ensure it is free of dust and grease.
- Attach the adjustable dashboard mount to the display unit.
- Peel off the protective film from the adhesive base of the mount.
- Press the mount firmly onto the desired location on your dashboard. Hold for a few seconds to ensure a secure bond.
- Adjust the display angle for optimal viewing without obstructing your driving view.
5.2 Connecting Power
- Insert the car charger into your vehicle's cigarette lighter socket.
- Connect the USB end of the car charger cable to the power input port on the display unit.
- The unit will power on automatically or can be manually turned on.
5.3 Connecting the Backup Camera
The backup camera provides a rear view when reversing. Follow these steps for installation:
- Mount the backup camera at the rear of your vehicle, typically near the license plate.
- Route the camera cable to the display unit, ensuring it is securely tucked away and does not interfere with vehicle operation.
- Connect the camera's video cable to the AV IN port on the display unit.
- Connect the red wire from the camera's power cable to your vehicle's reverse light positive terminal. This ensures the camera activates automatically when the vehicle is in reverse gear.
- Connect the black wire from the camera's power cable to a suitable ground point on your vehicle chassis.

Image 5.1: Wiring diagram for connecting the display unit, rear camera, and car charger.
6. Operation
6.1 Power On/Off
- The unit typically powers on automatically when connected to the car charger and the vehicle's ignition is on.
- To manually turn off the display, press and hold the power button (location may vary, refer to physical unit). A short press usually turns the screen off/on while keeping the unit powered.
6.2 Wireless CarPlay/Android Auto Connection
After initial setup, your phone will automatically connect via Bluetooth and Wi-Fi.
- Ensure Bluetooth and Wi-Fi are enabled on your smartphone.
- On the display unit, navigate to the CarPlay or Android Auto icon and select it.
- On your smartphone, search for and connect to the display unit's Bluetooth name.
- Follow any on-screen prompts on both your phone and the display to complete the pairing process.
- Once connected, you can access navigation, make calls, send messages, and play music directly from the display.
6.3 Mirror Link Functionality
Mirror Link allows you to display your smartphone's screen content on the unit.
- Select the 'Mirror Link' option on the display unit.
- Follow the specific instructions provided on the display for connecting your iOS or Android device. This typically involves connecting via Wi-Fi or USB.
- Once connected, your phone's screen will be mirrored on the display.
6.4 Audio Output Modes
The unit offers several ways to output audio:
- Built-in Speakers: Audio will play directly from the display unit's integrated speakers.
- Bluetooth: Connect the display unit to your car's existing Bluetooth audio system for sound output.
- AUX: Use the provided AUX cable to connect the display unit's AUX output to your car's AUX input.
- FM Transmitter: Select an unused FM frequency on the display unit and tune your car's radio to the same frequency to transmit audio wirelessly.

Image 6.1: Illustration of the multiple audio output options available, including FM, built-in speakers, AUX, and Bluetooth.
6.5 Dash Cam Operation
The integrated dash cam automatically records footage to the included 64GB TF card.
- The dash cam supports loop recording, overwriting the oldest files when the TF card is full.
- Footage can be reviewed directly on the display unit or by removing the TF card and inserting it into a computer.
- The front camera records in 2K resolution, and the rear camera records in 1080p.

Image 6.2: Features of the dual dash cam recording, including storage and reversing lines.
6.6 Backup Camera Operation
When the vehicle is shifted into reverse gear, the display unit will automatically switch to the backup camera view, providing a clear image of the area behind your vehicle.
- The 170° ultra-wide angle lens provides a broad field of view.
- WDR (Wide Dynamic Range) and AHD (Analog High Definition) technologies ensure balanced exposure and clear video, even in low-light conditions.
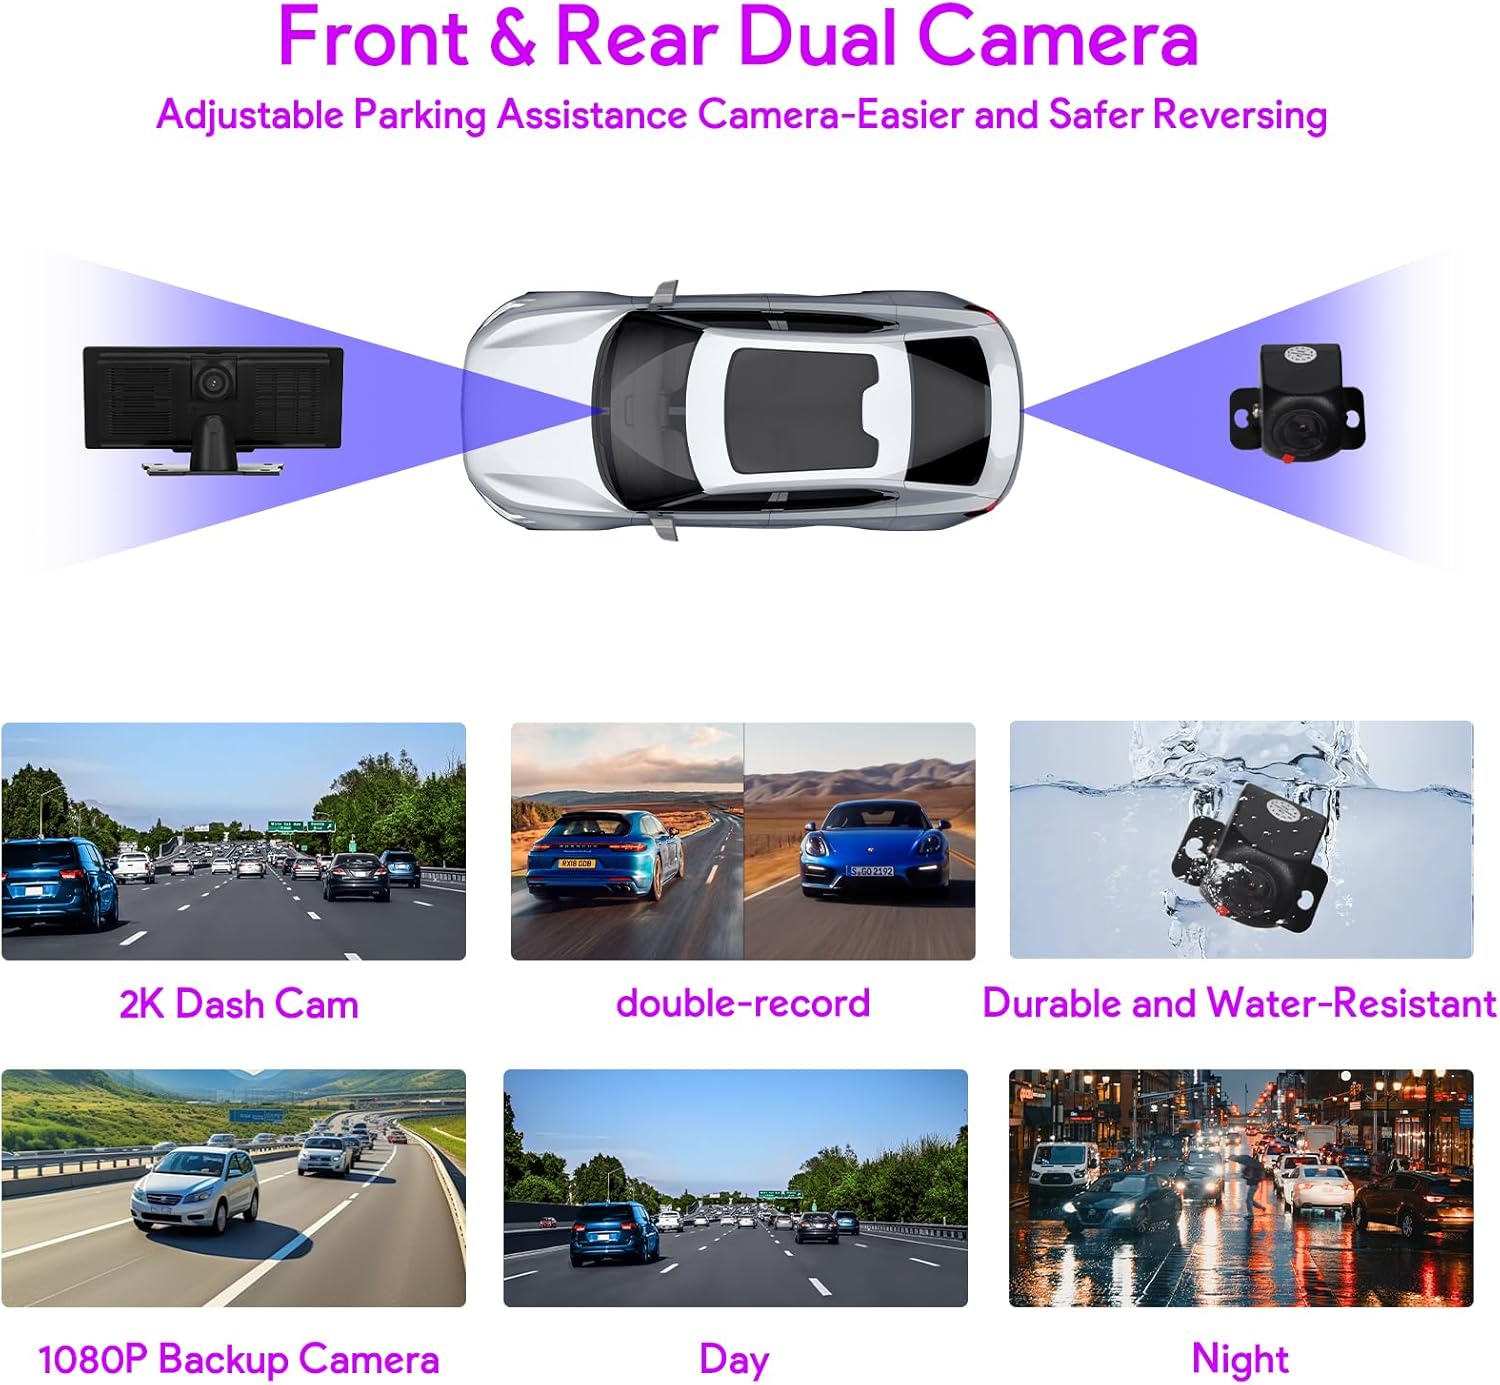
Image 6.3: Overview of the front and rear dual camera system, including parking assistance features.
6.7 Touchscreen and Voice Control
- Navigate the display's interface using the responsive touchscreen.
- Activate voice control through CarPlay or Android Auto to use Google Assistant or Siri for commands like navigation, calling, or music playback.

Image 6.4: Demonstrating hands-free operation using voice commands for navigation and calls.
7. Maintenance
- Cleaning: Use a soft, dry cloth to clean the display screen. For stubborn smudges, a slightly damp, lint-free cloth can be used. Avoid harsh chemicals or abrasive materials.
- Temperature: Avoid exposing the unit to extreme temperatures for prolonged periods.
- Cable Management: Ensure all cables are properly routed and secured to prevent damage or interference with driving.
- TF Card: Periodically format the TF card (at least once a month) to maintain optimal recording performance and prevent data corruption. Back up any important footage before formatting.
8. Troubleshooting
| Problem | Possible Cause | Solution |
|---|---|---|
| Unit does not power on | No power from cigarette lighter; faulty car charger; loose connection. | Check cigarette lighter functionality; ensure car charger is fully inserted; verify cable connections. Use the supplied car charger for stable power. |
| Wireless CarPlay/Android Auto not connecting | Bluetooth/Wi-Fi off on phone; incorrect pairing; interference. | Ensure phone's Bluetooth and Wi-Fi are on; delete previous pairings and re-pair; try restarting both devices. |
| No audio output | Incorrect audio output mode selected; volume too low; faulty AUX/Bluetooth connection. | Check selected audio output mode (Bluetooth, AUX, FM); increase volume on both unit and car stereo; ensure AUX cable is fully inserted or Bluetooth is properly connected. |
| Backup camera not displaying | Loose camera connection; incorrect wiring to reverse light; faulty camera. | Verify camera cable connection to AV IN; check wiring to reverse light for proper power; ensure vehicle is in reverse gear. |
| Screen freezes or reboots randomly | Unstable power supply; software issue; overheating. | Ensure using the supplied car charger for stable power. If using a different cable, verify sufficient voltage and current. Try a factory reset. Ensure adequate ventilation around the unit. |
| Poor image quality on dash cam/backup camera | Dirty lens; low light conditions; TF card issues. | Clean camera lenses; ensure sufficient lighting for optimal performance; format the TF card. |
9. Warranty and Support
Your NUOTIAN NT-1026 comes with a 1-year manufacturer warranty from the date of purchase. This warranty covers defects in materials and workmanship under normal use.
For any warranty-related inquiries, technical assistance, or customer service, please contact our support team. We are committed to providing professional technical support and prompt customer service to resolve any issues you may encounter.
- Customer Service: Quick response within 24 hours.
- Returns & Exchanges: Free returns and exchanges within 90 days of purchase.
- Technical Support: Lifetime technical support team available.