Introduction
This manual provides detailed instructions for the setup, operation, and maintenance of your new replacement remote control for adjustable bed bases. Please read this manual thoroughly before use to ensure proper functionality and to avoid any issues.
Important Compatibility Notes
This replacement remote control is specifically designed for use with adjustable bed bases that utilize the CU358-2-L control box. It is crucial to verify your bed base's control box model number before attempting to pair or use this remote.
To ensure compatibility, it is highly recommended to compare your existing remote control and control box with the images provided. If you are uncertain about compatibility, please consult your bed base's original manual or contact the manufacturer for assistance.
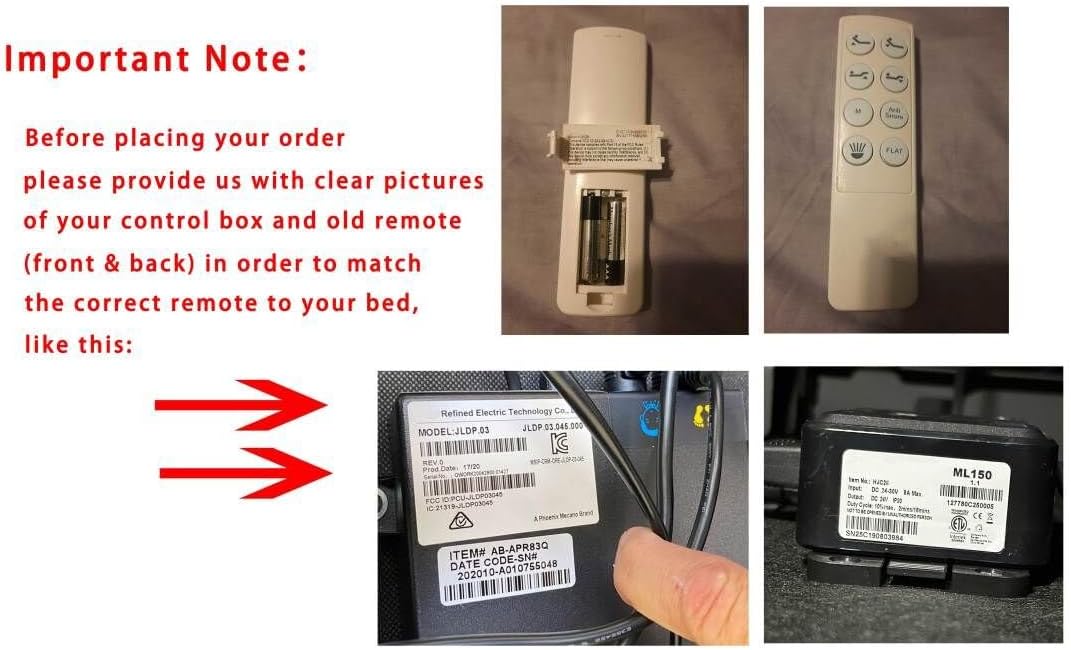
Figure 1: Example of control box and old remote for compatibility verification. Ensure your control box matches the CU358-2-L model.
Setup
1. Battery Installation
The remote control requires 2 AAA batteries (not included). Follow these steps to install them:
- Locate the battery compartment cover on the back of the remote control.
- Slide the cover downwards or press the latch to open it.
- Insert 2 AAA batteries, ensuring the correct polarity (+ and -) as indicated inside the compartment.
- Replace the battery compartment cover until it clicks securely into place.

Figure 2: Back of the remote control, showing the battery compartment.
2. Pairing the Remote Control
The original remote that came with your adjustable base is typically pre-paired. If this is a replacement remote or if your remote is not responding, follow these pairing instructions:

Figure 3: Remote control pairing steps diagram.
- Step 1: Unplug the power cord of your adjustable bed base from the wall outlet. Wait approximately 5 seconds.
- Step 2: Plug the power cord back into the outlet. You must perform Step 3 within 10 seconds of plugging the power cord back in.
- Step 3: On the back of the remote control, press and hold the PAIR button. The PAIR button will illuminate blue and begin flashing.
- Step 4: Continue holding the PAIR button. When the PAIR button stops flashing, the LED light on the control box will go out. Release the PAIR button.
- The remote is now paired to the adjustable base. Test all remote functions to confirm successful pairing. If the remote buttons do not control the adjustable base movements, repeat the process.
Alternative Pairing Method (if applicable, refer to your bed base manual):

Figure 4: Alternative pairing method with control box reset button.
- Ensure the distance between the remote and control box is less than 2 meters.
- Remove the battery cover on the back of the remote.
- Insert/check existing 3x AAA batteries (note: product specifications state 2 AAA, this image might be for a different model, but the principle is similar).
- Push the reset button on the control box twice with a pointed object. The green pairing LED adjoining it will light up.
- You now have 10 seconds to pair the remote and receiver.
- On the back of the remote, locate the silicone push button positioned above the batteries (often labeled 13). Press and hold this button. A blue LED will start blinking. Keep it pressed until the blue LED light becomes continuously lit, then pairing is complete, and the blue LED light fades away.
Operating Instructions
Familiarize yourself with the buttons on your remote control. The layout is designed for intuitive control of your adjustable bed base.

Figure 5: Front view of the remote control.
| Button/Section | Function |
|---|---|
| MASSAGE (10 MIN, 20 MIN, 30 MIN) | Activates the massage function for the specified duration. |
| TIMER/ALL OFF | Turns off all active functions (e.g., massage, lights) or sets a timer for certain functions. |
| HEAD (+ / -) | Adjusts the head section of the bed base up (+) or down (-). |
| FOOT (+ / -) | Adjusts the foot section of the bed base up (+) or down (-). |
| ZERO G | Activates the "Zero Gravity" preset position, which elevates the head and foot to a position that may relieve pressure on the back. |
| Light Bulb Icon | Controls under-bed lighting or other integrated lights. |
| Wave Icons (Massage Intensity/Pattern) | Adjusts the intensity or pattern of the massage function. |
| Flat Icon | Returns the bed base to a completely flat position. |
Maintenance
To ensure the longevity and optimal performance of your remote control, follow these maintenance guidelines:
- Cleaning: Wipe the remote control with a soft, dry cloth. Do not use liquid cleaners, aerosols, or abrasive cleaning agents, as these can damage the remote.
- Battery Replacement: Replace batteries when the remote's response becomes sluggish or if the indicator light (if present) signals low battery. Always replace both batteries at the same time with new ones of the same type (AAA).
- Storage: Store the remote in a dry place, away from direct sunlight, extreme temperatures, and high humidity.
- Avoid Drops: Protect the remote from physical impact. Dropping the remote can cause internal damage.
Troubleshooting
If you experience issues with your remote control, try the following troubleshooting steps:
- Remote Not Responding:
- Check if the batteries are correctly installed and have sufficient charge. Replace them if necessary.
- Ensure the remote is within range of the bed base's receiver (typically within 2 meters during pairing).
- Verify that the bed base is plugged into a working power outlet.
- Attempt to re-pair the remote control following the "Pairing the Remote Control" instructions in the Setup section.
- Intermittent Operation:
- This could indicate low battery power. Replace the batteries.
- Ensure there are no obstructions between the remote and the bed base's receiver.
- Specific Functions Not Working:
- If only certain buttons are not working, try re-pairing the remote.
- Confirm that your bed base model supports all functions indicated on the remote.
If the problem persists after attempting these steps, please refer to your adjustable bed base's original user manual or contact the bed base manufacturer for further assistance.
Specifications
| Feature | Detail |
|---|---|
| Model Number | members marks MMKD-TL |
| Compatible Control Box | CU358-2-L |
| Power Source | 2 x AAA Batteries (not included) |
| Item Weight | 3.2 ounces |
| Color | Black |
| Max Number of Supported Devices | 1 |
| Compatible Devices | Adjustable Bed Base |
| Manufacturer | SZHKHXD |
| Country of Origin | China |
Warranty and Support
This replacement remote control is intended to function with compatible adjustable bed bases. For specific warranty information regarding your bed base or the remote control, please refer to the documentation provided by the original manufacturer of your adjustable bed base or the seller of this replacement remote.
For technical support or further inquiries, please contact the seller or the manufacturer of the remote control. When contacting support, please have your product model number (members marks MMKD-TL) and details of your adjustable bed base (including its control box model) ready.


