Introduction
This manual provides instructions for the Generic replacement remote control designed for use with Sleep Technologies S5 and S3 adjustable bed bases. Please read this manual carefully before use to ensure proper operation and compatibility.
Important Compatibility Note:
This remote control is specifically designed to work with control box model number CU358-2-L. Before purchasing or attempting to pair, verify that your adjustable bed base uses this specific control box model. The remote will not function with other control box models. Additionally, ensure your old remote is identical in appearance to this replacement.
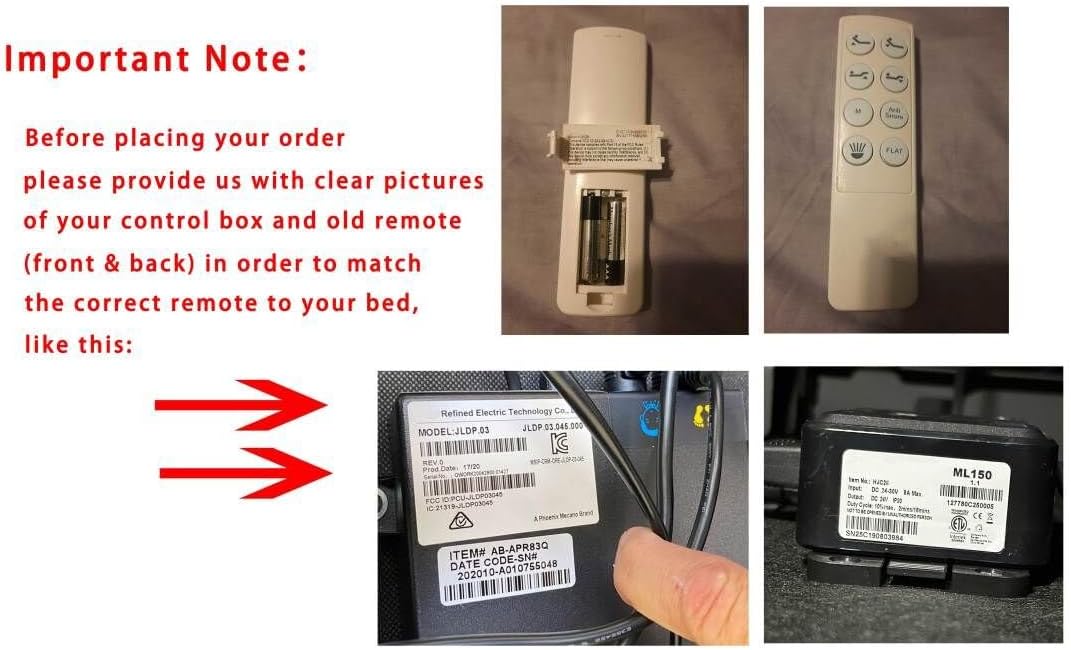
Figure 1: Example of control box label (CU358-2-L) and remote back. It is crucial to verify your control box model number matches CU358-2-L for compatibility.
Setup and Pairing
1. Battery Installation
The remote control requires 2 AAA batteries (not included). To install:
- Locate the battery compartment cover on the back of the remote control.
- Slide the cover off in the direction indicated by the arrow (if present).
- Insert 2 AAA batteries, ensuring the correct polarity (+/-) as marked inside the compartment.
- Replace the battery compartment cover until it clicks securely into place.
Figure 2: Battery compartment on the back of the remote control.
2. Pairing Method
The original remote that came with your adjustable base is typically pre-paired. If you are using a replacement remote or if your remote loses connection, follow these steps to pair it with your adjustable base. Ensure the remote is within 2 meters of the control box during pairing.
- Step 1: Power Cycle the Base
Unplug the power cord of your adjustable bed base from the wall outlet. Wait approximately 5 seconds, then plug it back into the outlet. Proceed to Step 2 within 10 seconds of plugging the power cord back in.

Figure 3: Power cycling the adjustable bed base.
- Step 2: Activate Pairing on Remote
On the back of the remote control, locate and press and hold the PAIR button. The PAIR button will illuminate blue and begin flashing. Continue holding the button until the PAIR button stops flashing and the LED light on the control box goes out. Release the PAIR button.
Figure 4: Location of the PAIR button on the remote control.
- Step 3: Test Functions
Test all remote functions to ensure successful pairing. If the remote buttons do not impact the adjustable base movements, repeat the pairing process from Step 1.
Note: An alternative pairing method, often used for troubleshooting, involves pressing a reset button on the control box twice, then pressing a silicone push button on the remote's flipside. If the primary method fails, consult your bed base's manual or contact support for specific instructions related to your control box.
Operation
The remote control features various buttons to adjust your Sleep Technologies S5 S3 adjustable base. Refer to the diagram below for button identification and their functions.

Figure 5: Front view of the remote control with button layout.
Button Functions:
- MASSAGE (10 MIN, 20 MIN, 30 MIN): Activates the massage function for the selected duration.
- TIMER/ALL OFF: Likely functions as a timer for massage or turns off all active functions.
- HEAD + / -: Adjusts the head section of the bed upwards (+) or downwards (-).
- FOOT + / -: Adjusts the foot section of the bed upwards (+) or downwards (-).
- ZERO G: Activates the Zero Gravity preset position, which elevates the head and foot to a specific angle for pressure relief.
- Flat Button (Icon: horizontal line): Returns the bed to a completely flat position.
- Preset Position Buttons (Icons: wavy lines, sun, various bed shapes): These buttons typically activate pre-programmed positions such as anti-snore, lounge, or TV positions. Refer to your bed base's original manual for specific details on these presets.
Maintenance
Battery Replacement
When the remote control's range decreases or buttons become unresponsive, it is likely time to replace the batteries. Follow the battery installation steps outlined in the "Setup and Pairing" section. Always use fresh AAA batteries and dispose of old batteries responsibly.
To clean the remote, use a soft, dry cloth. Avoid using liquid cleaners or abrasive materials, as these can damage the remote's surface or internal components.
Troubleshooting
| Problem | Possible Cause | Solution |
|---|---|---|
| Remote not responding to bed base. |
|
|
| Pairing fails repeatedly. |
|
|
Alternative Pairing (In Case of Trouble)
Some control boxes may require a slightly different pairing sequence, especially if the primary method does not work. This often involves a reset button on the control box itself.
- Remove the battery cover from the remote.
- Insert/check existing 2x AAA batteries (Note: This remote uses 2x AAA batteries).
- Push the reset button on the control box twice with a pointed object. A green pairing LED should illuminate. You have 10 seconds to complete the next step.
- On the flipside of the remote (often a small silicone button near the batteries), press and hold this button. A blue LED will start blinking. Keep it pressed until the blue LED is lit continuously, then it fades away. Pairing is then complete.

Figure 6: Alternative pairing method diagram, showing reset button on control box and hidden remote button.
Specifications
- Model Number: Sleep Technologies S5 S3 (Remote is compatible with these bed base models)
- Compatible Control Box: CU358-2-L
- Power Source: 2 x AAA Batteries (not included)
- Item Weight: 3.2 ounces
- Color: Black (Remote body is typically black or silver/grey)
- Special Feature: Ergonomic design
- Max Number of Supported Devices: 1 (per remote)


