Introduction
This manual provides detailed instructions for the installation, operation, and maintenance of your darkFlash DB330M Micro-ATX PC Case. Please read this manual thoroughly before beginning assembly to ensure proper setup and safe usage. The DB330M case features a 270° panoramic tempered glass panel, pre-installed PWM ARGB fans, and a high-speed I/O panel.
Safety Information
- Always disconnect the power supply from the wall outlet before installing or servicing any components inside the PC case.
- Handle tempered glass panels with care to prevent breakage. Avoid impacts or sharp objects.
- Wear anti-static gloves or use an anti-static wrist strap to prevent electrostatic discharge (ESD) damage to sensitive components.
- Keep small parts and screws away from children.
- Ensure proper ventilation around the PC case to prevent overheating.
Package Contents
Verify that all items are present in the package:
- darkFlash DB330M Micro-ATX PC Case
- 3 x Pre-installed PWM ARGB Fans
- Accessory Box (screws, cable ties, etc.)
- User Manual (this document)
Features Overview
- 270° Panoramic Tempered Glass: Provides an expansive view of internal components and RGB lighting.
- High-Speed I/O Panel: Includes USB 3.0 and Type-C ports for fast data transfer.
- Vertical Airflow Cooling: Optimized design with pre-installed fans for efficient heat dissipation.
- Magnetic Dust Filters: Located on top and bottom to keep components clean.
- Easy Installation: User-friendly design for hassle-free assembly and maintenance.
Specifications
| Feature | Specification |
|---|---|
| Model Name | DB330M PC CASE |
| Dimensions (LxWxH) | 8.58"D x 13.11"W x 15.75"H (218mm x 333mm x 400mm) |
| Motherboard Compatibility | Micro ATX, ITX |
| Case Type | Midi Tower |
| Material | Plastic, Tempered Glass |
| Pre-installed Fans | 3 x 120mm PWM ARGB Fans |
| Max CPU Cooler Height | 180mm |
| Max GPU Clearance | 305mm |
| Radiator Support (Top) | Up to 240mm |
| Power Supply Mounting Type | Bottom Mount (Max 140mm PSU length) |
| I/O Ports | 1 x USB 3.0, 1 x Type-C, Audio In/Out |
Setup and Installation
1. Accessing the Interior (Quick Release Design)
The darkFlash DB330M features a quick-release design for easy access to internal components. The tempered glass panels can be removed by gently pulling them away from the chassis. The top panel also detaches for fan/radiator installation.

2. Motherboard Installation
Install your Micro-ATX or ITX motherboard into the designated area. Ensure standoffs are correctly aligned and secured. The case supports CPU coolers up to 180mm in height and GPUs up to 305mm in length.

3. Fan and Cooling System Installation
The case comes with three pre-installed 120mm PWM ARGB fans. Two fans are located at the top, and one at the rear. Additional fan mounts are available at the bottom (up to 2 x 120mm) for enhanced airflow. The case supports a 240mm AIO radiator on the top panel.
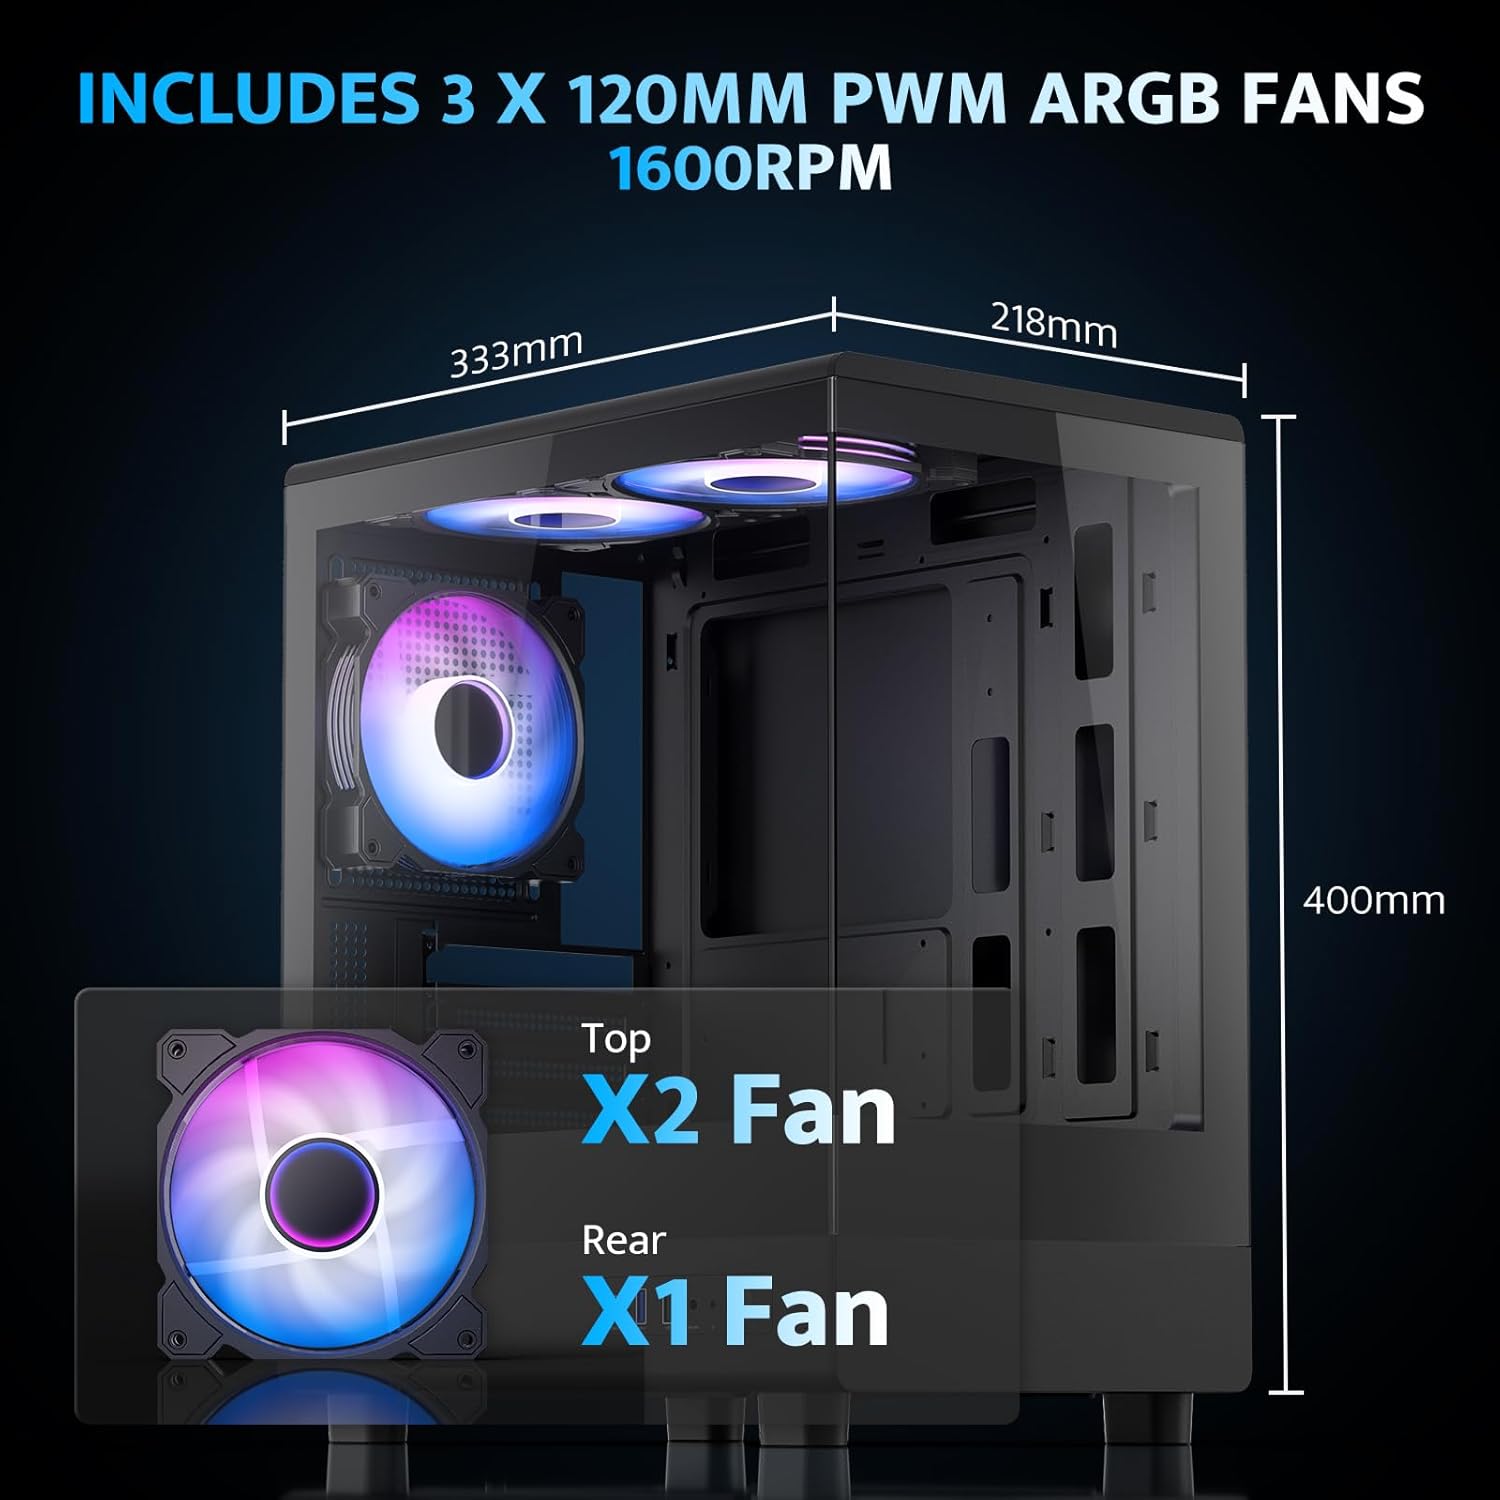
The pre-installed fans are PWM ARGB type, offering speed adjustment and rich lighting modes with motherboard synchronization. Note: An RGB hub controller is not included.

4. Power Supply and Storage Installation
Install your power supply unit (PSU) in the bottom mount. The case supports PSUs up to 140mm in length. Utilize the standard hard drive cage for storage devices.
5. Connecting Front I/O Panel
Connect the front I/O panel cables to your motherboard. The panel includes a Type-C port, USB 3.0 port, and USB 2.0 port for various connectivity needs.

6. Cable Management
Utilize the cable routing options and tie-downs behind the motherboard tray to ensure clean cable management. This improves airflow and aesthetics.
Operating Instructions
1. Powering On
After all components are securely installed and connected, plug in the power cable to your PSU and press the power button on the front I/O panel to start your system.
2. ARGB Fan Control
The pre-installed ARGB fans can be controlled via compatible motherboard software (if connected to an ARGB header) to customize lighting effects and fan speeds. Refer to your motherboard manual for specific software instructions.
3. Airflow Configuration
The DB330M is designed with optimized airflow channels. The pre-installed fans facilitate vertical airflow, with the fan above the PSU directing air towards the graphics card. Ensure no obstructions block the airflow paths.


Maintenance
1. Dust Filter Cleaning
Regularly clean the magnetic dust filters located on the top and bottom of the case. Gently remove the filters and clean them with compressed air or a soft brush. Reattach them securely after cleaning.
2. General Cleaning
Use a soft, dry cloth to wipe down the exterior of the case. For tempered glass panels, use a glass cleaner and a microfiber cloth. Avoid abrasive cleaners or solvents.
Troubleshooting
- PC Not Powering On:
- Ensure the power supply is properly connected to the wall and the PSU switch is in the 'ON' position.
- Verify all power cables from the PSU are securely connected to the motherboard and components.
- Check the front panel power switch connection to the motherboard.
- Fans Not Spinning/RGB Not Working:
- Confirm fan power cables are connected to the motherboard or fan controller.
- Ensure ARGB cables are connected to a compatible ARGB header on the motherboard or an ARGB controller.
- Check motherboard software settings for fan speed and RGB control.
- USB Ports Not Functioning:
- Verify the front panel USB 3.0 and Type-C cables are correctly plugged into the corresponding headers on your motherboard.
- Ensure motherboard drivers are up to date.
Warranty and Support
darkFlash provides a 1-year assurance for this computer case. For technical support, warranty claims, or further assistance, please contact darkFlash customer service through their official website or the retailer where the product was purchased. Please retain your proof of purchase for warranty validation.
Official darkFlash Website: www.darkflash.com