1. Introduction
The FLEXMAN DT2236B is a versatile 5-digit LCD display handheld digital tachometer designed for accurate measurement of rotational speed (RPM) and linear speed. It supports both non-contact (photoelectric) and contact measurement methods, making it suitable for a wide range of applications including conveyor belts, gears, pulleys, motors, and more. This manual provides detailed instructions for the proper setup, operation, and maintenance of your device.

Image 1.1: The FLEXMAN DT2236B Digital Tachometer, showing its ergonomic design and LCD display.
2. Package Contents
Please verify that all items listed below are included in your package:
- 1 x FLEXMAN Digital Tachometer (Model: DT2236B)
- 4 x Measurement Accessories (various contact wheels/probes)
- 1 x User Manual (this document)
- 2 x Reflective Paper strips
- 1 x Black Carrying Bag
3. Product Features
- Dual Measurement Methods: Supports both photoelectric (non-contact) and contact measurement for diverse applications.
- High Accuracy: Provides precise measurements across a wide range of speeds.
- Multiple Probes: Equipped with 4 different rubber wheels/probes for accurate contact measurements on various surfaces.
- Large LCD Screen: Clear 5-digit LCD display for easy and intuitive reading, with a maximum display of 99999.
- Memory Function: Automatically stores maximum, minimum, and last measured values for convenient data recall.
4. Specifications
| Parameter | Value |
|---|---|
| Item Type | Digital Tachometer |
| Model | DT2236B |
| Battery | 4 x 1.5V AA Battery (not included) |
| Screen | 5-digit large LCD display, 18mm word height |
| Non-Contact Speed Range | 2.5 - 99999 RPM |
| Contact Speed Range | 0.5 - 9999 RPM |
| Line Speed (Metric) Range | 0.05 - 9999 meters per minute |
| Non-Contact Resolution | 0.1 RPM (2.5-9999.9 RPM); 1 RPM (above 1000 RPM) |
| Contact Resolution | 0.1 RPM (0.5-999.9 RPM); 1 RPM (above 1000 RPM) |
| Line Speed Resolution | 0.01 m/min (0.05-99.99 m/min); 0.1 m/min (over 100 m/min) |
| Sampling Rate | 0.8 seconds (above 60 RPM) |
| Low Battery Indication | Yes |
| Working Current | 50mA |
| Timing Accuracy | 0-50℃ |
| Maximum Display | 99999 |
| Accuracy | ±(0.05%+1) |
| Photoelectric Effective Distance | 50-500mm |
| LED Effective Distance | 50-250mm |
| Memory Function | Maximum, Minimum, Final Value |
| Size | Approx. 7.5 x 3.5 x 20cm / 3 x 1.4 x 7.9in |
5. Setup
5.1 Battery Installation
- Locate the battery compartment on the back of the tachometer.
- Open the battery compartment cover.
- Insert four (4) 1.5V AA batteries, ensuring correct polarity (+/-).
- Close the battery compartment cover securely.
5.2 Preparing for Photoelectric Measurement
For non-contact (photoelectric) measurements, reflective paper is required.
- Cut a small piece of the provided reflective paper.
- Attach the reflective paper to the rotating object (e.g., fan blade, pulley) whose speed you wish to measure. Ensure it is securely affixed and will not detach during rotation.
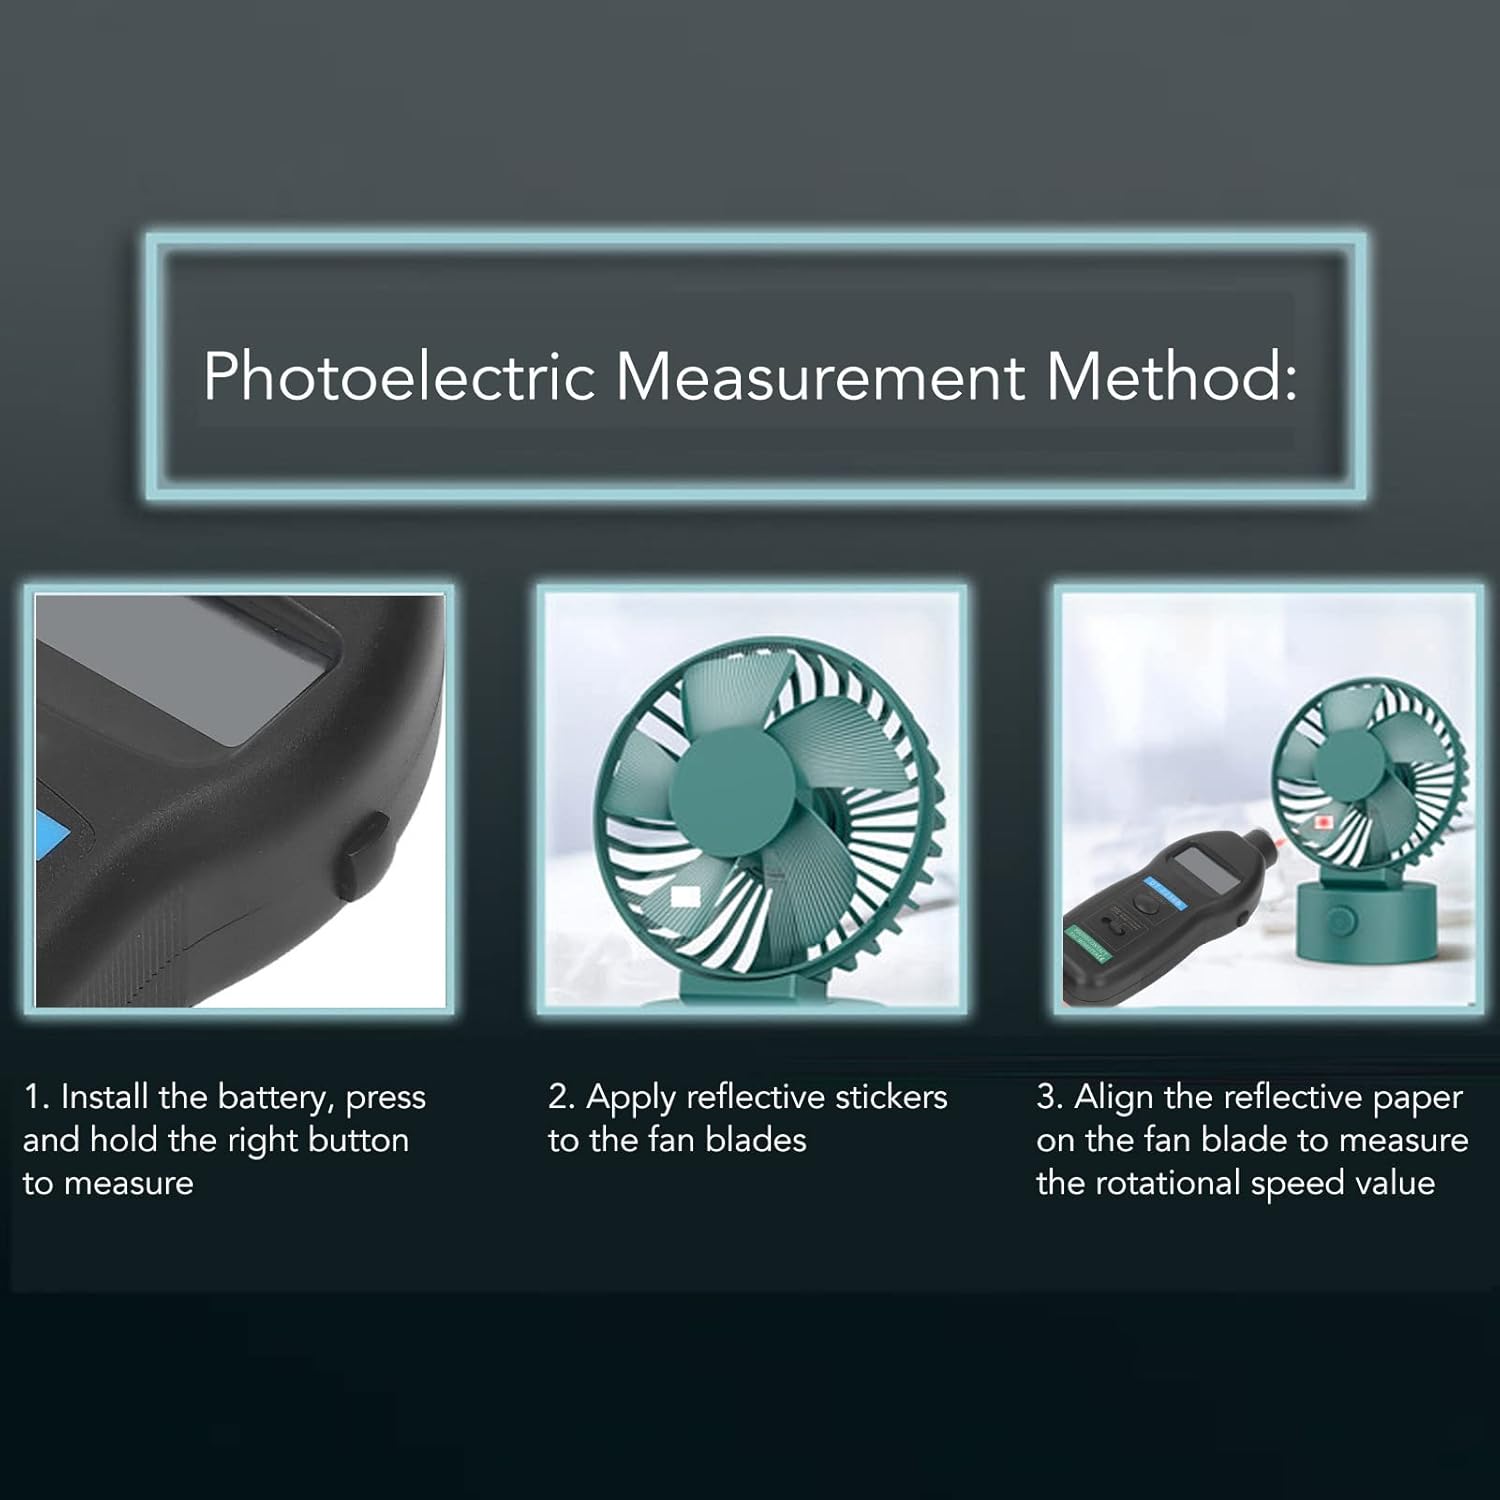
Image 5.1: Visual guide for photoelectric measurement setup, showing battery installation, reflective sticker application, and alignment for measurement.
5.3 Preparing for Contact Measurement
For contact measurements, select and attach the appropriate rubber wheel accessory.
- Identify the contact measurement port at the bottom of the tachometer.
- Select one of the four provided rubber wheels or probes suitable for the surface you intend to measure.
- Securely attach the chosen accessory to the contact measurement port.

Image 5.2: The tachometer with a contact measurement wheel attached, ready for use.
6. Operating Instructions
6.1 General Operation
The tachometer features a mode switch to select between Photo (non-contact) and Contact measurement, and a 'MEMORY' button for data recall.
6.2 Photoelectric (Non-Contact) Measurement
- Ensure reflective paper is applied to the rotating object (refer to Section 5.2).
- Set the mode switch on the tachometer to the 'PHOTO' position.
- Point the photoelectric sensor (located at the top of the tachometer) towards the reflective paper on the rotating object.
- Maintain an effective distance of 50-500mm between the sensor and the reflective paper.
- Press and hold the measurement button (usually the main trigger or side button) to begin measurement. The RPM value will be displayed on the LCD screen.
- Release the button to stop measurement.
6.3 Contact Measurement
- Attach the appropriate rubber wheel accessory to the contact measurement port (refer to Section 5.3).
- Set the mode switch on the tachometer to the 'CONTACT' position.
- Gently press the rotating rubber wheel against the surface of the object whose speed you wish to measure (e.g., shaft, pulley, conveyor belt).
- Press and hold the measurement button to begin measurement. The RPM or linear speed value will be displayed.
- Release the button to stop measurement.
6.4 Memory Function
The DT2236B automatically stores the maximum, minimum, and last measured values. To recall these values:
- After a measurement, or while in standby mode, press the 'MEMORY' button.
- The display will cycle through the stored values: first showing the numerical value, then an English symbol indicating what it represents (e.g., "UP" for maximum, "dn" for minimum, "LA" for last).
- Press the 'MEMORY' button repeatedly to cycle through the stored values.

Image 6.1: Illustration of the memory function displaying maximum, minimum, and last measurement values.
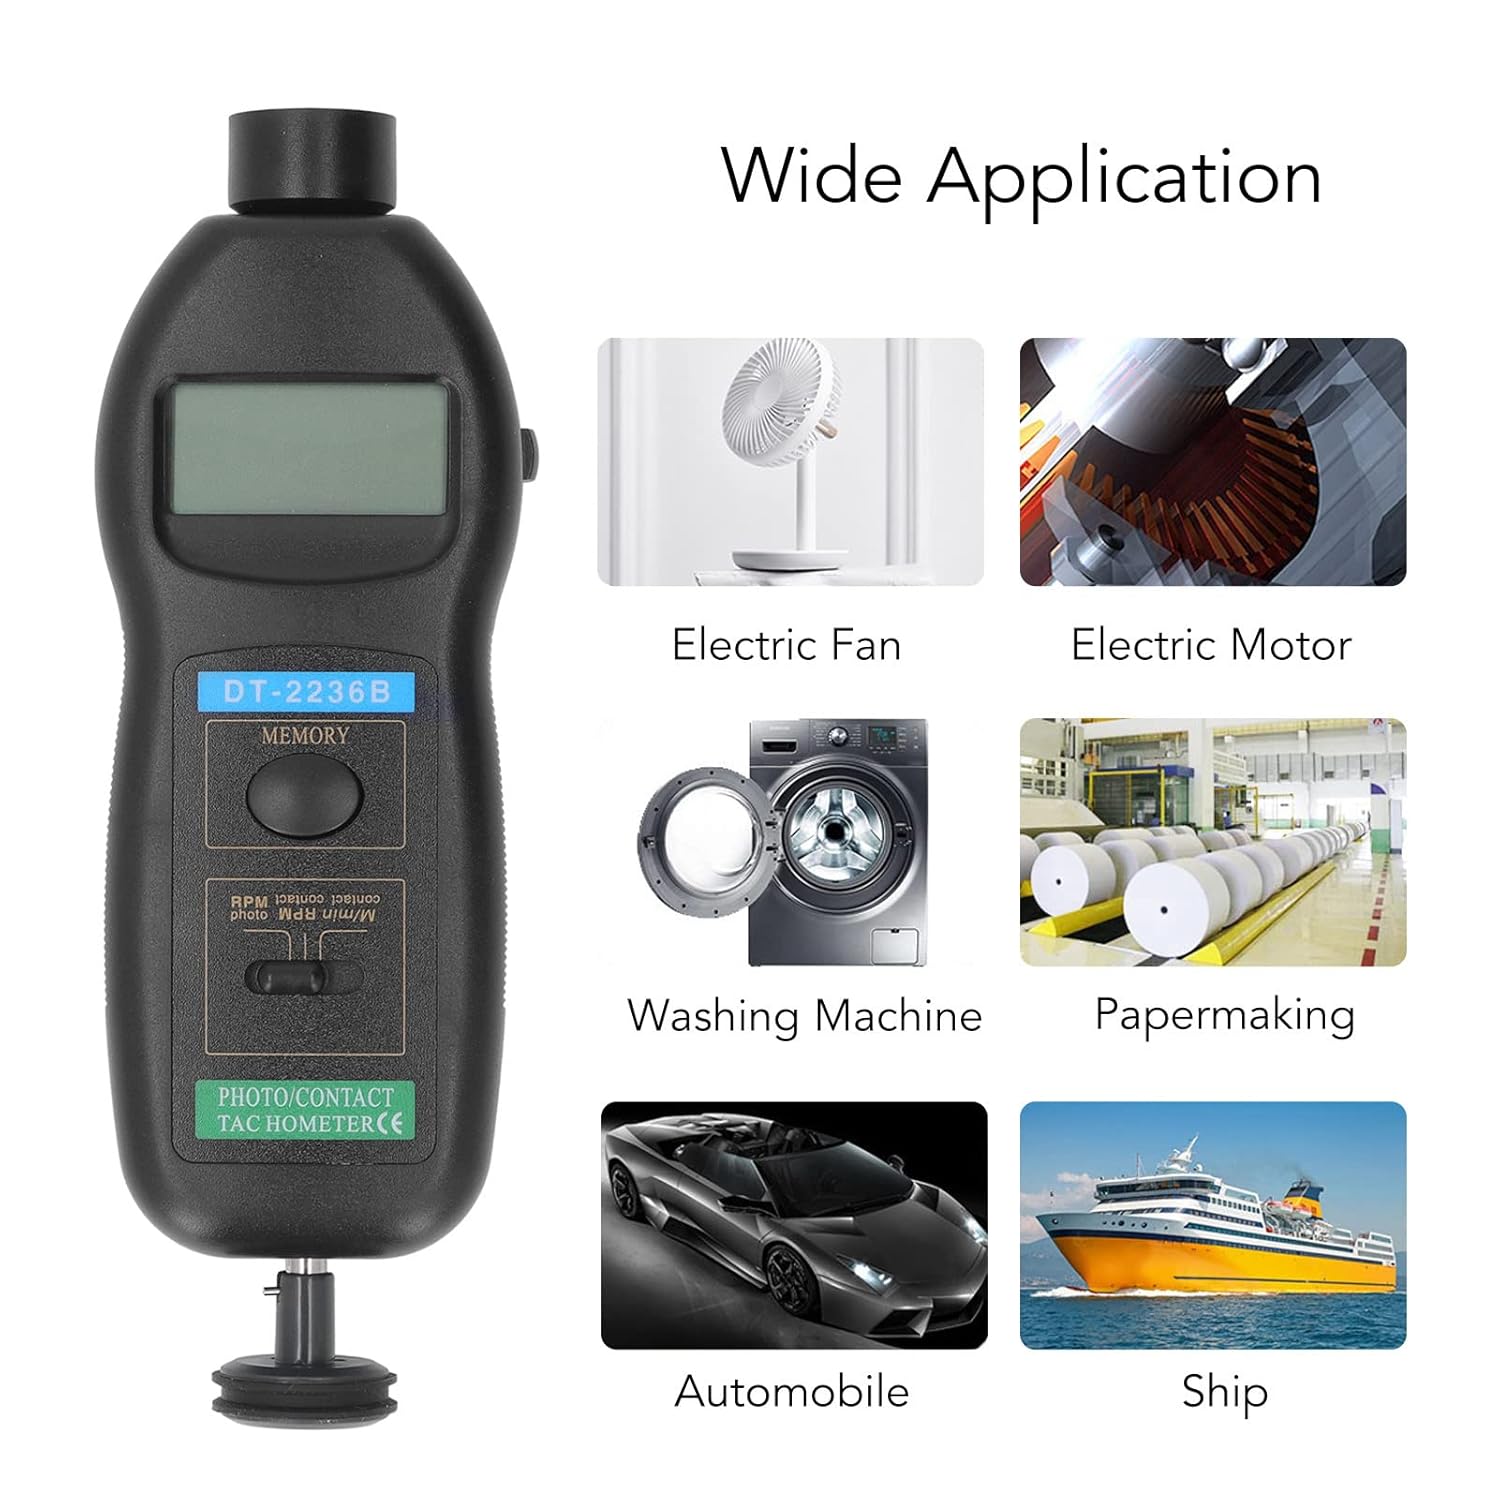
Image 6.2: Examples of wide applications for the tachometer, including electric fans, motors, washing machines, papermaking, automobiles, and ships.
7. Maintenance
7.1 Cleaning
- Wipe the device with a soft, dry cloth.
- Do not use abrasive cleaners or solvents, as they may damage the casing or screen.
- Keep the photoelectric sensor lens clean and free of dust or debris for accurate readings.
7.2 Storage
- When not in use for extended periods, remove the batteries to prevent leakage and damage to the device.
- Store the tachometer in its black carrying bag in a cool, dry place, away from direct sunlight and extreme temperatures.
7.3 Battery Replacement
When the low battery indicator appears on the display, replace all four AA batteries promptly to ensure continued accurate operation.
8. Troubleshooting
| Problem | Possible Cause | Solution |
|---|---|---|
| No display or device does not power on | Dead or incorrectly installed batteries | Check battery polarity; replace with new AA batteries. |
| Inaccurate or unstable readings (Photoelectric) | Insufficient reflective surface; sensor too far/close; ambient light interference; dirty sensor lens | Ensure reflective paper is clean and properly applied; adjust distance (50-500mm); avoid strong light sources; clean sensor lens. |
| Inaccurate or unstable readings (Contact) | Improper contact with surface; worn-out rubber wheel; incorrect mode selection | Ensure firm and stable contact; replace worn rubber wheels; verify mode switch is set to 'CONTACT'. |
| Display shows "Lo" or low battery icon | Low battery power | Replace all four AA batteries. |
9. Warranty and Support
For information regarding product warranty, technical support, or service, please refer to the warranty card included with your purchase or contact the retailer/manufacturer directly. Specific warranty terms and support channels may vary by region and purchase location.