Tangxi Tangxigie8uha6zp
Tangxi MIDI Pad Controller User Manual
Model: Tangxigie8uha6zp
Brand: Tangxi
1. Introduction
The Tangxi MIDI Pad Controller is a versatile and portable device designed for music production and performance. It offers intuitive control over your digital audio workstation (DAW) with its responsive pads, assignable knobs, and seamless connectivity options. This manual provides detailed instructions to help you set up, operate, and maintain your MIDI controller.
2. Key Features
- 16 RGB Velocity-Sensitive Pads: Pads with aftertouch for expressive control.
- 8 Assignable 360-Degree Rotating Encoders: Customizable knobs for fine-tuning parameters.
- Note Repeat Function: For rhythmic effects.
- Full Level Buttons: For consistent velocity output.
- Wide Compatibility: Works with popular DAWs like Ableton Live, FL Studio, Cubase, Logic Pro X, Bitwig, Reason, Studio One, and GarageBand (iOS). Compatible with OS X, Android, and iOS.
- Stable and Low Latency Connectivity: Supports both Bluetooth and wired USB connections.
- Built-in Rechargeable Battery: Provides up to 16 hours of working time for portability.
- Compact and Portable Design: Easy to carry for on-the-go music creation.
- Soft Backlit Silicone Buttons: Designed for quiet operation and comfortable touch.
3. Package Contents
Please check the box for the following items:
- Tangxi MIDI Pad Controller
- User Manual
- USB-C Cable (for charging and wired connection)
4. Product Overview
Familiarize yourself with the layout of your Tangxi MIDI Pad Controller.

Figure 4.1: Top view of the Tangxi MIDI Pad Controller.

Figure 4.2: Labeled diagram of the MIDI Pad Controller's main components.
- USB-C Port and Power Switch: Located on the side for charging and wired connection.
- Assignable Knobs (1-8): Eight 360-degree rotating encoders for parameter control.
- 16 RGB Backlight Pads: Velocity-sensitive pads with aftertouch.
- Control Buttons: Including BT (Bluetooth), PAD BANK, KNOB BANK, navigation arrows, Play/Pause, Stop, Shift, and Note Repeat.
5. Setup
5.1 Charging the Device
The controller has a built-in rechargeable battery. To charge, connect the included USB-C cable to the USB-C port on the device and the other end to a power source (e.g., computer USB port, USB wall adapter).

Figure 5.1: USB-C port for charging and wired connection.
The device will automatically charge when connected via USB. A full charge provides approximately 16 hours of working time.
5.2 Connecting to Your Device
The Tangxi MIDI Pad Controller supports both wired and wireless connections.
5.2.1 Wired Connection (USB)
Connect the USB-C cable from the controller to a USB port on your computer (OS X) or compatible Android/iOS device (with appropriate adapter, not included). The device is plug-and-play and does not require driver installation. It will be automatically recognized by your operating system and DAW.
5.2.2 Wireless Connection (Bluetooth)
To connect via Bluetooth:
- Turn on the MIDI Pad Controller.
- Press the BT button on the controller to activate Bluetooth pairing mode. The BT indicator light will blink.
- On your computer (OS X), Android, or iOS device, go to Bluetooth settings and search for available devices.
- Select "Tangxi MIDI Controller" (or similar name) from the list to pair.
- Once connected, the BT indicator light on the controller will become solid.

Figure 5.2: The BT button for wireless connection.
5.3 Software Compatibility
The controller is designed for seamless integration with various Digital Audio Workstations (DAWs) and music software. It is compatible with:
- Ableton Live
- FL Studio
- Cubase
- Logic Pro X
- Bitwig
- Reason
- Studio One
- GarageBand (for iOS)
- And more.
Ensure your DAW's MIDI settings are configured to recognize the Tangxi MIDI Pad Controller as an input device.
6. Operating the Controller
6.1 16 RGB Backlight Pads
The 16 RGB pads are velocity-sensitive, meaning they respond to how hard you strike them, allowing for dynamic and expressive performances. They also feature aftertouch, providing additional control by pressing down on the pad after the initial strike.

Figure 6.1: The 16 RGB backlight pads.
Video 6.1: Demonstration of the MIDI Pad Controller in use, showcasing pad responsiveness and RGB lighting.
Use the PAD BANK button to switch between different pad banks, expanding the number of assignable sounds or functions.
6.2 8 Assignable Knobs
The 8 assignable 360-degree rotating encoders can be customized to control various parameters within your DAW, such as volume, pan, effects sends, or filter cutoff. Each knob set has an indicator light for visual feedback.

Figure 6.2: The 8 assignable stepless knobs.

Figure 6.3: Adjusting the assignable knobs for fine-tuning parameters.
Different message sending types (e.g., AfterTouch, MIDI CC) can be adjusted through software settings. Use the KNOB BANK button to switch between different knob banks.
6.3 Control Buttons
The controller features several dedicated control buttons for enhanced workflow:
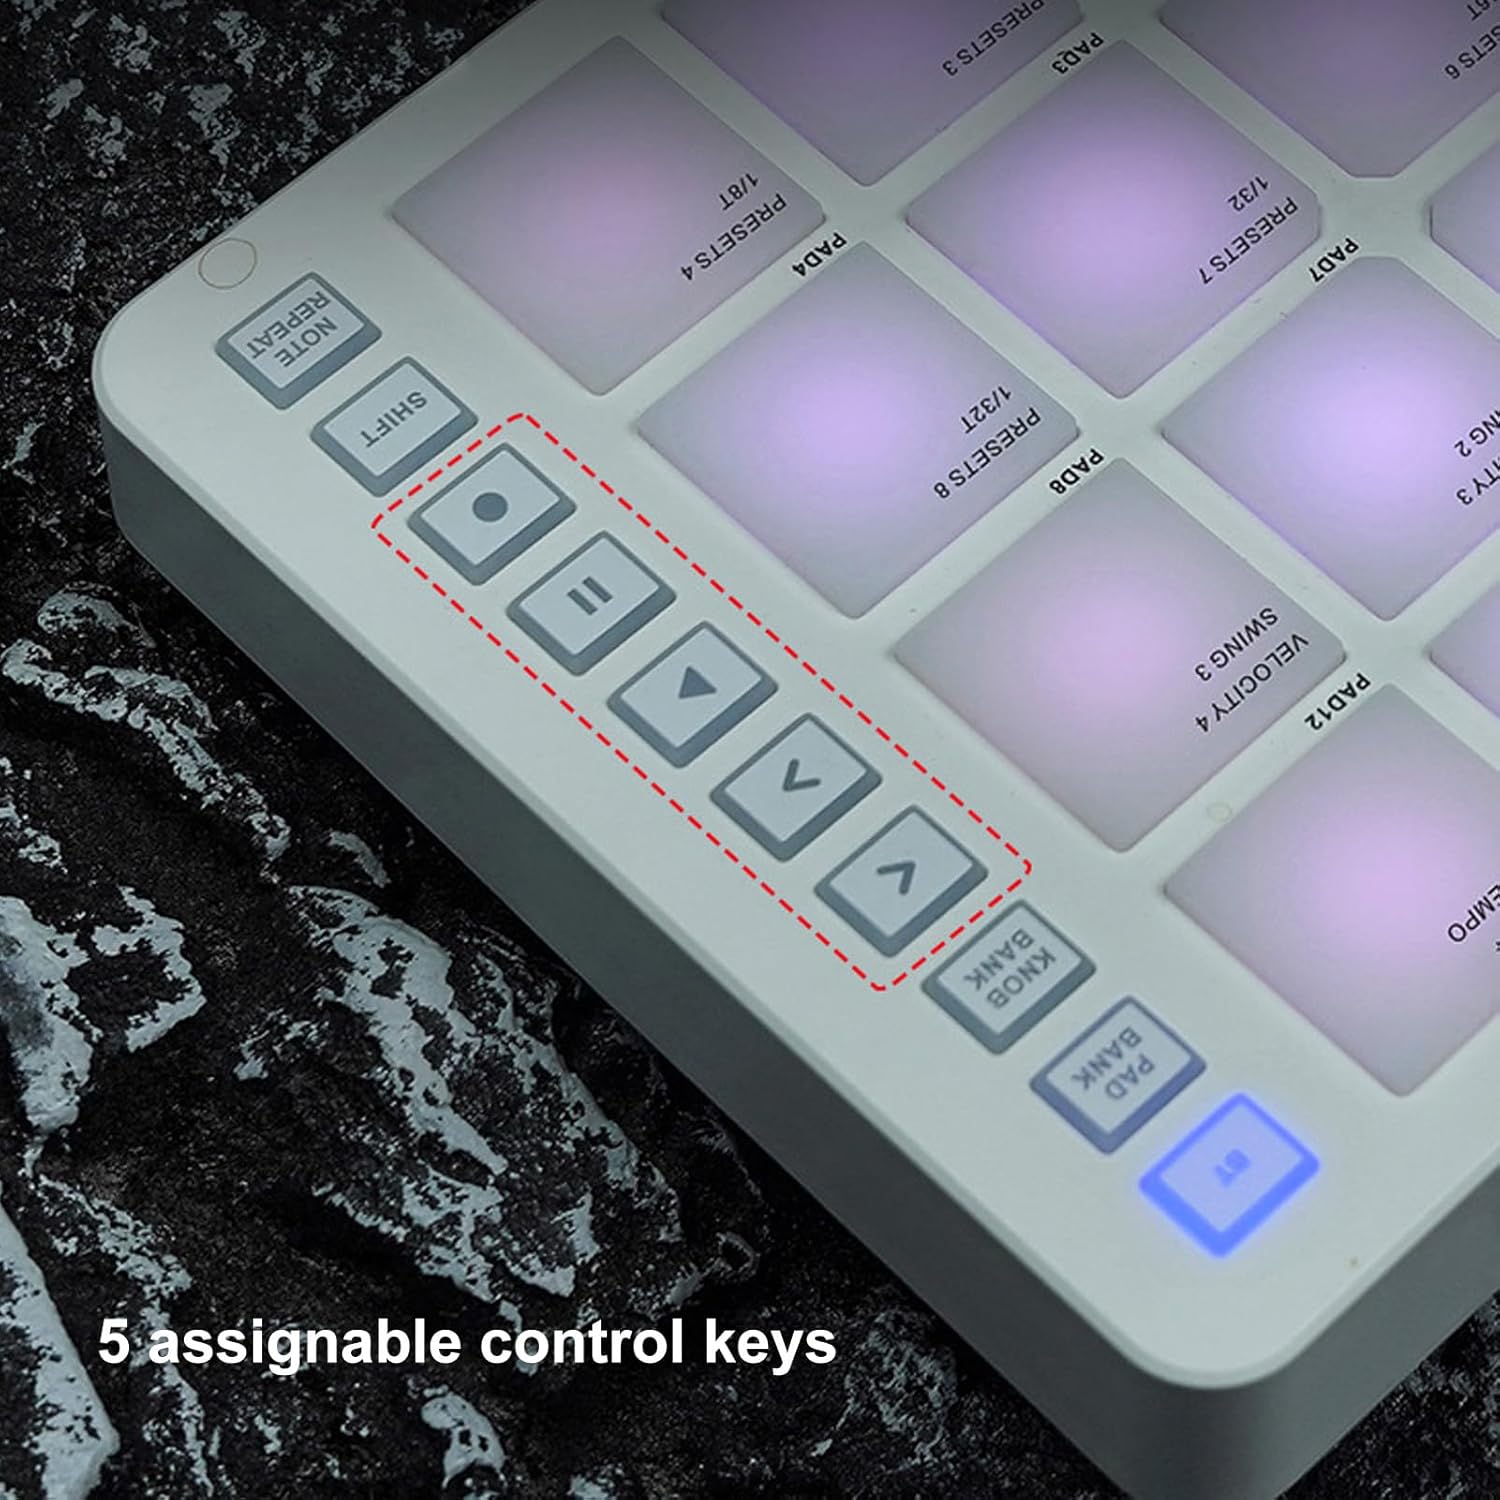
Figure 6.4: The 5 assignable control keys.
- Play/Pause and Stop: Standard transport controls for your DAW.
- Navigation Arrows (<, >, ^, v): Used for navigating menus or selecting parameters within your software.
- Shift: Activates secondary functions for pads and knobs. Hold down the Shift button while pressing another button or turning a knob to access its alternate function.
- Note Repeat: When activated, holding down a pad will repeatedly trigger the note at a set tempo. Hold down the Note Repeat function key while turning knobs 1-4 to adjust the Note Repeat function parameters (e.g., rate).
- Full Level: Ensures that all pad strikes send a maximum velocity value (127), regardless of how hard you hit them.
7. Maintenance
To ensure the longevity and optimal performance of your Tangxi MIDI Pad Controller, follow these maintenance guidelines:
- Cleaning: Use a soft, dry cloth to wipe down the surface of the controller. For stubborn dirt, slightly dampen the cloth with water. Avoid using harsh chemicals, solvents, or abrasive cleaners, as these can damage the finish and components.
- Storage: Store the controller in a cool, dry place away from direct sunlight, extreme temperatures, and high humidity.
- Handling: Avoid dropping the device or subjecting it to strong impacts. Do not place heavy objects on top of the controller.
- Liquid Exposure: Keep the controller away from liquids. If liquid spills on the device, immediately power it off and disconnect it from any power source. Allow it to dry completely before attempting to use it again. If issues persist, contact customer support.
8. Troubleshooting
If you encounter issues with your Tangxi MIDI Pad Controller, refer to the following common troubleshooting steps:
| Problem | Possible Cause | Solution |
|---|---|---|
| Device does not power on. | Low battery or power switch off. | Ensure the power switch is in the ON position. Connect the USB-C cable to charge the device. |
| No sound or MIDI input in DAW. | Incorrect MIDI settings, wrong input selected, or connection issue. |
|
| Pads or knobs are not responding. | Software mapping issue, incorrect bank selected, or hardware malfunction. |
|
| Bluetooth connection is unstable. | Interference, distance, or low battery. |
|
If the problem persists after trying these steps, please contact Tangxi customer support for further assistance.
9. Specifications
| Feature | Detail |
|---|---|
| Model Name | Tangxigie8uha6zp |
| Brand | Tangxi |
| Number of Pads | 16 (RGB, Velocity Sensitive, Aftertouch) |
| Number of Knobs | 8 (Assignable, 360-degree rotating) |
| Connectivity Technology | Bluetooth, USB |
| Hardware Interface | USB |
| Compatible Devices | Tablet, Smartphone, PC/Mac |
| Supported Software | Ableton Live, FL Studio, Cubase, Logic Pro X, Bitwig, Reason, Studio One, GarageBand (iOS) |
| Material Type | Silicon, Acrylonitrile Butadiene Styrene (ABS) |
| Item Weight | 1.56 pounds (approx. 0.71 kg) |
| Product Dimensions | 5.8 x 8.9 x 1.5 inches (approx. 14.7 x 22.6 x 3.8 cm) |
| Battery Life | Up to 16 hours (rechargeable) |
| Country of Origin | China |
10. Warranty and Support
For warranty information or technical support, please refer to the documentation included with your purchase or visit the official Tangxi website. You can also contact Tangxi customer service through the platform where you purchased the product.
Tangxi Store Link: Visit the Tangxi Store on Amazon
Ask a question about this manual
Ask about setup, troubleshooting, compatibility, parts, safety, or missing instructions. Manuals+ will review the question and use this page’s manual context to help answer it.