KJDEYT W6pro DMR UHF
ANYSECU W6Pro Android 10 4G Network Radio User Manual
Model: W6pro DMR UHF | Brand: KJDEYT
1. Introduction
This manual provides comprehensive instructions for the operation, maintenance, and troubleshooting of your ANYSECU W6Pro Android 10 4G Network Radio. Please read this manual thoroughly before using the device to ensure proper functionality and safety.

Figure 1: Front view of the ANYSECU W6Pro device, showing its display with various application icons and the physical keypad below.
2. Package Contents
Upon unboxing, please verify that all items listed below are present and in good condition:
- ANYSECU W6Pro Radio Unit
- Rechargeable Battery (4200mAh)
- Charging Head
- Data Cable (USB)
- Lanyard
- Antenna
- User Manual (this document)
- Optional: Desktop Charger
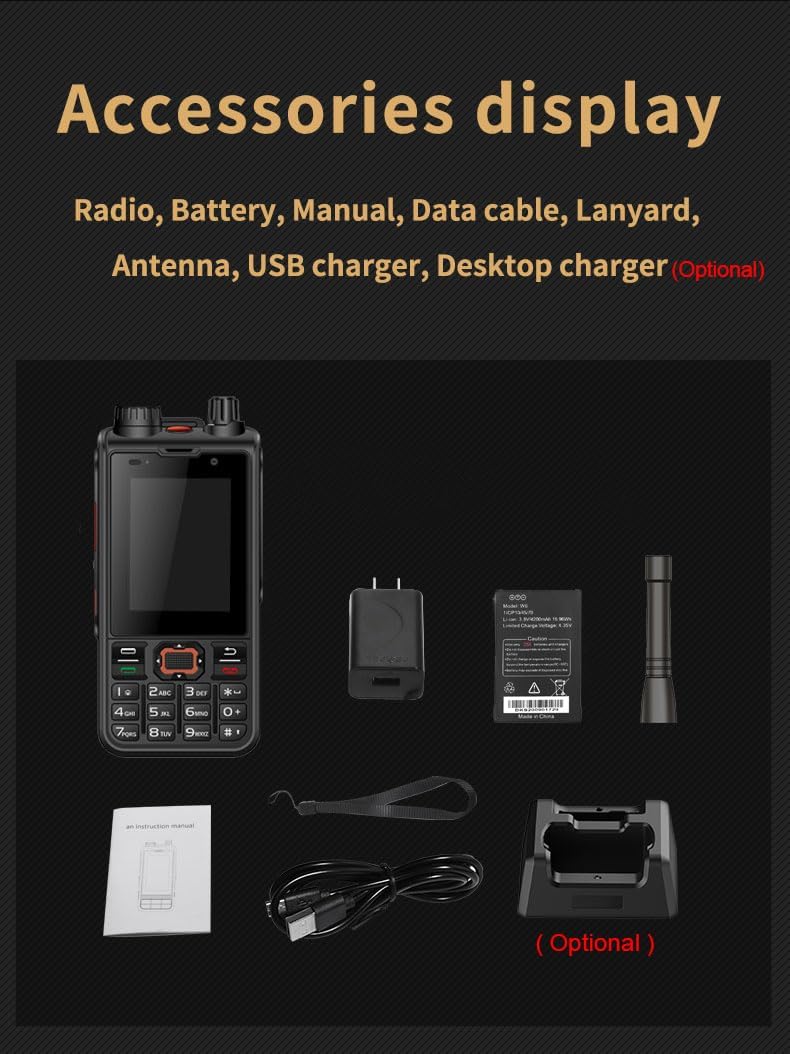
Figure 2: Display of the included accessories: the radio unit, battery, charging head, data cable, lanyard, antenna, and an optional desktop charger.
3. Device Overview
Familiarize yourself with the physical components and controls of the W6Pro radio.

Figure 3: Detailed diagram illustrating the various buttons, ports, and features of the W6Pro radio, including the antenna, SOS button, PTT keys, volume control, cameras, and USB port.
3.1. Key Components
- Antenna: For radio signal transmission and reception.
- Light Sensing + Distance Sensor: Located near the front camera.
- Indicator Light: Provides status indications.
- Frequency Modulation Knob: For adjusting radio frequency.
- Rear Camera: For taking photos and videos.
- Flash: For illumination.
- Red and Blue Flashing Light: For signaling or alerts.
- Turn ON/OFF Button: Power control.
- UHF PTT Key: Push-to-Talk button for UHF analog intercom.
- POC PTT Key: Push-to-Talk button for Public Network Intercom (Zello, Real-PTT).
- Volume Control: Adjusts audio output level.
- SOS Button: Long press to record and activate emergency function.
- Front Camera: For video calls and photos.
- M6 Interface: For external accessories.
- USB Port: For charging and data transfer. Note: Use the original cable due to its waterproof design.
- Keypad: Numeric and function keys for navigation and input.
4. Setup and Initial Use
4.1. Battery Installation and Charging
- Ensure the device is powered off.
- Locate the battery compartment cover on the rear of the device.
- Open the cover and insert the 4200mAh battery, aligning the contacts correctly.
- Close the battery compartment cover securely.
- Connect the original data cable to the USB port on the device and the charging head. Plug the charging head into a power outlet.
- The indicator light will show charging status. A full charge typically takes less than 150 minutes.
4.2. SIM Card and SD Card Installation (Optional)
The device supports 4G network communication. If desired, install a SIM card for cellular connectivity and an SD card for expanded storage.
- With the battery removed, locate the SIM card slot(s) and microSD card slot.
- Insert the SIM card(s) and microSD card into their respective slots, ensuring correct orientation.
- Reinstall the battery and battery cover.
4.3. Powering On/Off
- To Power On: Press and hold the Power ON/OFF button until the screen illuminates.
- To Power Off: Press and hold the Power ON/OFF button, then select "Power Off" from the on-screen options.
5. Operating Instructions
5.1. Network Connectivity
- Wi-Fi: Navigate to Settings > Network & Internet > Wi-Fi to connect to available Wi-Fi networks (supports 2.4G/5G).
- Mobile Data: Ensure a SIM card is installed and mobile data is enabled in Settings > Network & Internet > Mobile network. Supports GSM, WCDMA, FDD, and TDD bands.
- Bluetooth: Enable Bluetooth in Settings > Connected devices > Bluetooth to pair with other Bluetooth 4.2 compatible devices.
5.2. Intercom Functions
The W6Pro supports both Public Network Intercom (POC) and Analog UHF Intercom.
- Public Network Intercom (POC): Utilizes applications like Zello or Real-PTT over 4G/Wi-Fi. Press the POC PTT Key to transmit.
- Analog UHF Intercom: Operates on UHF frequencies (400-470MHz). Press the UHF PTT Key to transmit. Adjust frequency using the Frequency Modulation Knob if applicable.
5.3. SOS Function
In an emergency, long-press the SOS Button to activate the emergency function, which may include sending alerts or initiating calls to pre-set contacts.
5.4. Camera and Flashlight
- Access the camera application from the home screen to take photos or record videos using the front or rear camera.
- The Flash Key can be used to activate the flashlight function.
6. Maintenance and Care
- Cleaning: Use a soft, dry cloth to clean the device. Avoid using harsh chemicals or abrasive materials.
- Water Resistance: The device is IP68 waterproof. Ensure all port covers are securely closed before exposure to water. Do not submerge the device beyond specified limits.
- Charging: Always use the original charging cable and adapter to prevent damage and ensure proper waterproof sealing.
- Storage: Store the device in a cool, dry place away from direct sunlight and extreme temperatures.
- Battery Care: To prolong battery life, avoid fully discharging the battery frequently. Charge the device regularly.
7. Troubleshooting
| Problem | Possible Cause | Solution |
|---|---|---|
| Device does not power on. | Battery is depleted or not installed correctly. | Charge the battery. Ensure the battery is properly installed. |
| Cannot connect to Wi-Fi. | Wi-Fi is off, incorrect password, or out of range. | Enable Wi-Fi in settings. Verify password. Move closer to the Wi-Fi router. |
| No network signal (4G). | SIM card not installed, mobile data off, or out of network coverage. | Ensure SIM card is installed. Enable mobile data. Move to an area with network coverage. |
| Intercom not working. | Incorrect frequency/channel, application issue (POC), or low battery. | Verify frequency/channel settings. Restart POC application. Charge the device. |
| Charging issue. | Non-original cable/charger, damaged port, or faulty battery. | Use original charging accessories. Check USB port for damage. Contact support if issue persists. |
8. Product Specifications
| Feature | Detail |
|---|---|
| Model Name | W6pro DMR UHF |
| Operating System | Android 10 |
| Dimensions (L×W×H) | 125.5mm × 61.6mm × 25.3mm |
| Weight (Device) | 182g |
| Weight (Battery) | 67.5g |
| Memory | RAM: 1GB, ROM: 8GB |
| Battery Capacity | 4200mAh |
| Charging Time | < 150 minutes |
| Endurance (Standby) | > 48 hours (with GPS on) |
| Endurance (VOLTE Call) | > 14 hours |
| Network Bands | GSM: B2/3/5/8; WCDMA: B1/5/8; FDD: B1/3/4/5/7/8/20/28A/28B; TDD: B38/B40/B41 (120M) |
| GPS | GPS/Beidou/GLONASS |
| Wi-Fi | 2.4G/5G |
| Bluetooth | BT4.2 |
| Intercom Type | POC Public Network Intercom + Analog UHF Intercom (400-470MHz) |
| Microphone | Dual MIC |
| Speaker | 3W |
| Water Resistance | IP68 |
9. Warranty Information
The ANYSECU W6Pro device comes with a 1-Year Warranty from the date of purchase. This warranty covers manufacturing defects and malfunctions under normal use. It does not cover damage caused by misuse, accidents, unauthorized modifications, or natural disasters.
Please retain your proof of purchase for warranty claims.
10. Customer Support
For technical assistance, troubleshooting beyond this manual, or warranty inquiries, please contact KJDEYT customer support. Refer to the contact information provided with your purchase or visit the official KJDEYT website for support resources.
When contacting support, please have your product model (W6pro DMR UHF) and purchase details ready.
Ask a question about this manual
Ask about setup, troubleshooting, compatibility, parts, safety, or missing instructions. Manuals+ will review the question and use this page’s manual context to help answer it.