Sinolyn PRO D2
Sinolyn 3.0 Bi Xenon Projector Lenses PRO D2 Instruction Manual
Model: PRO D2 | Manufacturer Part Number: EX7-32855045303-001
1. Introduction
This manual provides comprehensive instructions for the installation, operation, and maintenance of your Sinolyn 3.0 Bi Xenon Projector Lenses, Model PRO D2. These lenses are designed for car headlight retrofits, compatible with D1S, D2S, D3S, and D4S Xenon light models, and also suitable for LED applications. Please read this manual carefully before proceeding with installation or use to ensure proper function and safety.

Figure 1: Sinolyn 3.0 Bi Xenon Projector Lenses (Front and Rear View)
This image displays two Sinolyn 3.0 Bi Xenon Projector Lenses. The lens on the left shows the clear glass projector lens and the reflective bowl, while the lens on the right shows the rear mounting plate and the solenoid mechanism for the bi-xenon function. These components are crucial for directing and shaping the light beam.
2. Product Specifications
The following table details the technical specifications of the Sinolyn 3.0 Bi Xenon Projector Lenses:
| Feature | Specification |
|---|---|
| Model Name | PRO D2 |
| Item Type | Lens |
| Origin | Mainland China |
| Usage | Car Headlamp Retrofit |
| Beam Pattern | LHD (Left-Hand Drive) |
| Wattage | 35W (Nominal) |
| Xenon Light Model Compatibility | D1S, D2S, D3S, D4S |
| Bulb Type Compatibility | LED, Xenon |
| Special Features | Waterproof |
| Certification | CE |
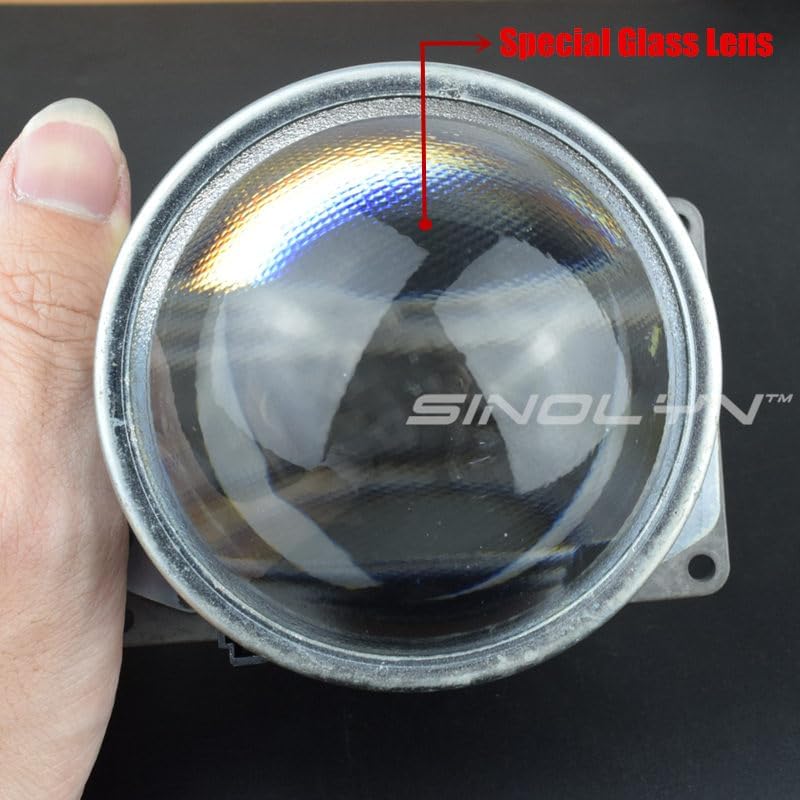
Figure 2: Special Glass Lens Detail
This image provides a close-up view of the projector lens, emphasizing its special glass construction. The quality of the lens material is critical for optimal light transmission and beam pattern formation, ensuring clear and focused illumination.
3. Setup and Installation
Installation of the Sinolyn 3.0 Bi Xenon Projector Lenses requires careful attention and may involve opening your vehicle's headlight assembly. Professional installation is recommended.
3.1 Pre-Installation Checklist
- Ensure your vehicle's battery is disconnected.
- Gather necessary tools (e.g., screwdrivers, heat gun/oven for headlight opening, sealant).
- Verify compatibility with your existing headlight housing and bulb type (D1S/D2S/D3S/D4S).
3.2 Installation Steps (General Guide)
- Remove Headlight Assembly: Carefully remove the headlight assembly from your vehicle.
- Open Headlight Housing: Heat the headlight housing to soften the sealant and carefully pry open the lens from the housing.
- Remove Old Projector (if applicable): Disconnect and remove any existing projector or reflector bowl.
- Mount New Projector: Secure the Sinolyn 3.0 Bi Xenon Projector Lens into the headlight housing. Ensure it is properly aligned and seated. The lens features a round shape base for mounting.
- Connect Wiring: Connect the solenoid wire for the bi-xenon high beam function to your vehicle's high beam circuit.
- Install Bulb: Insert your D1S/D2S/D3S/D4S Xenon or compatible LED bulb into the projector lens.
- Seal Headlight: Re-seal the headlight housing using appropriate sealant to prevent moisture ingress.
- Reinstall Headlight: Mount the reassembled headlight back into your vehicle.
- Test Functionality: Reconnect the battery and test all lighting functions (low beam, high beam).

Figure 3: Rear View with Cut-off Line and Base
This image shows the rear of the projector lens, highlighting the "European Cut off Line" mechanism, which is responsible for shaping the low beam pattern to prevent glare for oncoming traffic. It also indicates the "Round Shape Base," which is the primary mounting point for securing the projector within the headlight housing.
4. Operation
The Sinolyn 3.0 Bi Xenon Projector Lenses provide both low beam and high beam functionality from a single projector, controlled by an internal solenoid.
4.1 Low Beam Function
When the low beam is activated, the internal shield within the projector lens is positioned to create a sharp, horizontal cut-off line. This ensures that the light is directed onto the road without blinding other drivers. The beam pattern is designed for Left-Hand Drive (LHD) vehicles, meaning the cut-off line will have a step-up towards the right side of the road.
4.2 High Beam Function
Upon activation of the high beam, the solenoid retracts the internal shield, allowing the full light output from the bulb to project forward. This provides maximum illumination for driving in conditions requiring extended visibility.

Figure 4: Low Beam vs. High Beam Pattern
This image illustrates the distinct difference between the low beam and high beam patterns produced by the projector lenses. The top section shows the low beam with its sharp, horizontal cut-off, designed to illuminate the road without causing glare. The bottom section shows the high beam, where the internal shield is retracted to provide a broader and more intense light output for maximum visibility.
5. Maintenance
The Sinolyn 3.0 Bi Xenon Projector Lenses are designed for durability and minimal maintenance. However, periodic checks can help ensure optimal performance.
- Headlight Housing Seal: Regularly inspect the headlight housing for any signs of moisture or condensation, which could indicate a compromised seal. Re-seal if necessary.
- Lens Cleaning: Keep the outer headlight lens clean from dirt and debris to ensure maximum light output. Avoid abrasive cleaners.
- Bulb Replacement: If using Xenon bulbs, replace them in pairs to maintain consistent light color and intensity. Follow the bulb manufacturer's instructions for replacement.
- Wiring Inspection: Periodically check all wiring connections for corrosion or damage.
6. Troubleshooting
This section addresses common issues you might encounter with your projector lenses.
| Problem | Possible Cause | Solution |
|---|---|---|
| No light output | Faulty bulb, loose wiring, ballast failure (for Xenon), fuse blown. | Check bulb, inspect wiring connections, test ballast, check vehicle fuses. |
| High beam not working | Solenoid wiring issue, faulty solenoid, incorrect connection to high beam circuit. | Verify solenoid wiring, ensure proper connection to high beam signal. |
| Poor beam pattern / uneven light | Improper projector alignment, dirty lens, incorrect bulb seating. | Re-align projector, clean outer lens, ensure bulb is seated correctly. |
| Moisture inside headlight | Headlight housing not properly sealed after retrofit. | Re-open headlight, dry thoroughly, and re-seal with high-quality sealant. |
7. Warranty Information
This product comes with a 12-month warranty from the date of purchase. This warranty covers manufacturing defects and material faults under normal use. It does not cover damage resulting from improper installation, misuse, accidents, or unauthorized modifications.
Please retain your proof of purchase for any warranty claims.
8. Customer Support
Should you encounter any issues or have questions regarding your Sinolyn 3.0 Bi Xenon Projector Lenses, please do not hesitate to contact our customer support team. We are committed to providing assistance and will respond to your inquiries within 24 hours.
For support, please refer to the contact information provided by your retailer or the official Sinolyn website.