1. Product Overview
The JOMISE C810 is a mirror dash camera system designed to provide front and rear video recording, integrated with wireless CarPlay and Android Auto functionalities. It features a 2.5K front camera and a 1080P rear camera, enhanced night vision, and various smart features for a comprehensive driving experience.

Image 1.1: JOMISE C810 Mirror Dash Cam and included accessories.
2. Package Contents
Verify that all items are present in the package:
- JOMISE C810 Mirror Dash Cam Unit
- Rear Camera
- Car Charger (Power Cable)
- GPS Module
- 64GB Storage Card
- Mounting Straps/Clips
- User Manual
3. Setup and Installation
The JOMISE C810 is designed for a straightforward installation process. It is recommended to perform a test run of the system before final cable routing.
3.1 Mounting the Mirror Dash Cam
- Attach the mirror dash cam to your vehicle's existing rearview mirror using the provided heavy-duty clips. Ensure it is securely fastened and does not obstruct your view.
- Adjust the angle of the front camera lens to capture the desired field of view.
3.2 Installing the Rear Camera
- Determine a suitable mounting location for the rear camera, typically above the license plate or inside the rear window.
- Secure the rear camera using the provided adhesive or screws.
- Route the rear camera cable to the main mirror dash cam unit. Ensure the cable is tucked away safely to avoid interference with vehicle operations.
3.3 Power Connection
- Connect the provided car charger to the Type-C power port on the mirror dash cam unit.
- Plug the car charger into your vehicle's 12V power outlet (cigarette lighter socket).
- Route the power cable neatly to avoid obstructing controls or passenger movement.
3.4 GPS Module Connection
Connect the GPS module to the designated port on the main unit. Position the GPS module in an area with a clear view of the sky for optimal signal reception, such as on the dashboard.
3.5 Storage Card Insertion
Insert the included 64GB storage card into the designated slot on the dash cam unit. Ensure it is inserted correctly until it clicks into place.
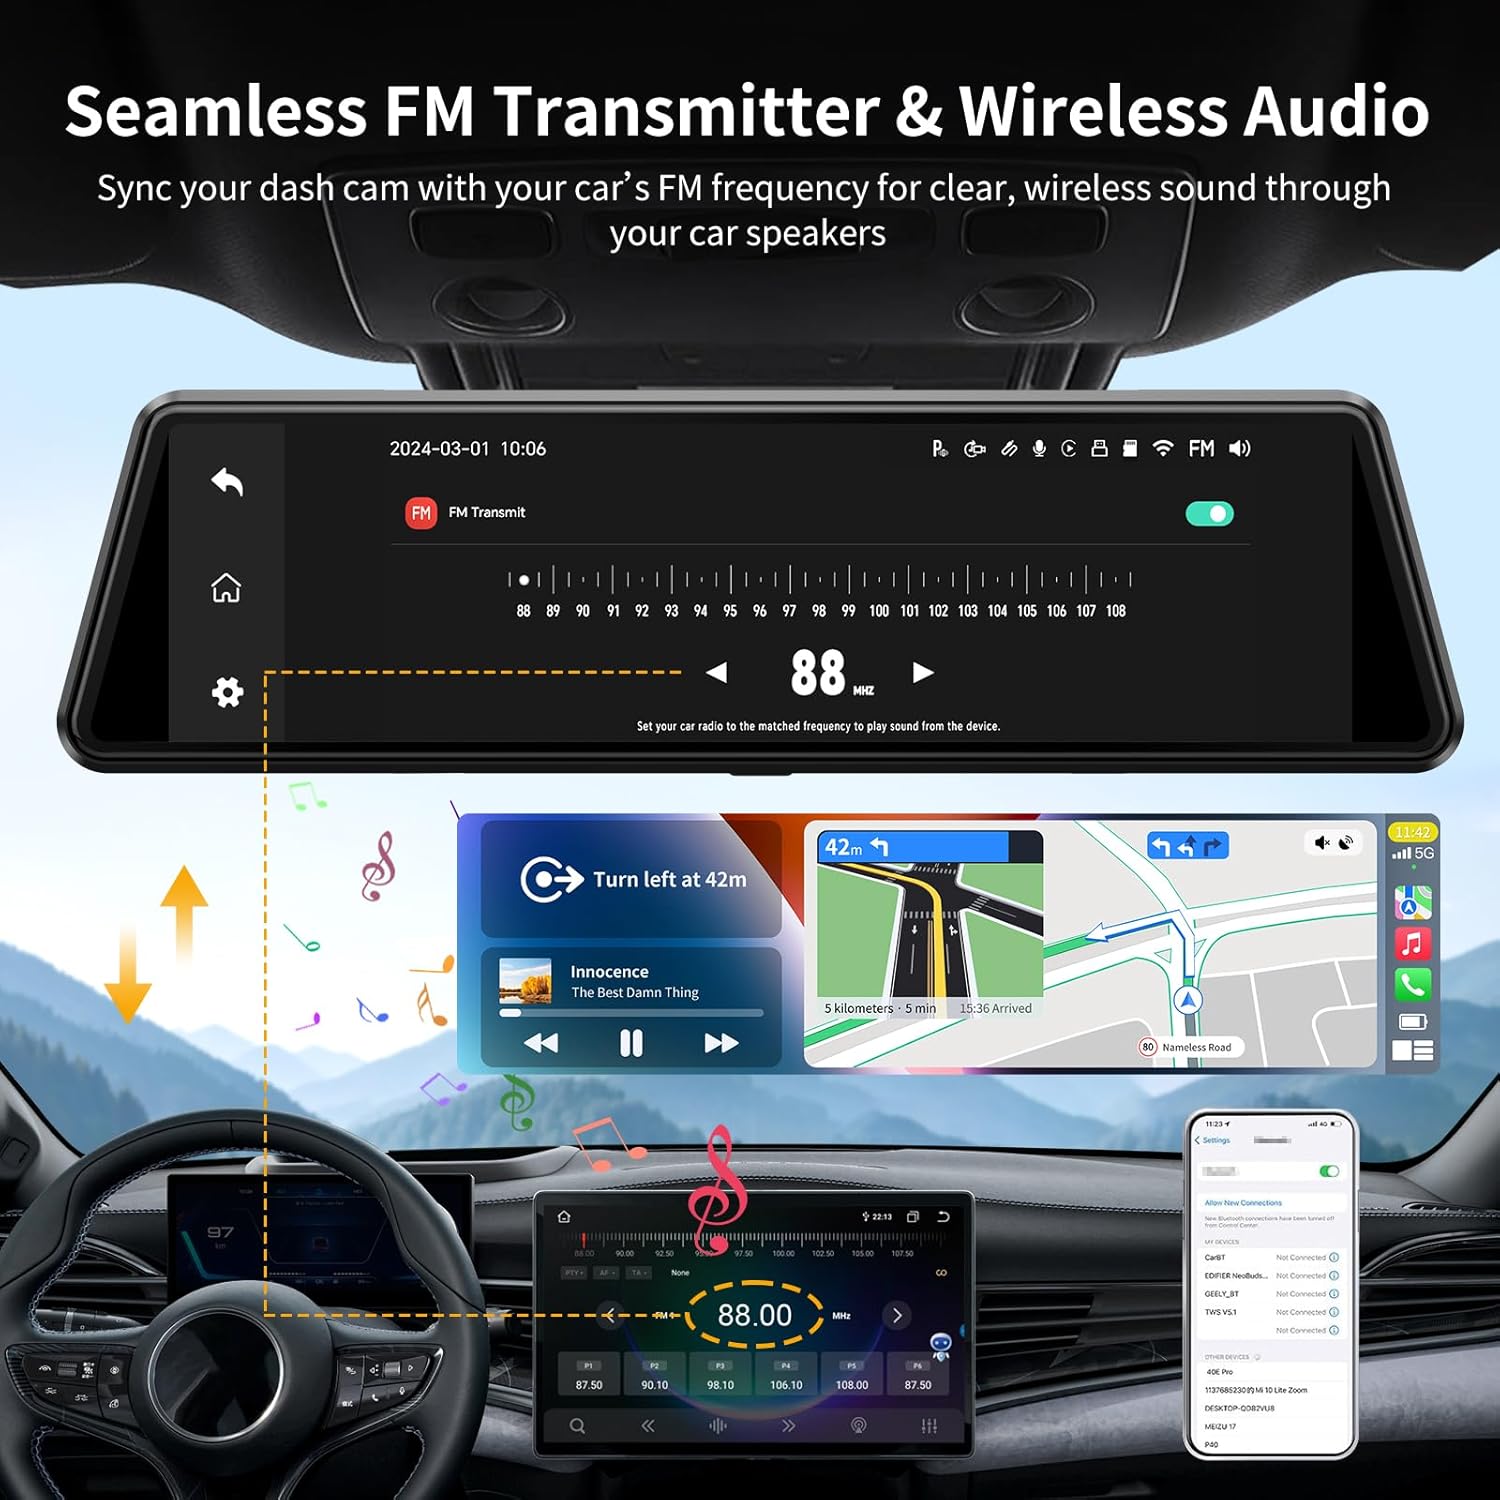
Image 3.1: General installation diagram for the mirror dash cam and its components.
4. Operating Instructions
4.1 Powering On/Off
The device will automatically power on when the vehicle's ignition is turned on and power off when the ignition is turned off.
4.2 Basic Recording
Upon powering on, the dash cam will automatically begin recording video from both the front (2.5K) and rear (1080P) cameras. Recordings are saved to the inserted storage card.

Image 4.1: Display showing simultaneous front (2.5K) and rear (1080P) camera views.
4.3 Night Vision
The camera system incorporates HDR technology for enhanced night vision, improving clarity and detail in low-light conditions.

Image 4.2: Example of enhanced night vision performance.
4.4 Wireless CarPlay and Android Auto
The device supports wireless CarPlay and Android Auto connectivity via 5.8GHz WiFi. To connect:
- Enable Bluetooth and Wi-Fi on your smartphone.
- On the dash cam, navigate to the CarPlay or Android Auto settings.
- Pair your phone with the dash cam via Bluetooth.
- Once paired, the system will automatically establish a Wi-Fi connection for CarPlay or Android Auto.

Image 4.3: Wireless CarPlay interface displayed on the mirror dash cam.
4.5 FM Transmitter Function
The built-in FM transmitter allows audio from the dash cam (e.g., music, navigation prompts) to be played through your vehicle's speakers.
- Access the FM Transmitter settings on the dash cam.
- Select an unused FM frequency.
- Tune your vehicle's radio to the same FM frequency.

Image 4.4: Configuring the FM transmitter to sync with your car's audio system.
4.6 Smart Voice Control
Operate key functions using voice commands for hands-free convenience. Common commands include:
- "Start recording"
- "Lock the video"
- "Turn on the screen"
- "Navigate to [destination]"
- "Pause music"
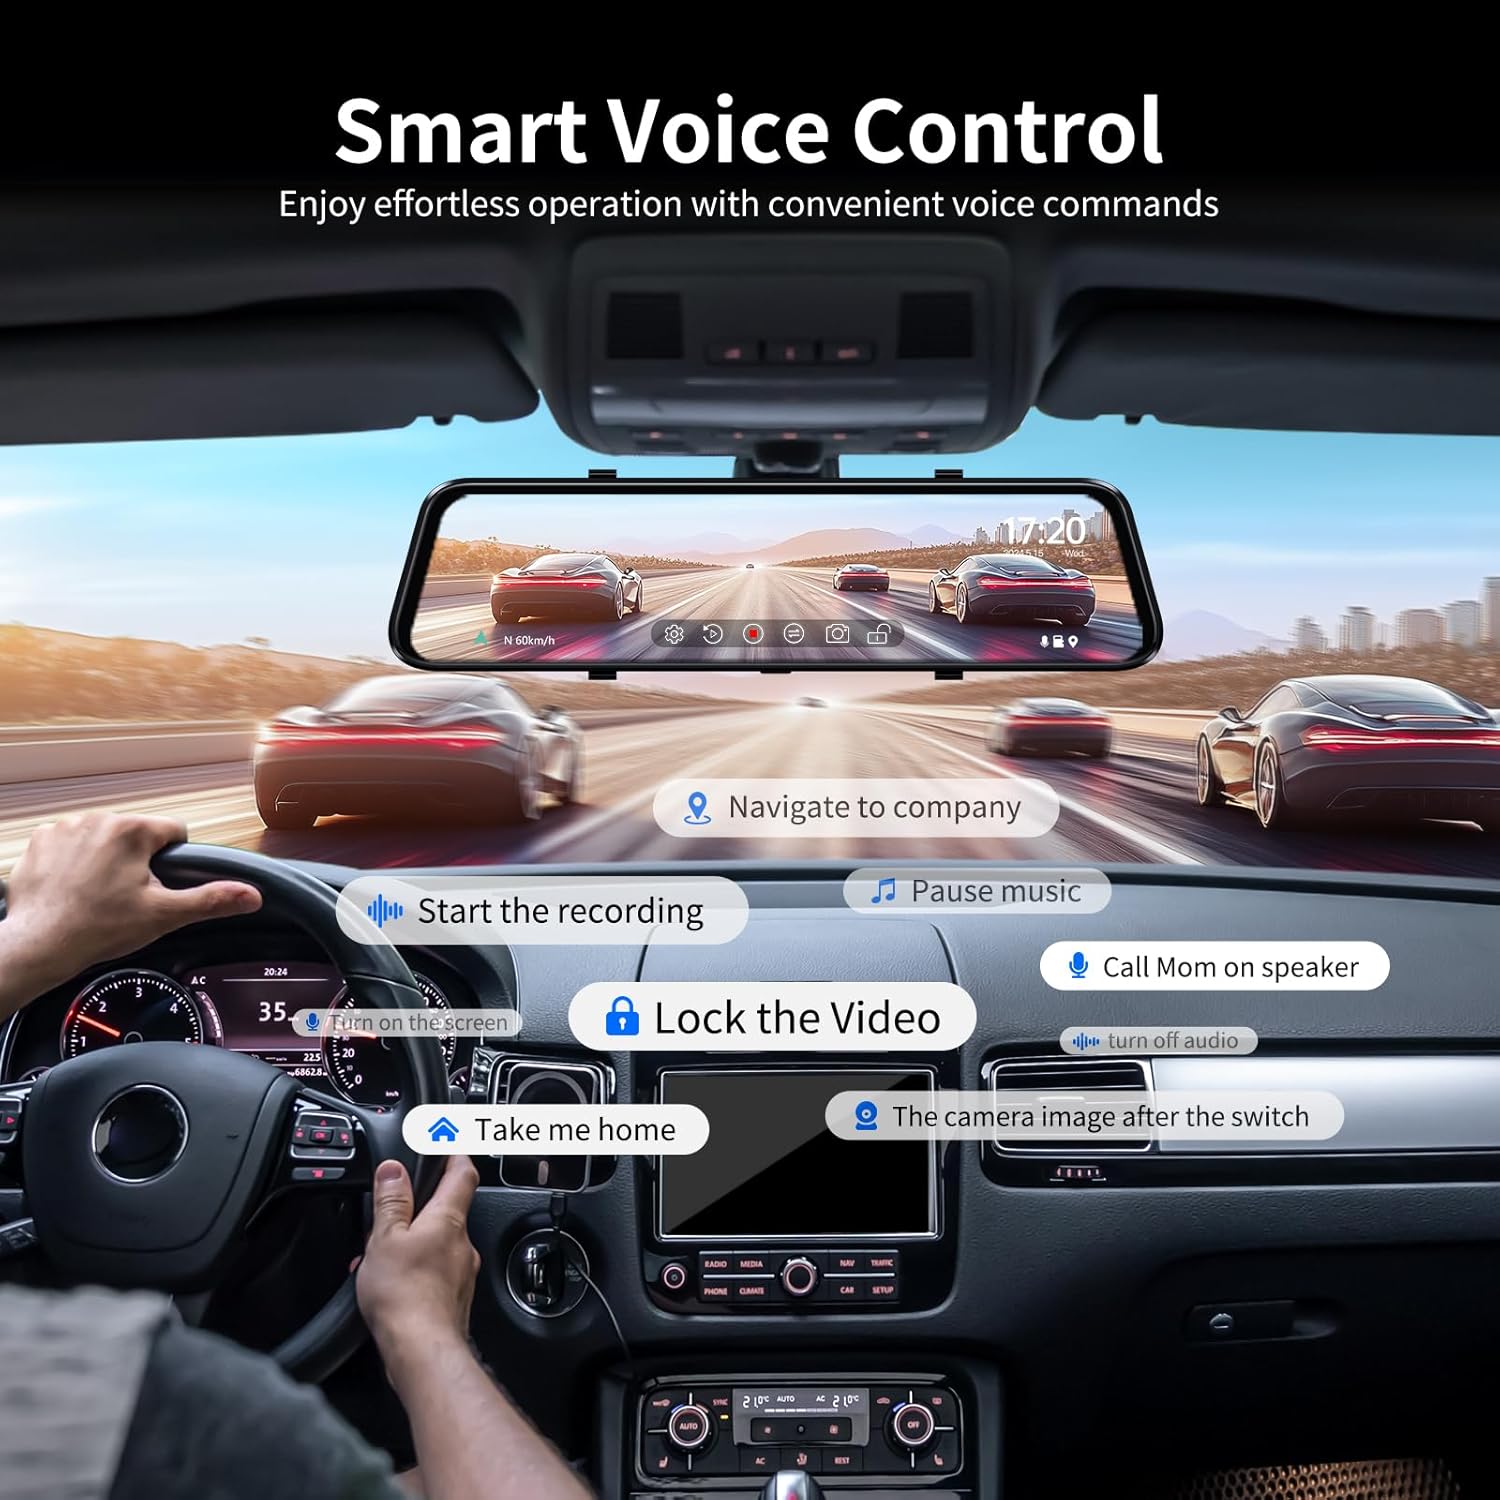
Image 4.5: Examples of voice commands for controlling the dash cam.
4.7 Display Modes and Touchscreen Operation
The 10-inch IPS touchscreen allows for intuitive control and offers multiple display modes:
- Full Screen: Displays either the front or rear camera view, or the CarPlay/Android Auto interface.
- Split Screen: Simultaneously displays two functions, such as recording and navigation, or recording and a call.
- Swipe Control: Swipe across the screen to switch between front and rear camera views or adjust display settings.

Image 4.6: Multiple display modes available on the 10-inch touchscreen.
4.8 24-Hour Parking Monitor
The parking monitor feature provides surveillance when the vehicle is parked. It operates in two modes:
- G-Sensor Mode: Automatically detects sudden impacts or vibrations and initiates recording of an emergency video.
- Time-Lapse Mode: Records continuous video at a low frame rate, conserving storage space while providing a comprehensive overview of events.

Image 4.7: The 24-hour parking monitor feature in action.
4.9 GPS Tracking Function
The integrated GPS module records driving data, including location and speed. This information can be reviewed using a dedicated GPS player software on a computer, providing a detailed record of your journeys.

Image 4.8: GPS tracking data displayed on a computer.
5. Maintenance
5.1 Cleaning the Device
To maintain optimal performance, regularly clean the dash cam unit and camera lenses. Use a soft, dry cloth to wipe the screen and exterior. For lenses, use a lens cleaning cloth and solution if necessary, ensuring no residue is left.
5.2 Storage Card Management
Periodically format the storage card (at least once a month) to prevent data corruption and ensure smooth recording. Back up any important video files before formatting. The device supports up to 256GB storage cards.
5.3 Environmental Considerations
The JOMISE C810 is designed to operate in temperatures ranging from -4°F to 158°F (-20°C to 70°C). Avoid exposing the device to extreme temperatures outside this range for prolonged periods to prevent damage.
6. Troubleshooting
If you encounter issues with your JOMISE C810, refer to the following common problems and solutions:
- Device does not power on:
Ensure the car charger is securely connected to both the dash cam and the vehicle's 12V power outlet. Verify the vehicle's power outlet is functioning. - Recording issues (e.g., freezing, skipped frames):
Format the storage card. Ensure you are using a high-speed (Class 10 or U3) microSD card. If the issue persists, try a different compatible storage card. - Bluetooth connection instability:
If Bluetooth connection becomes unstable, try restarting the device. Ensure there are no strong electromagnetic interferences in the area. A factory reset may resolve persistent connection issues. - Low audio volume:
Adjust the volume settings on the dash cam and your vehicle's audio system. If using the FM transmitter, ensure the frequency is clear and free from interference. - Parking Monitor not functioning:
Verify that the parking monitor feature is enabled in the device settings. Ensure the device is receiving continuous power (e.g., via a hardwire kit for 24-hour monitoring) if not relying solely on the internal battery for G-sensor events. - CarPlay/Android Auto connection problems:
Ensure Wi-Fi and Bluetooth are enabled on your phone. Try forgetting the device in your phone's Bluetooth settings and re-pairing. A factory reset of the dash cam can often resolve connectivity glitches.
7. Specifications
| Feature | Specification |
|---|---|
| Product Dimensions | 1.3 x 10.1 x 2.7 inches |
| Item Weight | 2.4 pounds |
| Model Number | C810 |
| Front Camera Resolution | 2.5K (1440p) |
| Rear Camera Resolution | 1080P |
| Connectivity Technology | Wireless (5.8GHz WiFi for CarPlay/Android Auto) |
| Special Features | HDR Night Vision, 4-Way Audio (FM included), CarPlay & Android Auto, Navigation & DVR, Voice Control |
| Display Features | 10-inch IPS Touchscreen |
| Included Components | Car Charger, 64GB Storage Card |
| Mounting Type | Rearview Mirror Mount |
| Field Of View | 170 Degrees (approx.) |
| Operating Temperature | -4°F to 158°F (-20°C to 70°C) |
8. Warranty and Support
JOMISE products are designed for reliability and performance. For any inquiries or support, please refer to the following information:
- Warranty: 12 Months Limited Warranty
- Return Policy: 7 Days Return Policy for eligible purchases. Returns on defects are accepted.
Contact Information:
- Email: jomise-us@jomise-cam.com
- Phone: +1 866 788 8775

Image 8.1: JOMISE warranty and support details.