NEEWER GM35
NEEWER GM35 Tripod Fluid Head Instruction Manual
Model: GM35
1. Introduction
Thank you for choosing the NEEWER GM35 Tripod Fluid Head. This manual provides essential information for the safe and effective use of your new equipment. Please read these instructions carefully before use and retain them for future reference.

Image 1.1: NEEWER GM35 Tripod Fluid Head, showcasing its compact design and key features like the telescopic handle and quick release plate.
2. Safety Information
- Always ensure the fluid head is securely mounted to a stable tripod or support before attaching any camera equipment.
- Do not exceed the maximum load capacity of 11lb/5kg to prevent damage to the equipment or injury.
- Ensure all locking knobs are tightened before operating the fluid head to prevent accidental movement.
- Avoid exposing the fluid head to extreme temperatures, moisture, or corrosive substances.
- Keep out of reach of children.
3. Package Contents
- 1x Tripod Head with Leveling Base
- 1x Quick Release Plate
- 1x 3/8" to 1/4" Screw Adapter

Image 3.1: Visual representation of the items included in the NEEWER GM35 package.
4. Product Overview
The NEEWER GM35 is a compact yet robust fluid head designed for smooth and precise camera movements. It features an integrated leveling base and an Arca-type quick release system for versatile use.
Key Components:
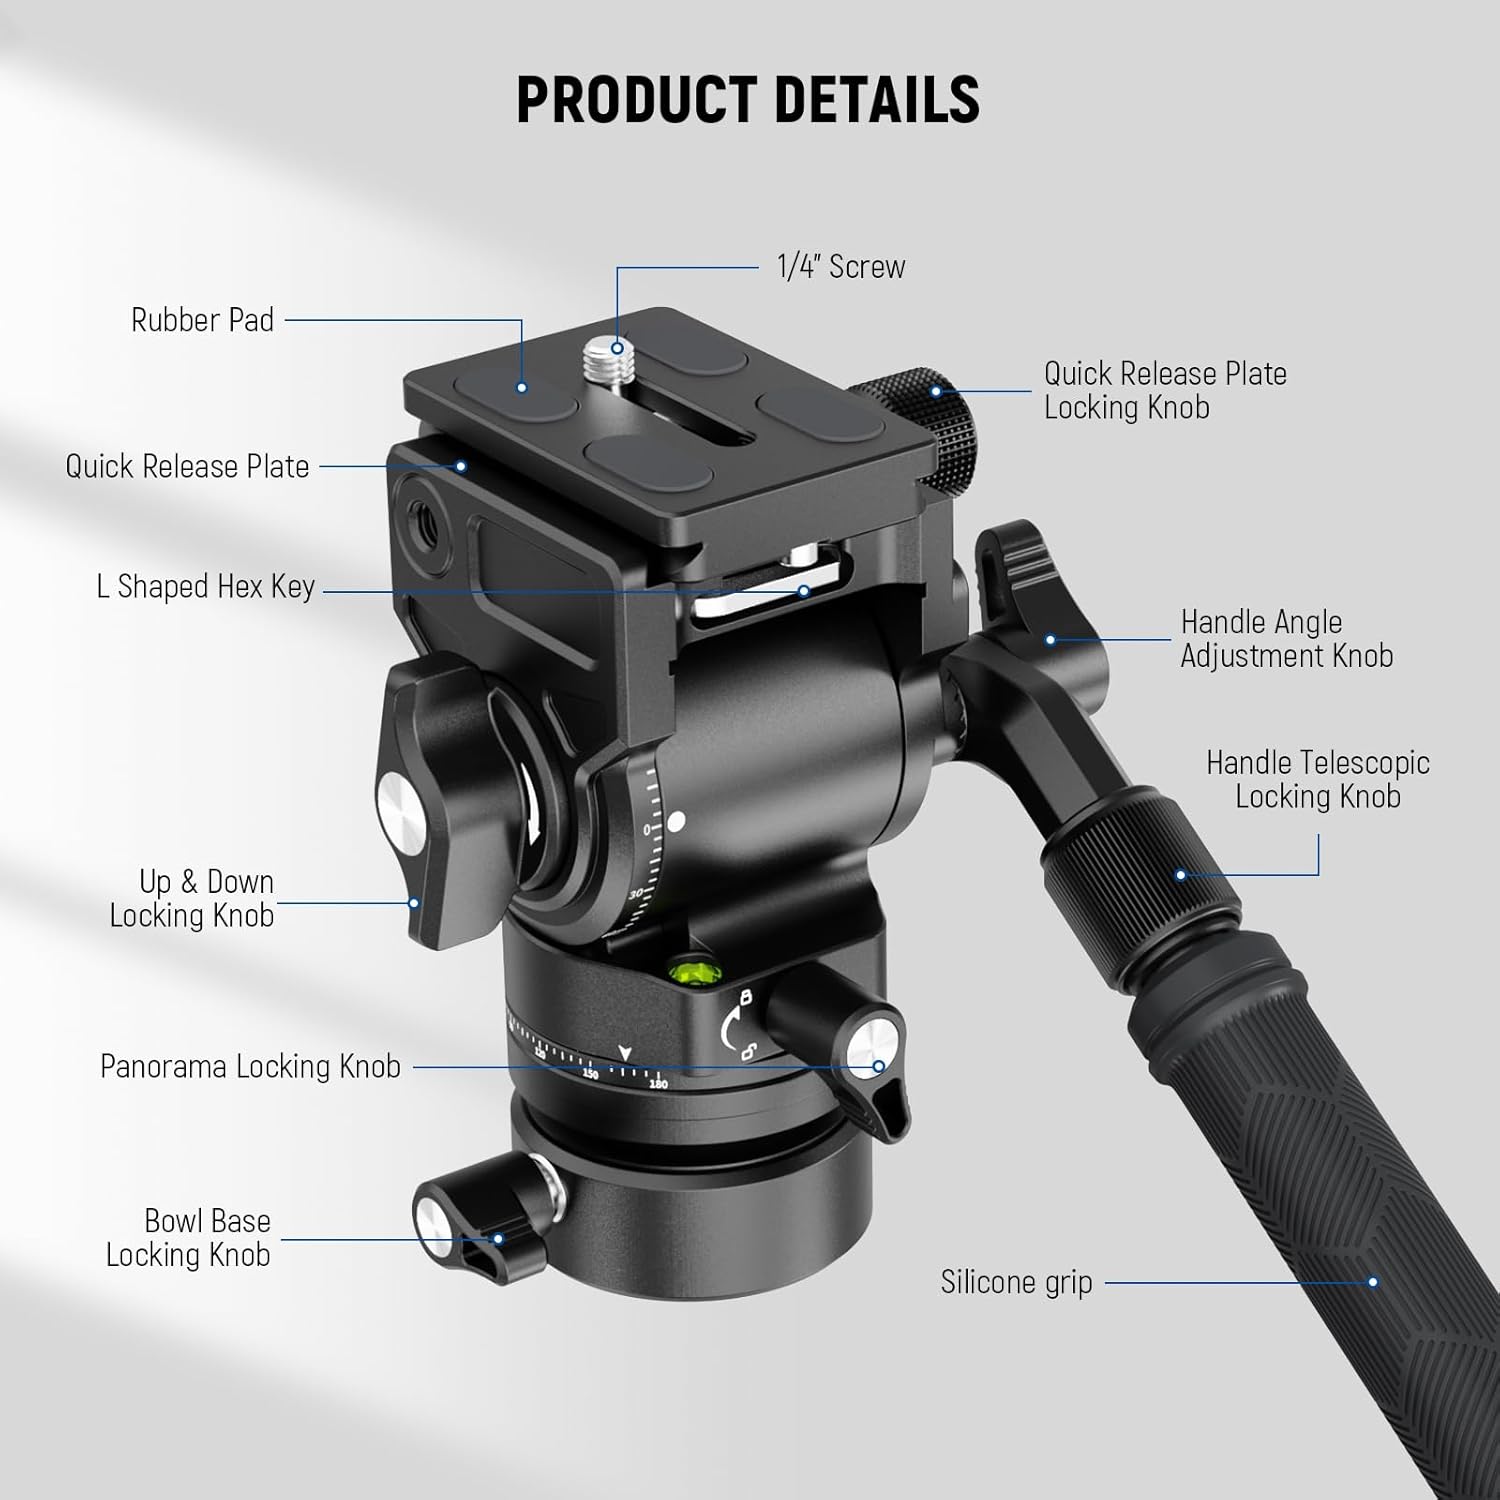
Image 4.1: Labeled diagram illustrating the various parts of the NEEWER GM35 Fluid Head.
- Quick Release Plate: Arca-type compatible for fast camera attachment and detachment.
- Quick Release Plate Locking Knob: Secures the quick release plate in place.
- 1/4" Screw: Standard camera mounting screw on the quick release plate.
- Handle Angle Adjustment Knob: Adjusts the angle of the telescopic handle.
- Handle Telescopic Locking Knob: Locks the telescopic handle at desired length.
- Up & Down Locking Knob: Controls the tilt movement of the head.
- Panorama Locking Knob: Locks the 360° horizontal rotation.
- Bowl Base Locking Knob: Secures the +/-7° leveling base.
- Silicone Grip: Provides comfortable and secure handling of the telescopic handle.
- L Shaped Hex Key: Stored magnetically under the QR base for convenience.
Features:
- Integrated Leveling Base: Features a φ48mm integrated tripod leveling base for +7°/-7° swift and accurate camera leveling on uneven terrain.
- Mini Size Yet Heavy Duty: Standing 4.6"/116mm high and weighing only 1.5lb/680g, it supports a maximum load of 11lb/5kg.
- Telescopic Handle & Detachable Use: The 2-section telescopic handle extends from 6.3"/16cm to 9.8"/25cm. The leveling base is detachable.
- Quick Switching Arca Type QR Plate: Enables quick mounting on tripods, monopods, handgrips, and sliders.
- Multiple Mounting Threads: 1/4" top screw on QR plate for cameras; 1/4" thread on QR clamp for accessories like LED lights or monitors.
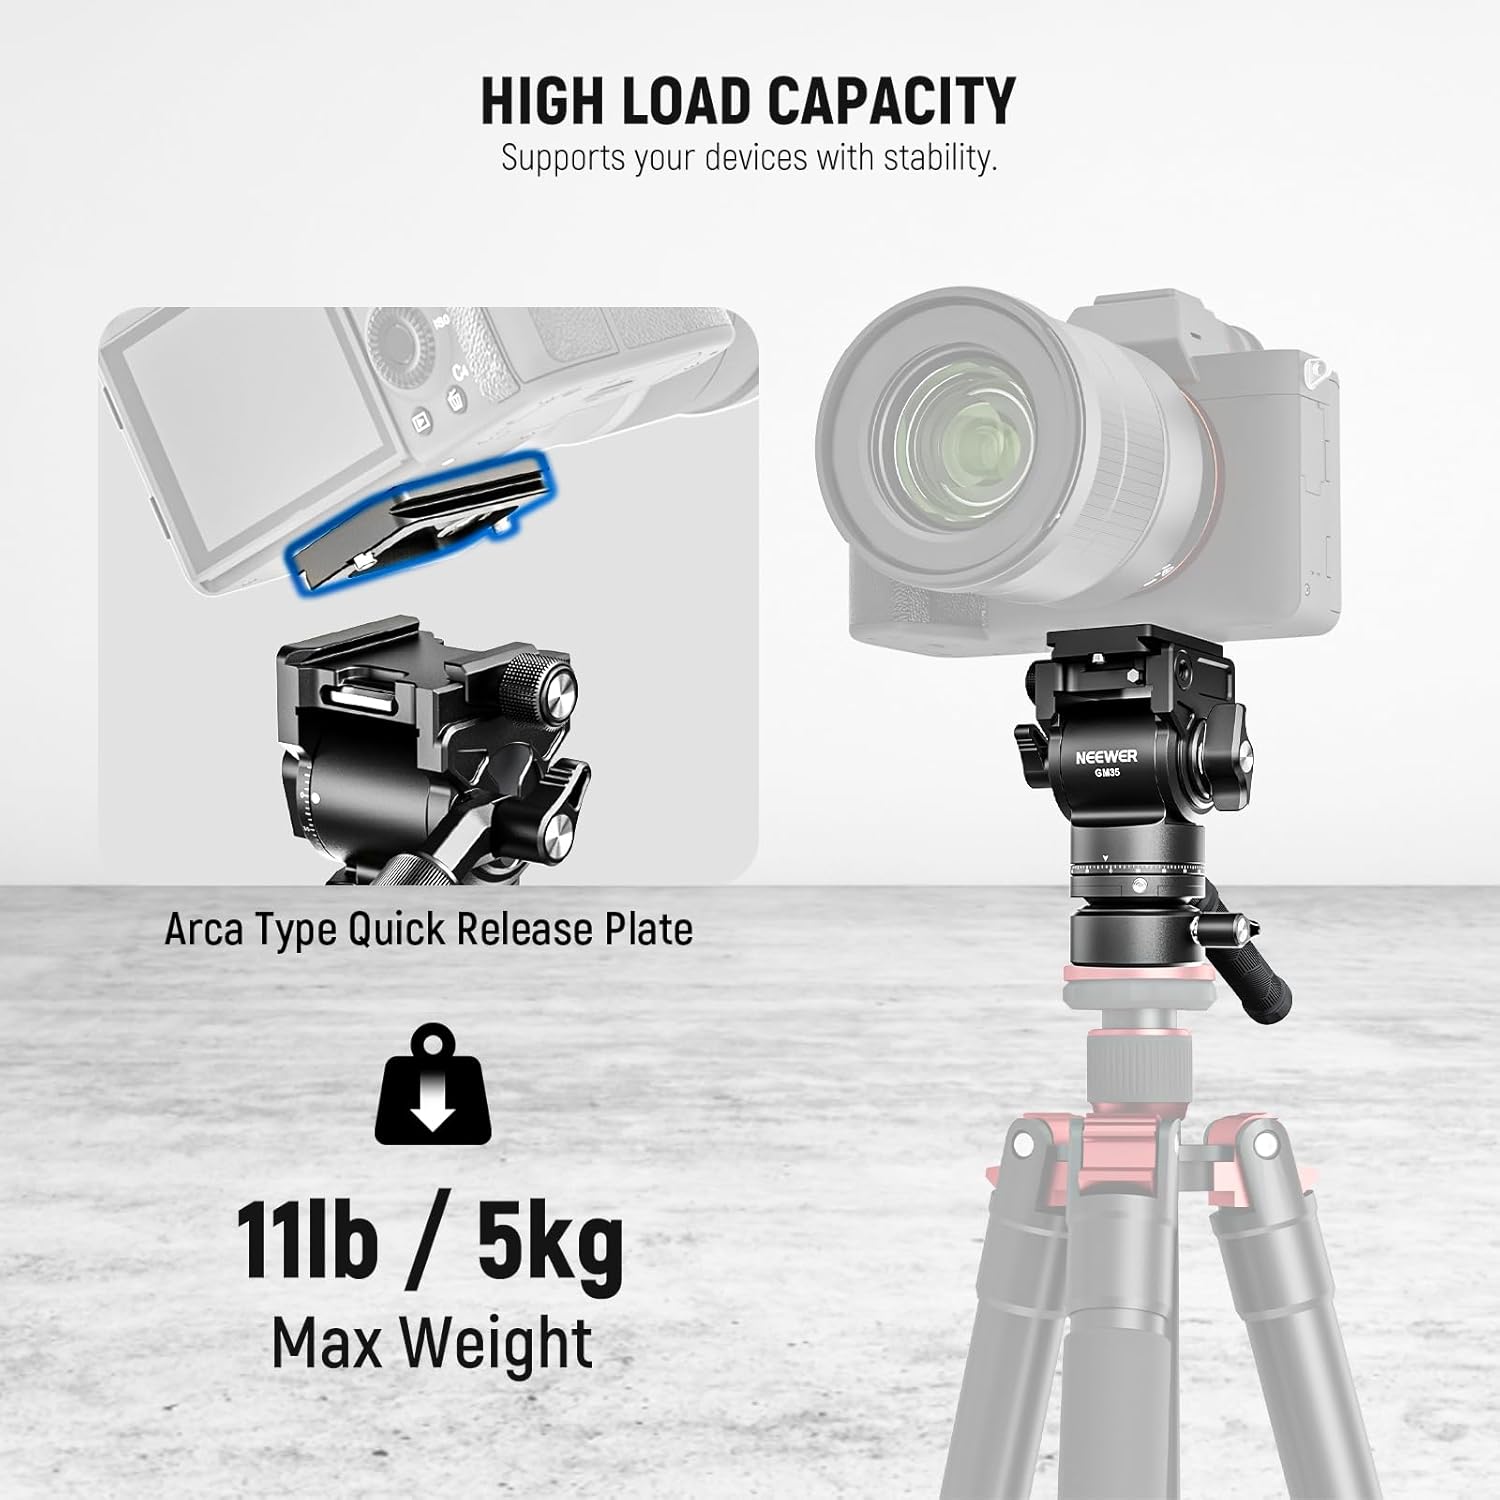
Image 4.2: The fluid head demonstrating its high load capacity with a camera mounted.

Image 4.3: The compact dimensions of the fluid head, emphasizing its portability.
5. Setup
5.1 Attaching the Fluid Head to a Tripod
- Locate the 3/8" threaded hole at the bottom of the fluid head.
- If your tripod has a 1/4" screw, use the provided 3/8" to 1/4" screw adapter.
- Screw the fluid head onto your tripod's mounting screw until it is securely fastened.
5.2 Attaching the Quick Release Plate to Your Camera
- Locate the 1/4" screw on the quick release plate.
- Align the screw with the tripod mounting hole on your camera's base.
- Tighten the screw securely using the L-shaped hex key (magnetically stored under the QR base) or a coin.
5.3 Mounting Your Camera to the Fluid Head
- Ensure the quick release plate locking knob on the fluid head is loosened.
- Slide the quick release plate (with your camera attached) into the clamp base of the fluid head.
- Once the plate is fully seated, tighten the quick release plate locking knob to secure your camera.
5.4 Attaching the Telescopic Handle
- Locate the threaded port on the side of the fluid head.
- Screw the telescopic handle into the port until it is firm.
- Adjust the handle's angle using the handle angle adjustment knob and extend its length using the telescopic locking knob as desired.
6. Operating Instructions
6.1 Adjusting Pan and Tilt
- Tilt Adjustment: Loosen the Up & Down Locking Knob to allow vertical (tilt) movement. Tighten it to lock the camera in position. The tilt range is -55° to +90°.
- Pan Adjustment: Loosen the Panorama Locking Knob to allow 360° horizontal (pan) rotation. Tighten it to lock the head in position.

Image 6.1: The fluid head's smooth pan and tilt capabilities for dynamic shots.
6.2 Using the Leveling Base
- The integrated leveling base allows for quick +/-7° camera leveling without adjusting tripod legs.
- Loosen the Bowl Base Locking Knob to adjust the camera's level using the built-in bubble level.
- Once level, tighten the Bowl Base Locking Knob to secure the position.

Image 6.2: The quick leveling bowl base feature for stable footage on uneven surfaces.
7. Maintenance
- Clean the fluid head regularly with a soft, dry cloth.
- Avoid using harsh chemicals or abrasive materials that could damage the finish.
- Periodically check all screws and knobs for tightness and re-tighten if necessary.
- Store the fluid head in a dry, dust-free environment when not in use.
8. Troubleshooting
- Movement is not smooth: Ensure all locking knobs are sufficiently loosened. Check for any obstructions or debris.
- Camera is not secure: Verify that the quick release plate is correctly seated and the quick release plate locking knob is fully tightened. Ensure the 1/4" screw on the plate is tight on your camera.
- Head feels loose on tripod: Confirm that the fluid head is securely screwed onto the tripod's mounting screw.
9. Specifications
| Feature | Detail |
|---|---|
| Model | GM35 |
| Load Capacity | 11lb / 5kg |
| Mounting Points | 1/4", 3/8" |
| Main Material | Aluminum Alloy |
| Product Dimensions | 4.6"D x 3.7"W x 4.6"H (116mm high) |
| Item Weight | 1.5lb / 680g |
| Tilt Range | -55° to +90° |
| Panoramic Rotation | 360° |
| Leveling Base Diameter | φ48mm |
| Leveling Base Tilt | +/-7° |
| Handle Length | 6.3"/16cm to 9.8"/25cm (telescopic) |
10. Warranty and Support
NEEWER products are designed for durability and performance. For warranty information or technical support, please refer to the official NEEWER website or contact their customer service directly. Keep your purchase receipt as proof of purchase.
Ask a question about this manual
Ask about setup, troubleshooting, compatibility, parts, safety, or missing instructions. Manuals+ will review the question and use this page’s manual context to help answer it.