1. Important Safety Instructions
Please read and understand all safety instructions before using this appliance. Failure to follow these instructions may result in electric shock, fire, or serious injury.
- Always remove the white foam from the base of the humidifier before initial use.
- Do not inject water beyond the maximum water level line indicated on the tank.
- Do not add water directly into the base chamber or mist tube. Always use the top-fill opening.
- Do not add essential oils or supplemental water treatment liquids directly into the water tank. Use only the designated essential oil diffuser tray.
- The humidifier includes an anti-dry burn function. If the water level drops too low, a red indicator light will activate, and the device will shut off automatically to prevent damage. Refill the tank and restart.
- When cleaning the atomizing sheet, use only a soft brush to avoid damage.

Image: Important warnings regarding water levels, essential oil placement, and the E2 error for low water.
2. Product Overview
2.1 Key Features
- Warm and Cool Mist Options: Provides both warm and cool mist for versatile use.
- Large 6L Capacity: Offers extended operation time, up to 60 hours per fill.
- Convenient Top-Fill Design: Easy water refilling without removing the tank.
- 360° Rotating Nozzle: Allows for mist dispersion in any desired direction.
- 3 Levels of Mist Adjustment: Customize mist output to suit your environment.
- Automatic Humidity Control: Smart sensor regulates humidity for optimal levels.
- Sleep Mode: Operates quietly with the LED screen off for undisturbed rest.
- Essential Oil Diffuser: Integrated tray for aromatherapy with essential oils.
- Anti-Dry Burn Protection: Automatic shut-off when water levels are low.
2.2 Components
Familiarize yourself with the main parts of your Coolfiqu humidifier:
- Water Tank (6L capacity)
- Base Unit with Control Panel
- Nozzle Cap
- Essential Oil Diffuser Tray
- Water Filter
- Nebulizer Tablet (inside the base)

Image: Front view of the Coolfiqu 6L Humidifier, highlighting its digital display and essential oil tray.

Image: Detailed view of the top water tank components (filter, purification device) and lower base components (sponge foam, nebulizer tablets).
3. Setup
Follow these steps to set up your humidifier for the first time:
- Unpack: Carefully remove the humidifier and all packaging materials from the box.
- Remove Foam: Locate and remove the white protective foam from the base of the unit. This is crucial for proper operation.
- Assemble Nozzle Cap: Align the nozzle cap with the humidifier cup lid and press them firmly together to assemble.
- Place Lid: After assembly, place the cup lid onto the water tank.
- Check Fittings: Ensure all internal fittings and accessories are correctly installed and secured.
- Placement: Place the humidifier on a flat, stable, and water-resistant surface, away from direct sunlight or heat sources.
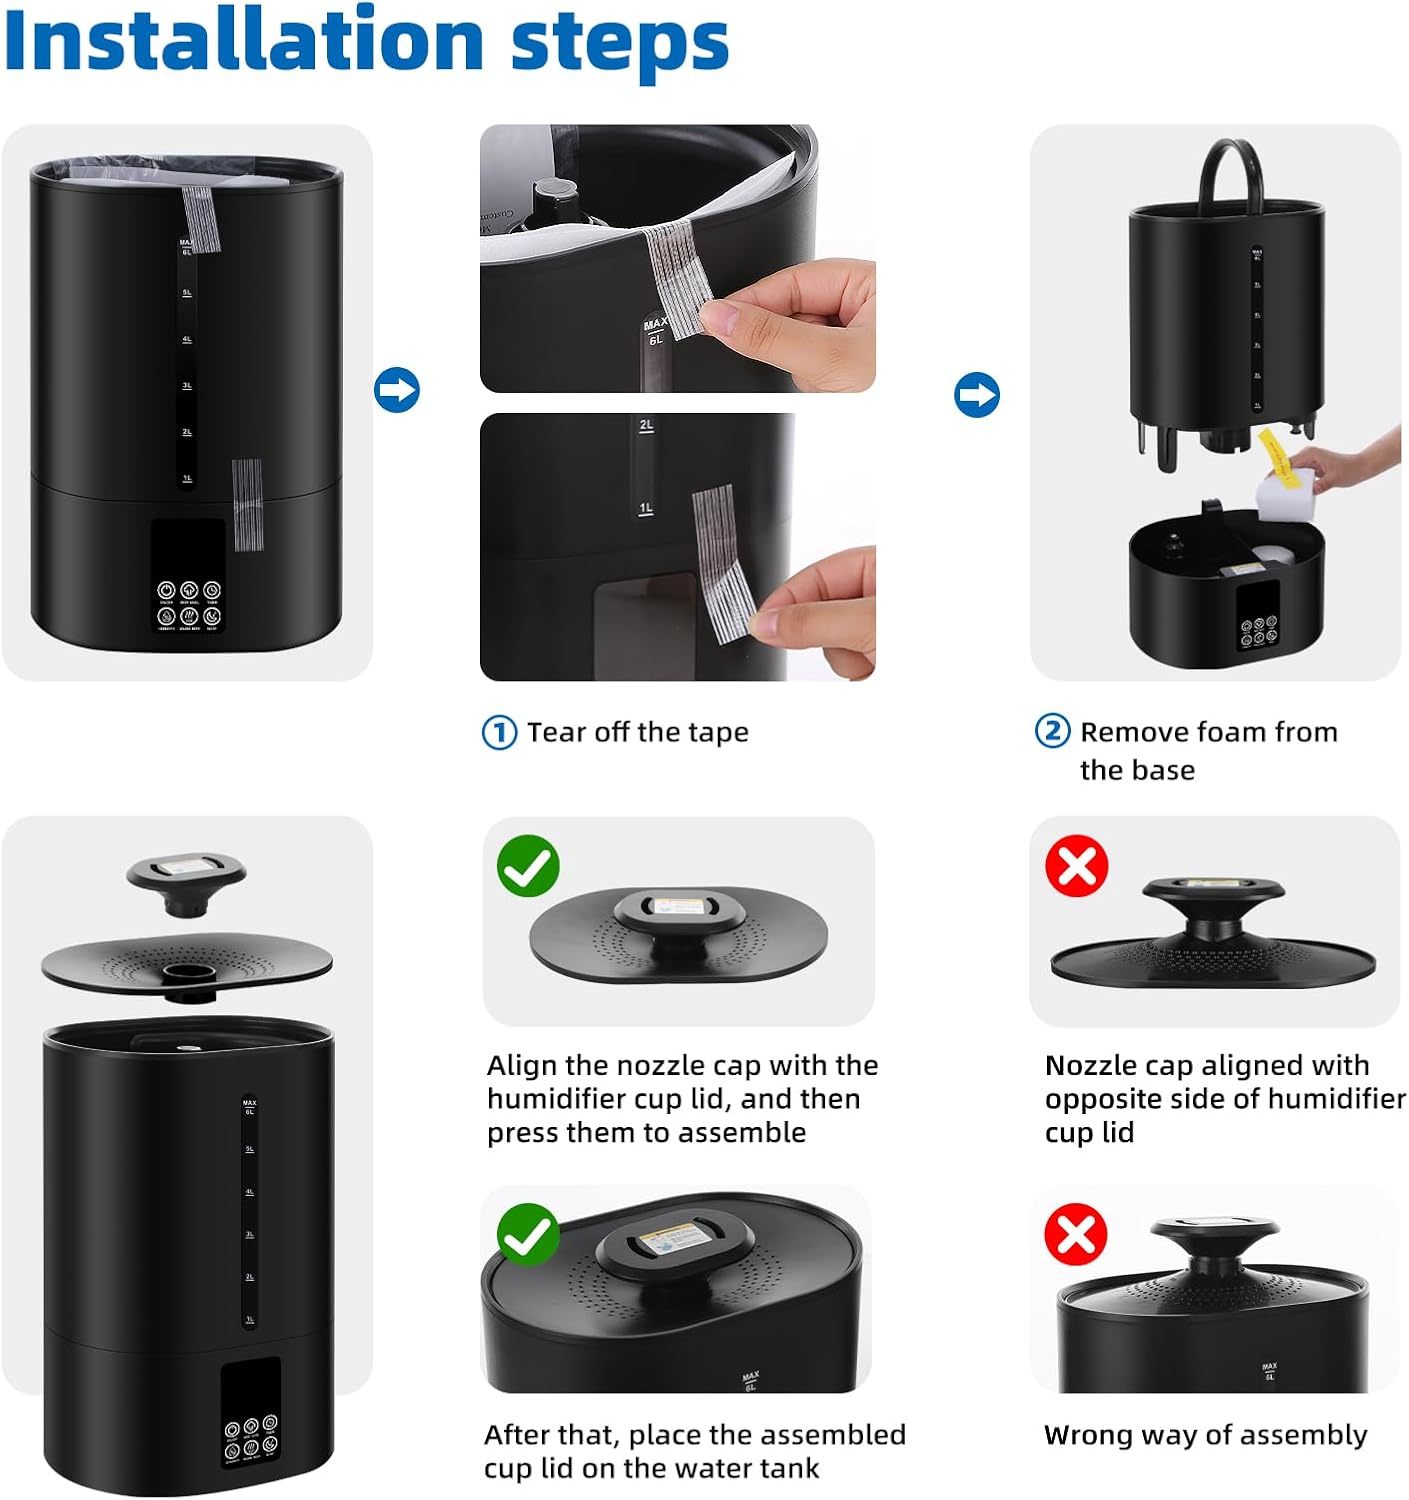
Image: Visual guide for initial setup, including removing tape and foam, and correctly attaching the nozzle cap.

Image: A visual summary of key setup and initial operation steps.
4. Operation
Operating your Coolfiqu humidifier is straightforward:
- Fill Water Tank: Open the top lid and pour clean water directly into the tank. Do not exceed the 'MAX 6L' indicator.
- Power On: Plug in the humidifier and press the 'ON/OFF' button on the control panel to turn it on.
- Select Mist Type: Use the 'WARM/COOL' button to switch between warm and cool mist modes.
- Adjust Mist Level: Press the 'MIST LEVEL' button to cycle through the three available mist output settings.
- Set Humidity: Use the 'HUMIDITY' button to set your desired humidity percentage. The humidifier will automatically adjust output to maintain this level.
- Activate Sleep Mode: Press the 'SLEEP' button to enter sleep mode. The LED screen will turn off, and the humidifier will operate quietly.
- Use Essential Oil Diffuser: Pull out the small tray located on the side or back of the base unit. Add a few drops of your preferred essential oil to the pad in the tray, then reinsert the tray.

Image: Instructions for convenient top-filling of the water tank.

Image: How to use the essential oil diffuser feature.

Image: Explanation of the humidifier's quiet operation in sleep mode.
5. Maintenance
Regular cleaning and maintenance ensure optimal performance and longevity of your humidifier.
- Flush Tank and Base: Periodically flush the water tank and base chamber with clean water to remove any residue.
- Clean Gaps: Use a cleaning brush to clean corners and gaps within the unit.
- Clean Atomizing Sheet: Gently clean the atomizing sheet with a soft brush. Avoid harsh scrubbing to prevent damage.
- Filter Cleaning: Lift the filter by rotating it clockwise to remove. Clean the filter under running water and reinsert.
- Gasket Maintenance: Clean the gaskets once a week to prevent clogging and potential leaks.

Image: Step-by-step instructions for cleaning the humidifier.

Image: Guide for cleaning and reinstalling internal accessories like gaskets.
6. Troubleshooting
Refer to this section for common issues and their solutions:
| Problem | Possible Cause | Solution |
|---|---|---|
| "E2" Error or Red Indicator Light Flashes | Low water level in the tank (Anti-dry burn device activated). | Refill the water tank to the appropriate level and restart the humidifier. |
| No Mist Output |
|
|
| Unusual Noise |
|
|
| Water Leakage | Clogged or improperly installed gaskets. | Clean the gaskets and ensure they are correctly seated. Refer to maintenance section. |
7. Specifications
| Feature | Detail |
|---|---|
| Brand | Coolfiqu |
| Model Name | 6L Humidifiers (LP-2113) |
| Special Features | Adjustable Humidity Control, Aroma Diffuser, Auto Shut Off, Low Water Indicator |
| Color | A-Black |
| Operation Mode | Automatic |
| Product Dimensions | 9.05"D x 6.29"W x 14.17"H |
| Item Weight | 4.93 pounds (2.24 Kilograms) |
| Recommended Room Type | Bedroom, Kids Room, Living Room, Nursery, Office |
| Voltage | 120 Volts (AC) |
| Shape | Rectangular |
8. Warranty and Support
Coolfiqu is committed to providing quality products and customer satisfaction.
If you encounter any issues with your product or require assistance, please contact our customer support team. Details on how to reach customer support are typically found on the product packaging or the official Coolfiqu website.
Please retain your proof of purchase for any warranty claims.


