Introduction
This manual provides comprehensive instructions for the setup, operation, and maintenance of your RETROSUN V3 Pro Replacement Voice Remote Control. Please read this guide carefully to ensure proper use and to maximize the functionality of your device.
This remote control is designed for use with specific vSeeBox models, offering enhanced connectivity and dual working modes for broad compatibility.
Compatibility
The RETROSUN V3 Pro Replacement Voice Remote Control is compatible with the following vSeeBox models:
- vSeeBox V5 Pro
- vSeeBox V3 Plus
- vSeeBox V3 Pro
- vSeeBox V2 Pro (Note: No Voice Command Feature)
- vSeeBox V1 Pro (Note: No Voice Command Feature)
- vSeeBox V1 Max (Note: No Voice Command Feature)
- vSeeBox Elite
- vSeeBox Max

Image: Compatibility diagram illustrating the remote control's support for different vSeeBox models, indicating which models do not support voice commands.
Setup Instructions
1. Battery Installation
The remote control requires two 1.5V AAA batteries (not included). To install:
- Open the battery compartment cover on the back of the remote control.
- Insert two AAA batteries, ensuring correct polarity (+ and -).
- Close the battery compartment cover securely.

Image: Illustration of battery installation, showing the remote's open battery compartment for two AAA batteries.
2. Pairing the Remote Control (Bluetooth)
To enable Bluetooth functionality and pair the remote with your vSeeBox device (applicable for V1 Pro/V2 Pro/Max/Elite):
- Press and hold the OK and Volume Down (Vol-) keys simultaneously for approximately five seconds.
- The indicator light on the remote control will begin to flash continuously, indicating that Bluetooth is enabled.
- On your vSeeBox device, navigate to System Settings > Bluetooth > Pair New Device.
- Locate "vseebox remote control" in the list of available devices and select it to connect.
- If the remote is not found, ensure Bluetooth is activated by repeating step 1.

Image: Visual guide for pairing the remote control, showing the required button press combination and on-screen confirmation.
3. Switching Working Modes (V3 Pro vs. V2 Mode)
The remote control supports two working modes: V3 Pro mode and V2 mode. The remote defaults to V3 working mode.
- V3 Pro Working Mode: Applicable to vSeeBox V3 Pro and V3 Plus.
- V2 Working Mode: Applicable to vSeeBox V1 Pro, V2 Pro, V1 Max, and Elite.
To switch between modes:
- Press and hold the number key 5 for more than 10 seconds.
- The indicator light on the remote control will flash, confirming that the mode switch was successful.

Image: Diagram explaining how to switch between V3 Pro/Plus mode and V2 mode by holding the '5' button, with compatible devices listed for each mode.
4. IR Learning Program (for TV Control)
This remote control features an IR learning function, allowing it to learn commands from your TV's original remote for basic TV functions (e.g., Power, Volume). This is not an ordinary remote control; the TV control functions need to be learned before they can be used.
- Press and hold the TV IN button for 5 seconds. The LED will flash rapidly, then turn solid, indicating learning mode.
- Press the key on the V3 Pro remote that you wish to program (e.g., TV Power). The LED will flash slowly, indicating it is ready to accept a signal.
- Aim your TV's original remote control towards the front of the V3 Pro remote (within 1 inch distance).
- Press the corresponding button on your TV's original remote (e.g., TV Power). The LED on the V3 Pro remote will flash 3 times, then turn solid, confirming successful learning.
- Repeat steps 2-3 for other keys you wish to program.
- To exit learning mode, press any other button on the V3 Pro remote. The LED will turn off.

Image: Visual guide for the IR learning process, showing how to position the V3 Pro remote and an original TV remote for command transfer.
Operating Instructions
1. Basic Functions
The remote control features standard buttons for navigation, volume control, channel changing, and playback functions. Refer to the button layout for specific functions.

Image: Front and back view of the remote control, highlighting the button layout and general design.
2. Voice Control
For compatible vSeeBox models (V5 Pro, V3 Plus, V3 Pro, Elite, Max), the remote supports voice commands. Press the dedicated voice button (microphone icon) and speak clearly into the remote.
- Note: V1 Max, V1 Pro, and V2 Pro models do not support voice command features.
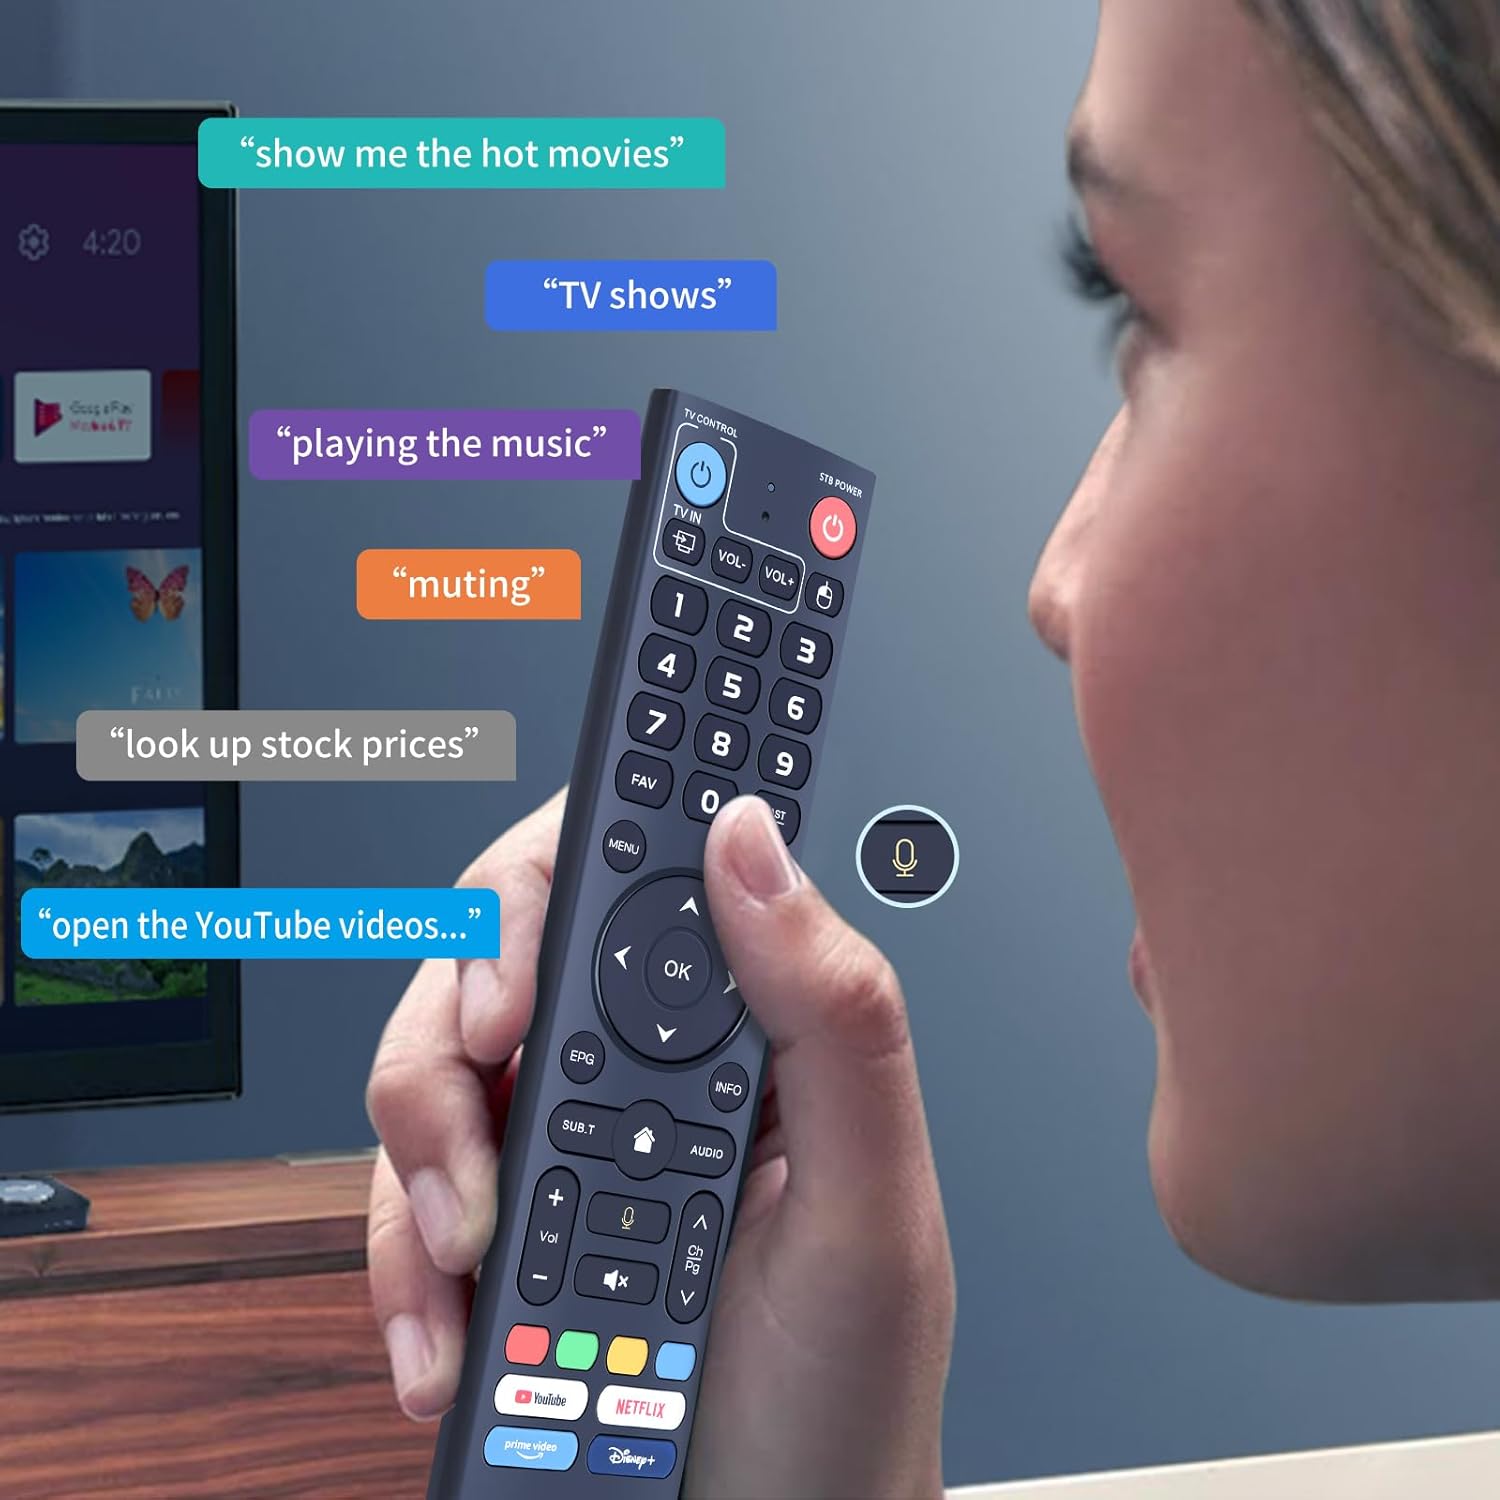
Image: Demonstration of voice control functionality, showing a user speaking into the remote and examples of voice commands.
3. Dedicated Hotkey Buttons
The remote control includes four dedicated hotkey buttons for quick access to popular streaming services:
- YouTube
- Netflix
- Disney+
- Prime Video
Pressing these buttons will directly launch the respective applications on your vSeeBox device.

Image: Close-up of the remote control, emphasizing the voice button and the dedicated streaming service hotkeys.
Maintenance
To ensure the longevity and optimal performance of your remote control:
- Cleaning: Wipe the remote control with a soft, dry cloth. Avoid using liquid cleaners or abrasive materials.
- Battery Replacement: Replace batteries when the remote's response becomes sluggish or the indicator light does not function as expected. Always use new AAA batteries and dispose of old batteries responsibly.
- Storage: Store the remote in a cool, dry place away from direct sunlight and extreme temperatures.
- Avoid Drops: Protect the remote from physical impact to prevent damage to internal components.
Troubleshooting
| Problem | Possible Cause | Solution |
|---|---|---|
| Remote not responding. | Low or dead batteries. Incorrect mode selected. Not paired via Bluetooth. | Replace batteries. Ensure the correct working mode (V3 Pro or V2) is selected. Re-pair the remote via Bluetooth as per setup instructions. |
| Voice commands not working. | Device not compatible with voice features. Bluetooth not connected. | Verify your vSeeBox model supports voice commands (V1 Max, V1 Pro, V2 Pro do not). Ensure the remote is successfully paired via Bluetooth. |
| IR learning for TV control fails. | Incorrect distance or angle. Original remote batteries low. | Ensure remotes are 1 inch apart and directly facing each other. Check batteries in the original TV remote. Repeat the IR learning steps carefully. |
| Slow response time. | Weak batteries. Interference. | Replace batteries. Ensure no obstructions between the remote and the vSeeBox device. Reduce potential wireless interference. |
Specifications
- Model: vSeeBox V3 Pro Replacement Voice Remote Control
- Brand: RETROSUN
- Item Weight: 3.84 ounces
- Package Dimensions: 8.94 x 1.97 x 0.83 inches
- Power Source: 2 x 1.5V AAA Batteries (not included)
- Special Feature: Ergonomic design, Voice Control, IR Learning
- Color: Blue
- Max Number of Supported Devices: 1 (per remote)
- Compatible Devices: Set Top Box (vSeeBox models as listed in Compatibility section)

Image: Dimensional drawing of the remote control, indicating its length, width, and thickness.
Warranty and Support
This product comes with standard after-sales service. If you encounter any issues or have questions regarding your RETROSUN V3 Pro Replacement Voice Remote Control, please contact us directly through the Amazon messaging tool.
If your device model is not explicitly listed in the compatibility section, please contact customer support for verification.


