1. Introduction
This manual provides detailed instructions for the installation, operation, and maintenance of your FOSA 5-Band Car Sound Equalizer, Model fosaam14k68rt2. This device is designed to enhance your car audio experience by providing precise control over various frequency bands, allowing for personalized sound tuning.
2. Safety Information
- Power Supply: Ensure the equalizer is connected to a stable 12V DC power supply. Incorrect voltage can damage the unit.
- Wiring: All wiring should be performed by a qualified professional to prevent electrical shorts or damage to your vehicle's electrical system.
- Mounting: Securely mount the equalizer to prevent movement during vehicle operation, which could cause distraction or damage.
- Moisture: Keep the unit away from water and excessive moisture.
- Temperature: Avoid exposing the unit to extreme temperatures.
3. Package Contents
Please verify that all items are present in the package:
- 1 x FOSA 5-Band Car Sound Equalizer
- 2 x Iron Piece (Mounting Brackets)
- 4 x Screws
4. Product Overview
4.1 Front Panel Controls
The front panel features various knobs and switches for sound adjustment and input selection.

Image Description: This image displays the front panel of the FOSA 5-Band Car Sound Equalizer. From left to right, it shows five rotary knobs for frequency adjustment (10KHz, 2.2KHz, 750Hz, 315Hz, 100Hz), followed by a toggle switch for CD/AUX input selection. To the right of the switch are four more rotary knobs for Fader, Sub Freq (subwoofer frequency), Sub Vol (subwoofer volume), and Master Volume control. The unit is black with white labels.
- Frequency Adjustment Knobs (100Hz, 315Hz, 750Hz, 2.2KHz, 10KHz): Adjust the gain for each of the five frequency bands from -12dB to +12dB.
- CD/AUX Input Select Switch: Toggles between the CD input and the Auxiliary (AUX) input.
- Fader Control: Adjusts the balance between front and rear audio output.
- Sub Freq (Subwoofer Frequency) Control: Adjusts the subwoofer crossover frequency from 50Hz to 130Hz.
- Sub Vol (Subwoofer Volume) Control: Adjusts the output level of the subwoofer channel.
- Volume Control: Master volume control for the overall audio output.
4.2 Rear Panel Connections
The rear panel provides all necessary input and output connections, along with the power terminal.
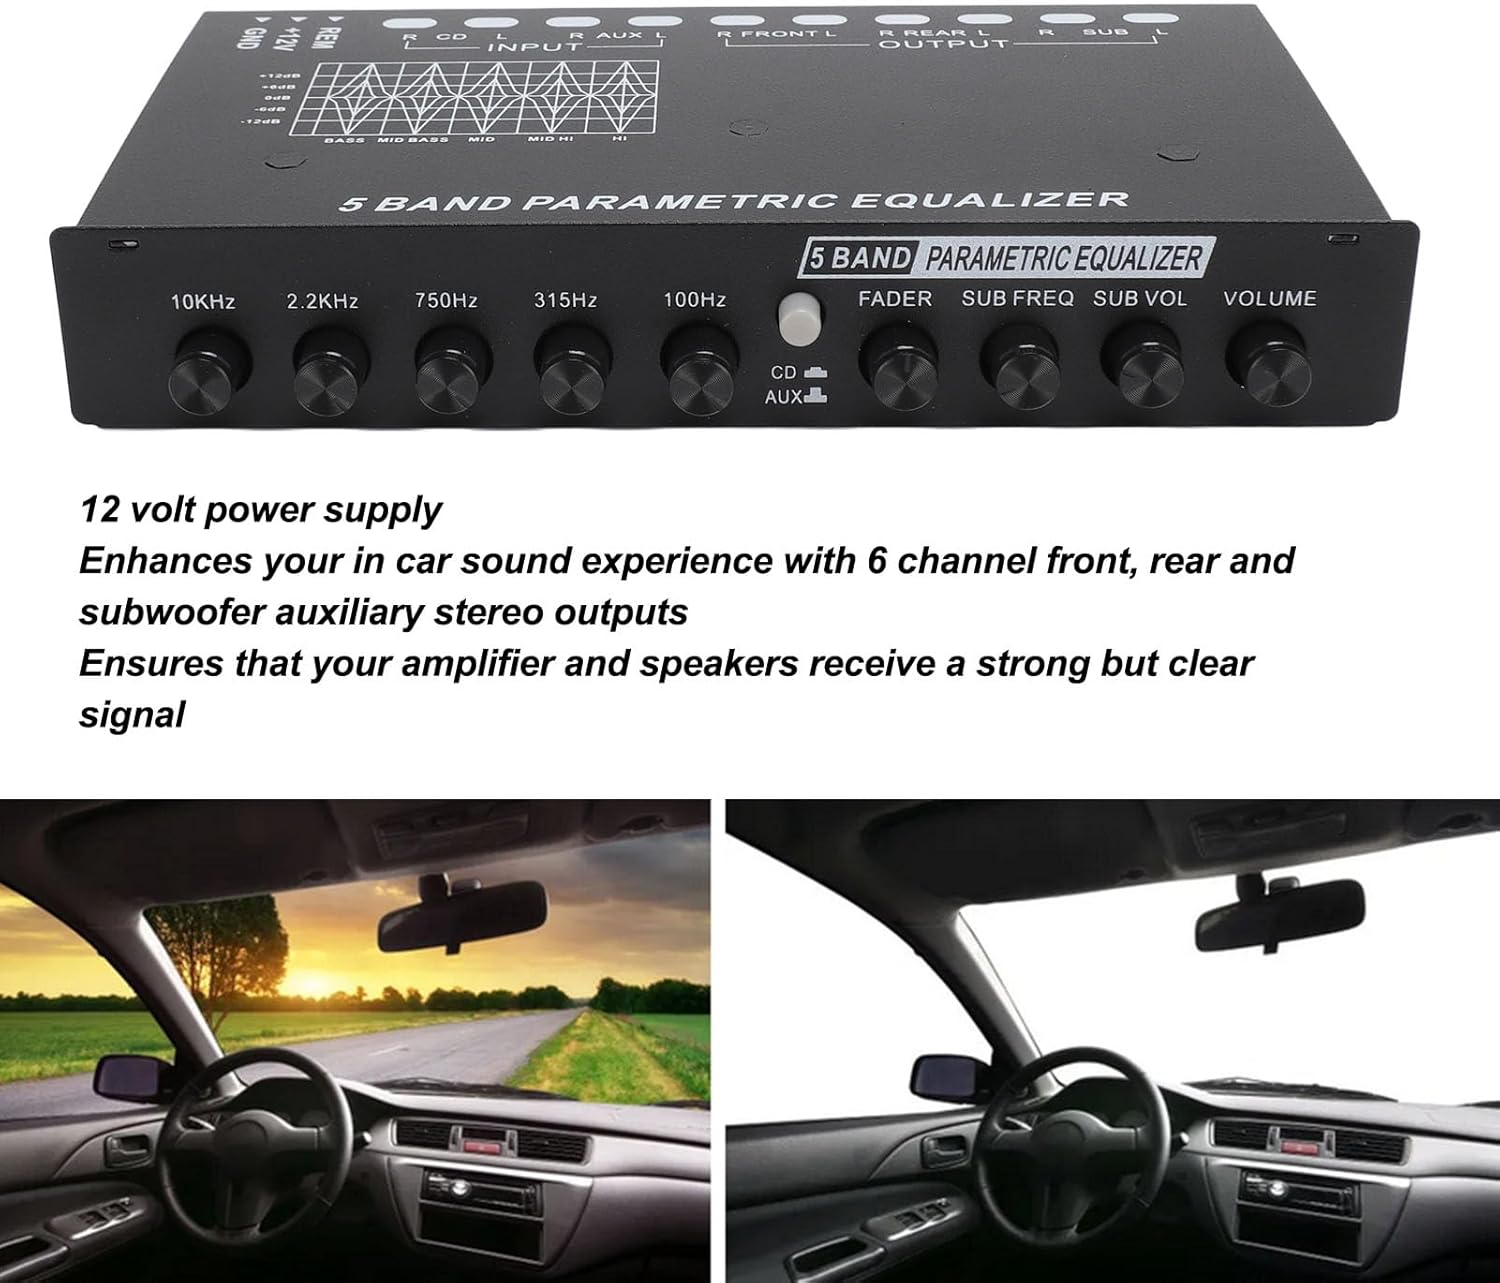
Image Description: This image shows the rear panel of the FOSA 5-Band Car Sound Equalizer. It features multiple RCA jacks for audio input and output, clearly labeled. From left to right, there are RCA outputs for Subwoofer (L/R), Rear (L/R), and Front (L/R). To the right of these are RCA inputs for AUX (L/R) and CD (L/R). On the far right, a three-pin terminal block is visible for power connections (REM, +12V, GND).
- Input (CD L/R, AUX L/R): RCA inputs for connecting your head unit's CD output or an auxiliary audio source.
- Output (Front L/R, Rear L/R, Sub L/R): RCA outputs for connecting to your car amplifier's front, rear, and subwoofer channels.
- Power Terminal (+12V, GND, REM): Terminal block for power connections.
5. Setup and Installation
Proper installation is crucial for optimal performance and safety. It is recommended that installation be performed by a professional.
5.1 Mounting
Use the provided iron pieces (mounting brackets) and screws to securely attach the equalizer to a stable surface in your vehicle, ensuring it does not obstruct driving controls or airbags.

Image Description: This image shows the FOSA 5-Band Car Sound Equalizer from a top-down perspective, with the two metal mounting brackets and four screws laid out in front of it. The brackets are L-shaped with holes for screws, designed to secure the equalizer in place.
5.2 Wiring Connections
Refer to the diagram on the unit and the following instructions for wiring:
- Power (+12V): Connect the +12V terminal to a switched 12V power source in your vehicle (e.g., ignition wire). This ensures the equalizer turns on and off with your vehicle.
- Ground (GND): Connect the GND terminal to a solid chassis ground point in your vehicle. Ensure a clean, bare metal connection for proper grounding.
- Remote (REM): Connect the REM terminal to the remote turn-on output of your head unit. This will turn the equalizer on when your head unit is active.
- Audio Input: Connect the RCA outputs from your head unit (CD or AUX) to the corresponding RCA inputs on the equalizer. Ensure left and right channels are correctly matched.
- Audio Output: Connect the RCA outputs from the equalizer (Front, Rear, Sub) to the corresponding RCA inputs on your car amplifier(s). Ensure left and right channels are correctly matched.
6. Operating Instructions
Once installed and wired, follow these steps to operate your equalizer:
- Power On: Turn on your vehicle's ignition and head unit. The equalizer should power on automatically via the remote wire.
- Input Selection: Use the CD/AUX Input Select Switch on the front panel to choose between your CD input or Auxiliary input source.
- Master Volume: Start with the Volume Control knob at a low setting to avoid sudden loud sounds. Gradually increase to a comfortable listening level.
- Equalization Adjustment: Use the five Frequency Adjustment Knobs (100Hz, 315Hz, 750Hz, 2.2KHz, 10KHz) to fine-tune the sound. Adjust each band to boost or cut specific frequencies according to your preference.
- Subwoofer Control:
- Use the Sub Freq knob to set the crossover frequency for your subwoofer, typically between 50Hz and 130Hz.
- Use the Sub Vol knob to adjust the output level of the subwoofer independently.
- Fader Control: Use the Fader Control knob to balance the sound output between the front and rear speakers.
7. Maintenance
The FOSA 5-Band Car Sound Equalizer requires minimal maintenance.
- Cleaning: Use a soft, dry cloth to wipe the unit. Do not use harsh chemicals or abrasive cleaners.
- Connections: Periodically check all wiring connections to ensure they are secure and free from corrosion.
8. Troubleshooting
If you encounter issues with your equalizer, refer to the following common problems and solutions:
| Problem | Possible Cause | Solution |
|---|---|---|
| No power to the equalizer |
|
|
| No sound output |
|
|
| Distorted sound |
|
|
| Humming or buzzing noise |
|
|
9. Specifications
Technical specifications for the FOSA 5-Band Car Sound Equalizer:
- Item Type: 5 Band Car Sound Equalizer
- Material: Metal
- Subwoofer Frequency Range: 50-130Hz
- Input Impedance: 15K OHMS
- Signal-to-Noise Ratio: 90dB
- Total Harmonic Distortion (T.H.D.): 0.05%
- Channel Separation: 70dB
- Frequency Response: 10Hz-50KHz
- Equalization Bands: 100Hz, 315Hz, 750Hz, 2.2KHz, 10KHz (Adjustable from -12dB to +12dB)
- Power Supply: DC 12V
- Item Weight: Approximately 1.13 pounds (0.51 kg)
- Package Dimensions: Approximately 7.87 x 5.51 x 1.57 inches (20 x 14 x 4 cm)
10. Warranty and Support
Specific warranty information for the FOSA 5-Band Car Sound Equalizer is not provided in this manual. For warranty details, technical support, or service inquiries, please contact the retailer or manufacturer directly using the contact information provided at the time of purchase.
