1. Introduction
Thank you for purchasing the KJK WIFI Trail Camera. This manual provides detailed instructions on how to set up, operate, and maintain your camera. Please read this manual carefully before use to ensure proper functionality and to maximize the camera's performance. This camera is designed for various outdoor and indoor monitoring applications, including wildlife observation, home security, and property surveillance.
2. Safety Information
- Do not expose the camera to extreme temperatures or direct sunlight for prolonged periods.
- Keep the camera away from strong magnetic fields.
- Use only recommended batteries and memory cards.
- Do not attempt to disassemble or repair the camera yourself. Contact customer support if issues arise.
- Ensure the battery compartment is securely closed to maintain IP67 waterproof rating.
- Dispose of batteries responsibly according to local regulations.
3. Package Contents
Please check the package contents to ensure all items are present:
- KJK Trail Camera Unit
- 64GB Memory Card
- USB Cable
- Mounting Strap
- Wall Mount Bracket
- Screws and Wall Plugs (x3)
- AA Batteries (x8)
- User Manual (Japanese)

Image: Contents included in the KJK Trail Camera package, showing the camera, memory card, batteries, USB cable, mounting accessories, and user manual.
4. Product Overview
Familiarize yourself with the main components of your KJK Trail Camera:

Image: Front view of the KJK Trail Camera, displaying the lens, screen, and infrared LEDs, alongside included accessories like the 64GB memory card, mounting bracket, strap, and AA batteries.
Key Components:
- Main Lens: Captures high-resolution images and videos.
- PIR Motion Sensor: Detects movement to trigger recording.
- Infrared LEDs: Provide illumination for night vision without visible light.
- LCD Screen: For menu navigation, settings, and playback.
- Control Buttons: For operating the camera's functions.
- Battery Compartment: Holds 8 AA batteries.
- SD Card Slot: For inserting the memory card.
- USB Port: For connecting to a computer or external power.
5. Setup
5.1. Battery Installation
- Open the camera's side latches and gently open the casing.
- Locate the battery compartment.
- Insert 8 AA alkaline batteries, ensuring correct polarity (+/-).
- Close the battery compartment cover securely.
5.2. Memory Card Installation
- With the camera casing open, locate the SD card slot.
- Insert the provided 64GB memory card into the slot until it clicks into place. The camera supports up to 128GB.
- It is highly recommended to format the memory card using the camera's menu before first use. Navigate to Menu > Format and confirm.
5.3. Mounting Options
The KJK Trail Camera offers versatile mounting options for various environments:
- Strap Mounting: Use the provided strap to secure the camera to a tree or pole.
- Wall Mount Bracket: Use the included bracket and screws to fix the camera to a wall or flat surface.
- Freestanding: The camera can be placed on a flat surface for temporary monitoring.

Image: Illustrations of various mounting methods for the KJK Trail Camera, including strap mounting on a tree, wall mounting, and freestanding placement, demonstrating its adaptability for different surveillance needs.
6. Operating Instructions
6.1. Powering On/Off
- To power on, slide the mode switch to the 'SETUP' position. The LCD screen will light up.
- To enter monitoring mode, slide the mode switch to the 'ON' position. The screen will turn off after a few seconds, and the camera will begin detecting motion.
- To power off, slide the mode switch to the 'OFF' position.
6.2. Basic Menu Navigation
Use the navigation buttons (UP, DOWN, LEFT, RIGHT, OK) to browse through the menu options and adjust settings on the LCD screen.
6.3. Wi-Fi Connection and App Usage
The camera features Wi-Fi connectivity for easy access to photos and videos via a smartphone app.
- Download the "TrailCam GO" app from your smartphone's app store (iOS/Android).
- On the camera, switch to 'SETUP' mode and enable Wi-Fi in the menu.
- On your smartphone, connect to the camera's Wi-Fi network (SSID and password will be displayed on the camera screen).
- Open the "TrailCam GO" app to view live feed, review captured media, download files, and change camera settings remotely.

Image: A visual representation of the KJK Trail Camera's Wi-Fi and app operation, showing a smartphone connected to the camera to view live footage of deer in a field, highlighting the convenience of remote access.
6.4. Recording Modes
The camera supports various recording modes:
- Photo Mode: Captures still images (up to 64MP).
- Video Mode: Records video clips (up to 8K FHD).
- Photo + Video Mode: Captures a still image followed by a video clip.
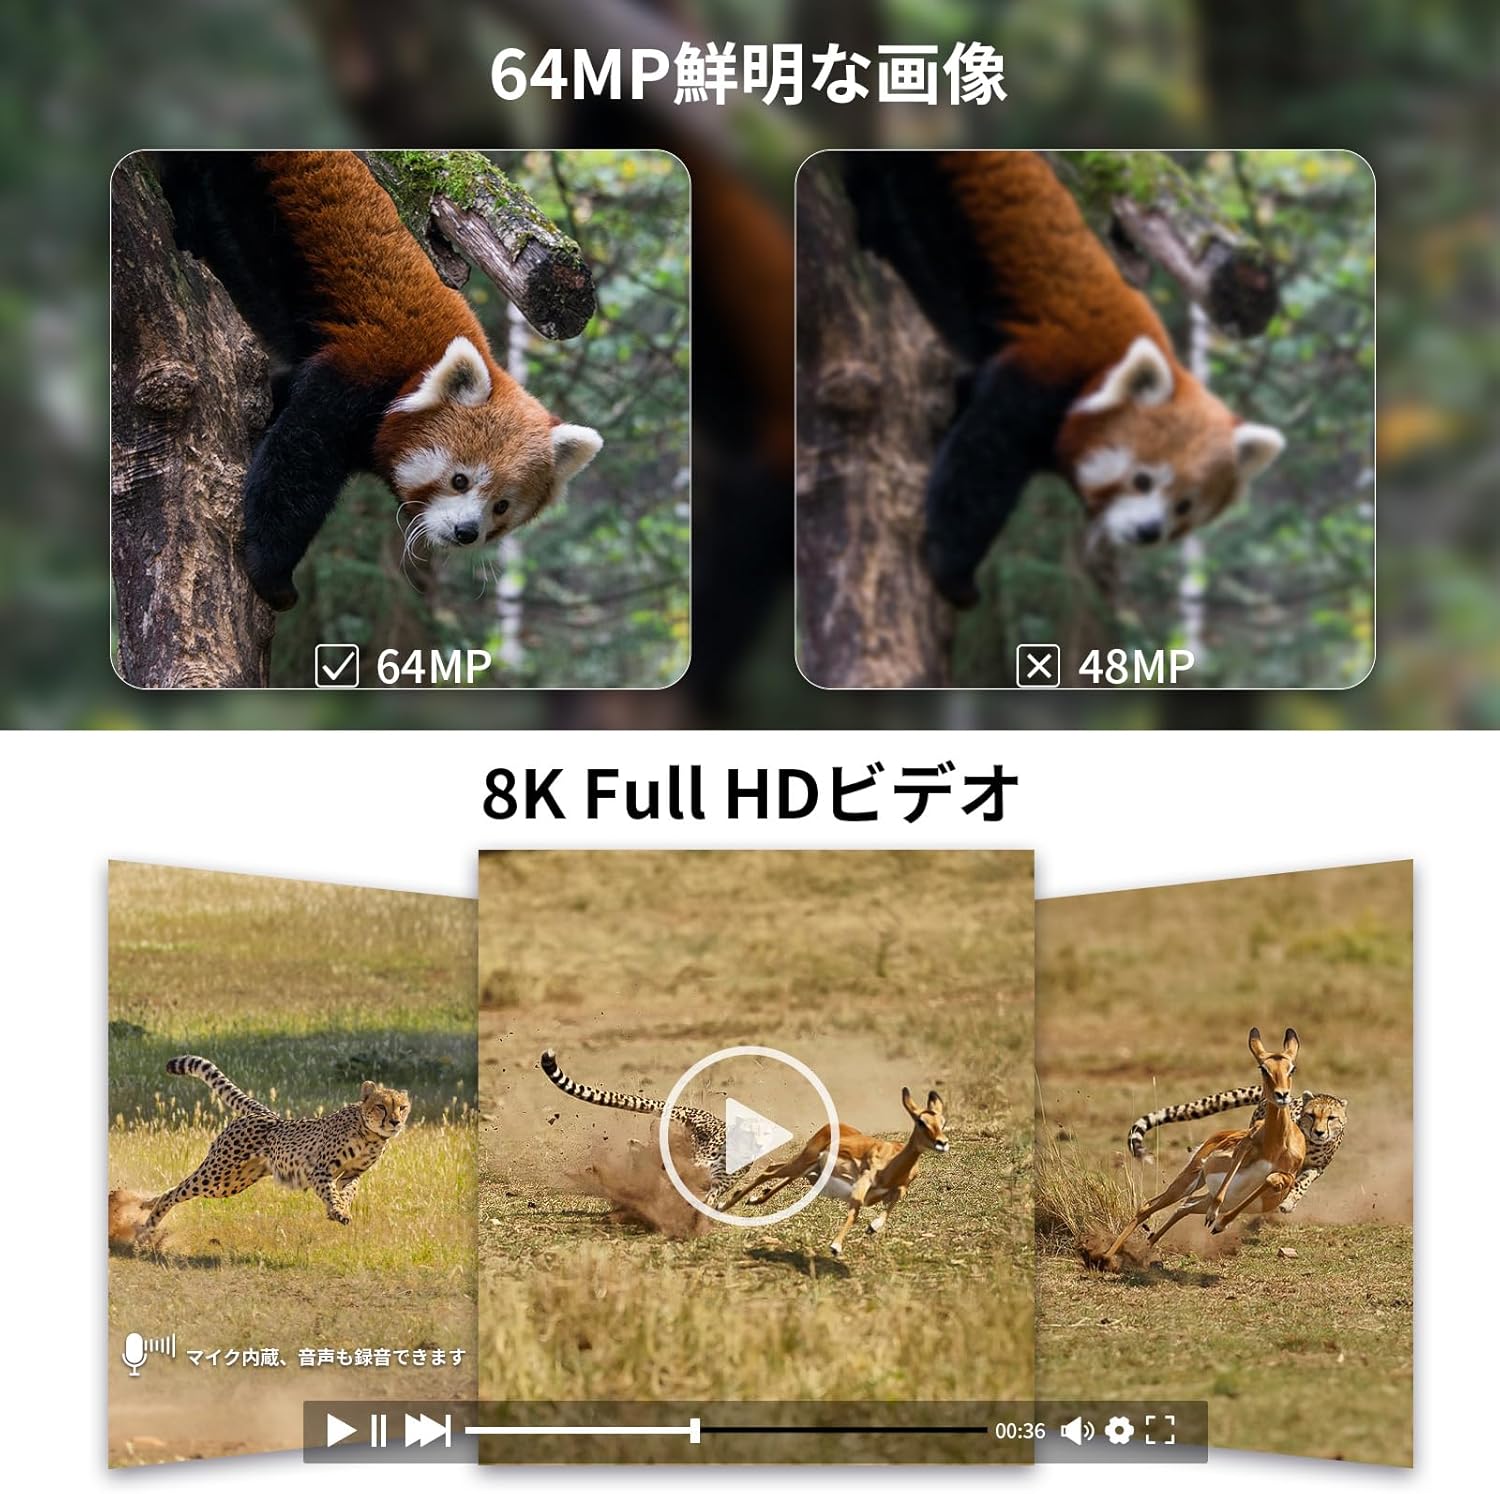
Image: Comparison of 64MP and 48MP still image quality, and a preview of 8K Full HD video, demonstrating the camera's high-resolution capabilities for both photos and videos.
6.5. Trigger Speed and Detection Angle
The camera features an ultra-fast 0.05-second trigger speed and a wide 130-degree detection angle to capture fast-moving subjects.

Image: Diagram illustrating the KJK Trail Camera's 0.05-second ultra-high-speed trigger and 130-degree wide detection angle, showing how it captures fast-moving animals like a cheetah with precision.
6.6. Night Vision and Infrared LEDs
Equipped with low-illumination infrared LEDs, the camera provides clear images and videos even in complete darkness without disturbing wildlife.

Image: A wolf howling in a snowy forest, with the KJK Trail Camera mounted on a tree, demonstrating its low-illumination infrared LED capabilities for clear night vision up to 30 meters.
6.7. Time-Lapse Function
The time-lapse function allows you to capture images or videos at set intervals, ideal for observing plant growth or long-term events.

Image: A sequence of images showing plant growth over time, illustrating the camera's time-lapse function, which can capture changes over 24 hours or longer periods.
6.8. Loop Recording
When the memory card is full, the camera can automatically overwrite the oldest files to continue recording. To enable this feature, navigate to Menu > Loop Recording and set it to 'ON'. (Initial setting is 'OFF').
7. Maintenance
7.1. Cleaning
- Wipe the camera body with a soft, damp cloth.
- For the lens, use a lens cleaning cloth and solution to avoid scratches.
- Ensure no dust or debris accumulates around the PIR sensor or infrared LEDs.
7.2. Battery Care
- Replace all batteries at the same time. Do not mix old and new batteries.
- Remove batteries if the camera will not be used for an extended period to prevent leakage.
- Consider using rechargeable AA batteries for environmental and cost efficiency.
7.3. Storage
Store the camera in a cool, dry place away from direct sunlight and extreme temperatures when not in use.
8. Troubleshooting
| Problem | Possible Cause | Solution |
|---|---|---|
| Camera not powering on | Low or dead batteries; Incorrect battery polarity | Replace batteries; Check battery orientation |
| Poor image/video quality at night | PIR sensor blocked; Subject too far; Lens dirty | Ensure clear line of sight for PIR; Place camera closer; Clean lens |
| Wi-Fi connection issues | Incorrect password; Too far from camera; App issues | Re-enter password; Move closer to camera; Restart app/phone |
| Camera not recording | Memory card full/corrupted; Incorrect settings; PIR sensitivity too low | Format/replace memory card; Check recording mode/PIR settings |
| Short battery life | Frequent recordings; Cold weather; Low quality batteries | Adjust recording frequency; Use high-quality alkaline batteries; Consider solar panel |
9. Specifications
| Feature | Specification |
|---|---|
| Model Number | KJK-HC230 |
| Still Image Resolution | Up to 64 Megapixels |
| Video Resolution | Up to 8K Full HD |
| Trigger Speed | 0.05 seconds |
| Detection Angle | 130 degrees |
| Night Vision Range | Up to 30 meters (98 feet) |
| Infrared LEDs | 42-piece 950nm No-Glow LED array |
| Memory Card Support | 64GB (included), supports up to 128GB |
| Waterproof Rating | IP67 |
| Power Source | 8 x AA Batteries (included) |
| Solar Panel Compatibility | 6V/1.5A DC Plug 3.5x1.35mm (sold separately) |
| Operating Temperature | -22°F to +158°F (-30°C to +70°C) |
| Dimensions | 13.8 x 10 x 6.5 cm (5.4 x 3.9 x 2.6 inches) |
| Weight | 730 g (1.6 lbs) |
10. Warranty and Support
Your KJK Trail Camera comes with a 12-month warranty from the date of purchase. This warranty covers manufacturing defects and malfunctions under normal use. It does not cover damage caused by misuse, accidents, unauthorized repairs, or natural disasters.
For technical support, warranty claims, or any questions regarding your product, please contact KJK customer service through the Amazon platform or visit the official KJK store page. Please have your purchase receipt and product model number ready when contacting support.
We are committed to providing excellent customer service and will assist you with any issues you may encounter.


