OmninexHub FD-570
User Manual for OmninexHub Smart Board Stand with Camera Tray
Model: FD-570
Product Overview
The OmninexHub Smart Board Stand with Camera Tray is a versatile and robust mobile stand designed to enhance your interactive display experience in various environments, including home, office, and classroom settings. It offers wide compatibility, height adjustability, and convenient mobility.
Key Features:
- Wide Compatibility: Designed for 42"-75" screens, this smart board stand is the perfect solution for a range of meeting devices, ideal for modern offices and classrooms.
- Height Adjustable: The whiteboard stand's height is easily adjustable, ensuring all participants have an optimal viewing angle.
- Sturdy Weight Capacity: With the ability to support up to 300LBS, this mobile stand ensures your equipment stays secure, making it perfect for corporate use.
- Integrated Camera Tray: The built-in camera tray offers a convenient mounting solution for video conferencing equipment, enhancing meeting efficiency.
- 360° Rotating Wheels for Easy Mobility: Move your smartboard stand effortlessly between rooms with smooth-rolling, 360° rotating wheels, perfect for dynamic office spaces.
What's in the Box:
- Tripod Legs (x2)
- Rolling Wheels (x4)
- Multi-functional Tray (x1)
- Vertical Pillars (x2)
- Mounting Plate (x1)
- Hanging Strips (x2)
- Camera Tray (x1)
- Hardware (screws, bolts, nuts, wrench, screwdriver)

Figure 1: OmninexHub Smart Board Stand with Camera Tray.
Assembly Instructions
Please follow these steps carefully to assemble your Smart Board Stand. A detailed assembly video is provided below for visual guidance.
Video 1: Complete Assembly Guide for OmninexHub Smart Board Stand.
This video demonstrates all assembly steps from wheel installation to final screen mounting.
Step 1: Wheel Installation
Insert the rolling wheels into the bottom of the tripod brackets. Use the provided wrench to secure and tighten them firmly.

Figure 2: Detail of 360° rotating wheels and their installation point.
Step 2: Mounting Tripods
Connect the two tripod pieces. Tighten the bolts on either side first to ensure a stable base.
Step 3: Tray Installation
Align the multi-functional tray with the designated slots on the assembled tripod base. Tighten the tray with a screwdriver and secure the bolts.

Figure 3: Close-up of the multi-functional tray.
Step 4: Installation of Pillars
Connect the two vertical pillars to the tripod base. Fasten them securely using the provided nuts and tighten the screws on each side.
Step 5: Mounting Plate Installation
Hang the mounting plate onto the support pole hooks. Secure the mounting plate with screws, ensuring all nuts and bolts are fastened. Once the screen is hung, put the two latches back in place and tighten the bolts for added security.

Figure 4: Detail of the versatile adjustable mount and safety lock mechanism.
Step 6: Camera Tray Installation
Attach the camera stand to the top mount. Tighten the bolts to secure the camera tray in place.

Figure 5: Close-up of the camera tray.
Operating Instructions
Adjusting Height:
The stand features an easily adjustable height mechanism. Locate the height adjustment points on the vertical pillars. Loosen the locking mechanisms, adjust the screen to your desired viewing height, and then securely tighten the locks. This ensures an optimal viewing angle for all participants, whether standing or seated.
Mobility and Stability:
The 360° rotating wheels allow for effortless movement of the stand between rooms or within a dynamic workspace. To secure the stand in place, engage the wheel locks on all four wheels. Ensure the locks are fully engaged to prevent unintended movement and maintain stability during use.

Figure 6: Smart board stand in a professional setting.
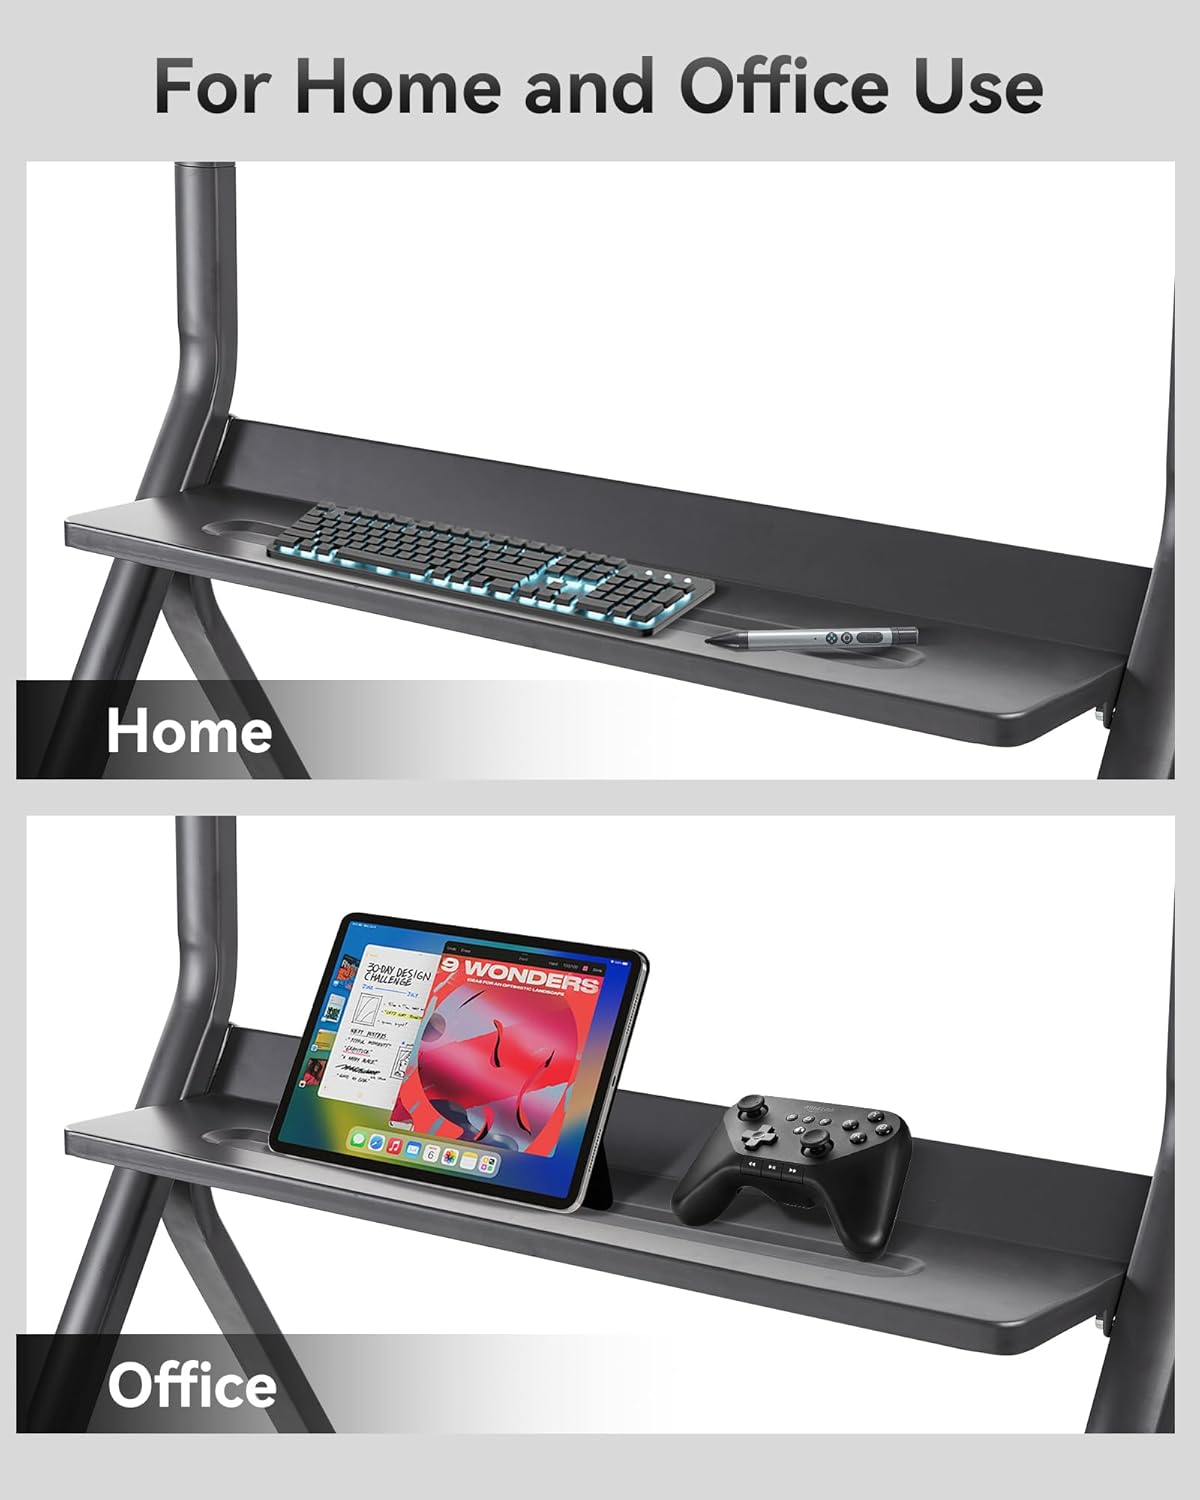
Figure 7: Versatile use of the stand in home and office environments.
Using the Camera Tray:
The integrated camera tray provides a stable platform for your video conferencing equipment. Place your camera or other peripherals securely on the tray. This feature is designed to enhance meeting efficiency by positioning your camera at an optimal height for clear video communication.
Maintenance
- Cleaning: Wipe down the metal surfaces with a soft, damp cloth. Avoid abrasive cleaners or solvents that could damage the finish.
- Inspections: Periodically check all bolts and screws to ensure they remain tight. Re-tighten if necessary to maintain stability and safety.
- Wheel Care: Keep the wheels free of debris to ensure smooth rolling. Lubricate the wheel axles if they become stiff.
Troubleshooting
- Stand Wobbles: Ensure all assembly bolts are securely tightened. Check that the floor surface is level.
- Difficulty Moving: Verify that the wheel locks are disengaged. Clean any debris from the wheels.
- Screen Not Level: Re-check the mounting plate installation and ensure it is properly seated on the support hooks. Adjust the screen's position on the mounting strips if needed.
Specifications
| Feature | Detail |
|---|---|
| Brand | OmninexHub |
| Item Model Number | FD-570 |
| Item Weight | 39 pounds |
| Product Dimensions | 25.98 x 6.29 x 34.64 inches |
| Color | Silver |
| Material Type | Metal |
| Number of Items | 1 |
| Size | for 42"-75" smart board |
| Mounting Type | Floor Mount |
| Recommended Uses | Gym, Home, Office, School |
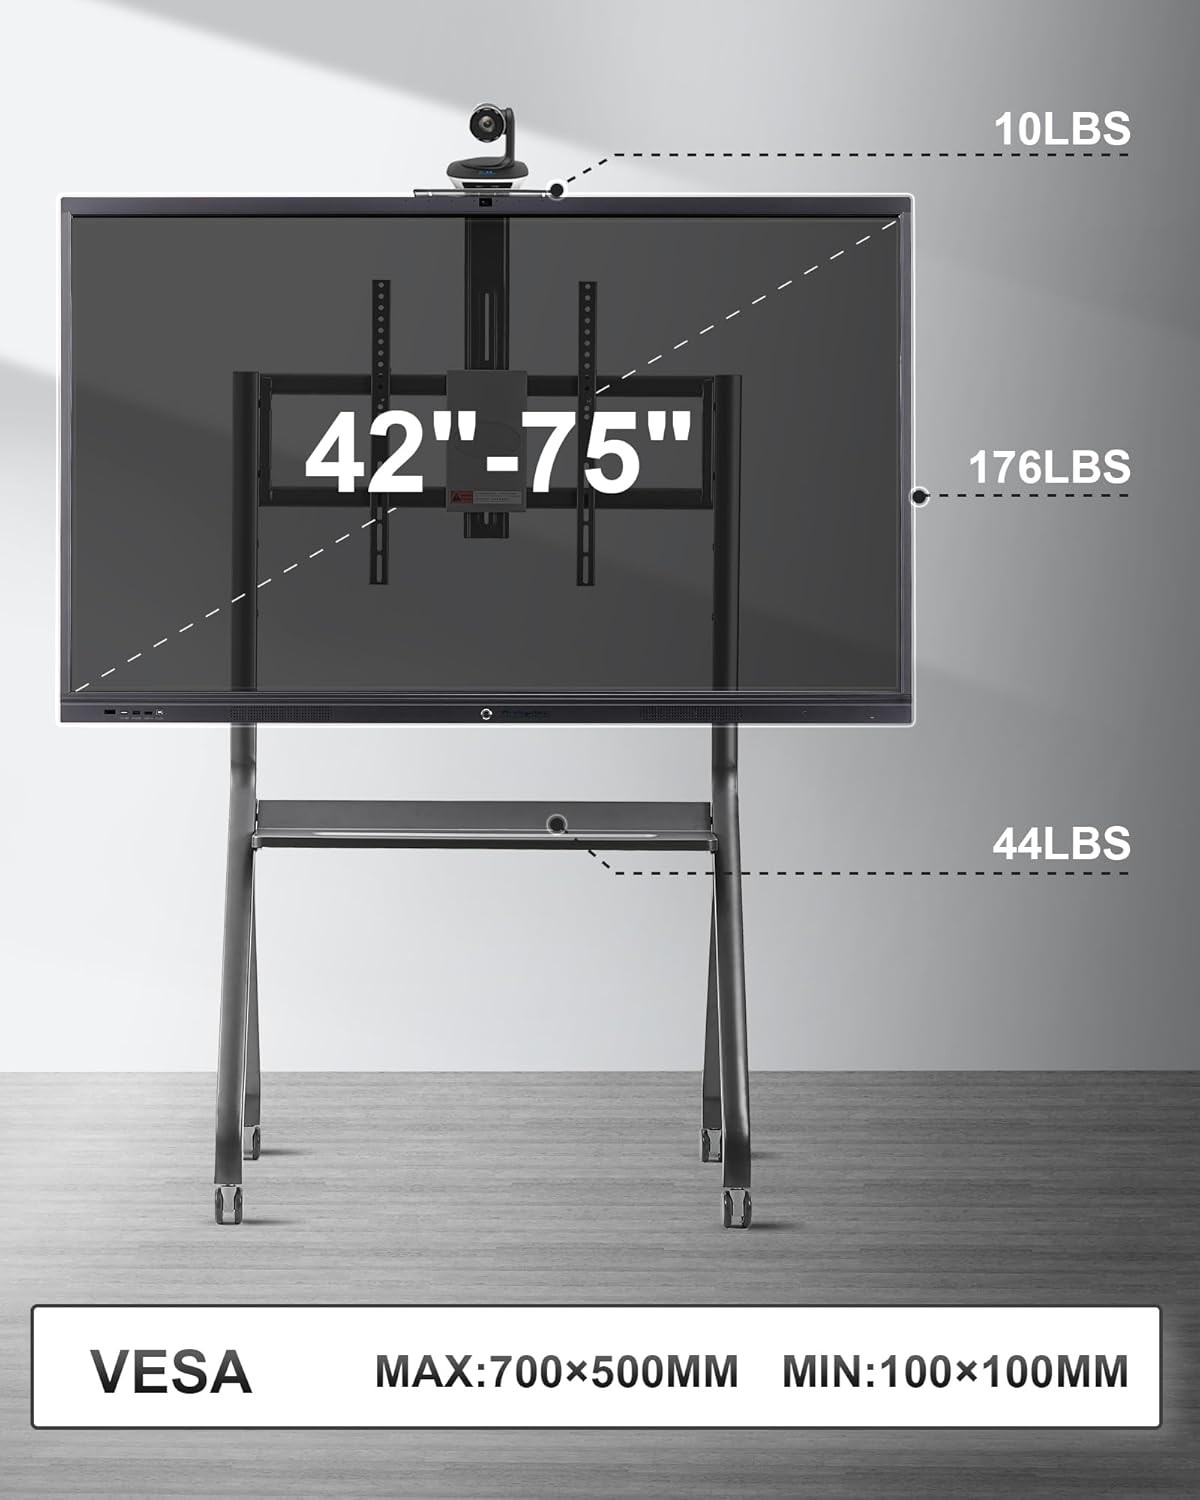
Figure 8: Screen size compatibility and weight capacity.
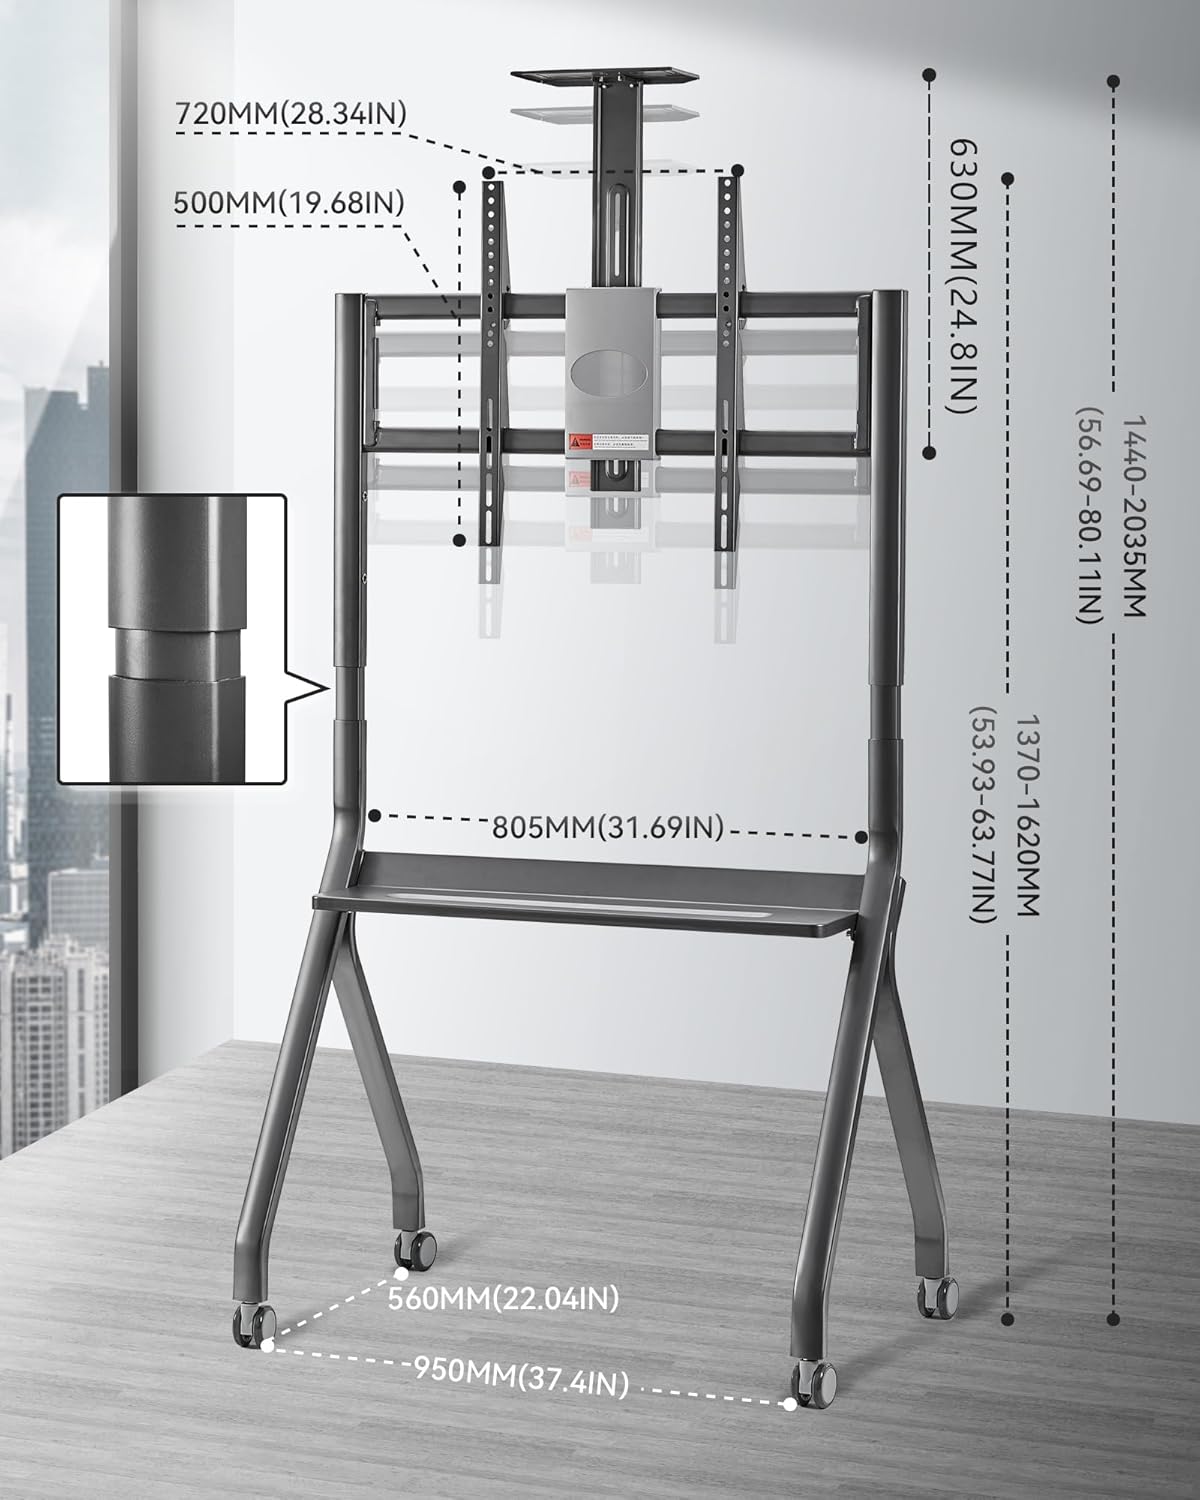
Figure 9: Detailed measurements of the stand.
Warranty and Support
OmninexHub is committed to providing high-quality products and excellent customer service.
- Warranty: This product comes with a 3-Year Standard Warranty.
- Technical Support: For any technical assistance or inquiries, please contact us via email at jiyuanxin-sci@outlook.com.
- Customer Service: Assured by 24/7 Live Chat Support.

Figure 10: OmninexHub Customer Support details.
Related Documents - FD-570
 |
STEELFORCE PRO 570 SLS DOUBLE COLUMN FRAME Assembly Manual Comprehensive assembly and operating manual for the STEELFORCE PRO 570 SLS DOUBLE COLUMN FRAME. Provides detailed instructions, safety information, and technical specifications for the proper installation and use of this height-adjustable workstation frame by Actiforce. |
 |
CFS Concrete Lifting Inserts: Safe Handling and Installation Solutions Explore CFS's comprehensive range of concrete lifting inserts, including tube cross hole sockets, solid cross hole sockets, flat steel anchors, waved anchors, sandwich panel anchors, bolt anchors, and rebar anchors. Designed for safe, efficient, and precise handling of heavy loads in precast concrete construction. |
 |
Illuxtron Downlights HV-FD Product Manual Product manual for Illuxtron Downlights HV-FD series, detailing symbol explanations, safety instructions, energy efficiency, dimensions, installation types, and dimmer compatibility. |
 |
ORCON HRC Display inbouw 15RF Installatie- en Gebruikershandleiding Handleiding voor de ORCON HRC Display inbouw 15RF, inclusief installatie-instructies, bediening, en service menu-opties voor optimale luchtkwaliteit. |
 |
S&C Alduti-Rupter Switches Installation and Operation Guide Comprehensive instructions for the installation and operation of S&C Alduti-Rupter Switches, including Heavy-Duty and Integer Style models for outdoor distribution. |
 |
Roland PD-7/KD-7/FD-7 Service Notes and Parts List Comprehensive service notes, specifications, exploded views, parts lists, and circuit diagrams for Roland PD-7, KD-7, FD-7, MDS-7, MDY-7, and MDH-7 drum accessories. Includes detailed part identification, assembly instructions, and technical information. |