
1. Product Overview
This set includes 9 Carbide High Speed Cutting Teeth, specifically 3 left-angled teeth with hardware, 3 right-angled teeth with hardware, and 3 straight teeth with hardware. Each tooth features a cast holder with dual bolt design and hex pockets to prevent rotation of the mounting bolts. These teeth are designed for high-speed cutting applications in stump grinders.

Image 1.1: Complete set of 9 WFCYX Carbide High Speed Cutting Teeth with accompanying hardware.

Image 1.2: Visual representation of the product overview, highlighting the three types of cutting teeth and their application on a stump grinder.
2. Compatible Models
These cutting teeth are specifically designed for optimal compatibility and performance with the following stump grinder models:
- DK2 Stump Grinder Model OPG777
- Power King Stump Grinder Model PK0803
- Power King Stump Grinder Model PK0803-EH
They are also suitable for other stump grinder machines that utilize cutting teeth of the same size and mounting specifications.

Image 2.1: Illustration of compatible models, showing the teeth and a detailed view of a stump grinder's cutting mechanism.
3. Product Function
The WFCYX Carbide High Speed Cutting Teeth are engineered for efficient and effective stump removal. Their primary function is to provide a complete replacement or upgrade for your existing stump grinder cutting system, ensuring optimal machine performance.
Key functional benefits include:
- High Speed Cutting: Designed to maximize cutting efficiency and speed.
- Optimized Performance: Ensures your stump grinder operates at its peak, reducing effort and time for land clearing tasks.
- Precise Cutting: Facilitates clean and effective removal of stumps and roots.
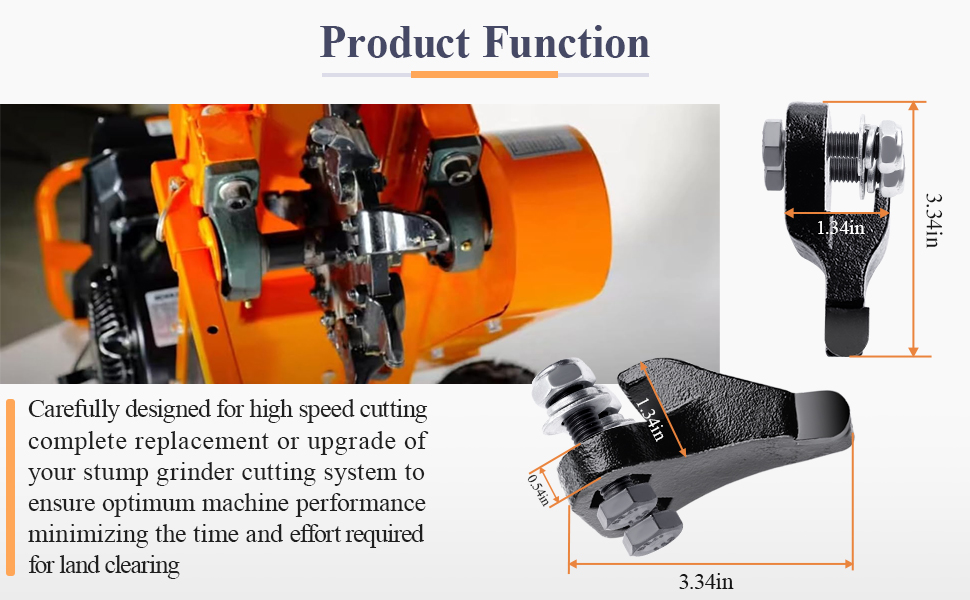
Image 3.1: Depiction of product function, including dimensional details of the teeth and a visual of the cutting process.
4. Premium Material
Each cutting tooth is equipped with a high-quality carbide tip. Carbide is renowned for its exceptional hardness and wear resistance, making these teeth highly durable and long-lasting.
The use of Tungsten Carbide ensures:
- Unmatched Hardness: Provides superior cutting capability.
- Wear Resistance: Extends the lifespan of the teeth, even under demanding conditions.
- Long-lasting Sharpness: Maintains cutting edge integrity for efficient operation over time.

Image 4.1: Close-up view of the carbide tip, emphasizing the premium material used for enhanced durability and cutting performance.
5. Installation Guide
5.1. Safety Precautions
- ALWAYS disconnect the machine from its power source (e.g., remove spark plug wire, disconnect battery, or unplug) before attempting any maintenance or replacement.
- Wear appropriate personal protective equipment (PPE), including heavy-duty gloves and eye protection.
- Ensure the machine is stable and cannot accidentally move during the installation process.
5.2. Installation Steps
Our kits include a complete set of necessary mounting hardware, eliminating the need for separate purchases. Follow these steps to replace worn cutting teeth:
- Ensure the stump grinder is turned off and disconnected from its power source.
- Locate the worn or damaged cutting teeth on the grinder's cutting wheel.
- Using appropriate tools (e.g., wrenches), carefully remove the bolts and nuts securing the old tooth.
- Remove the old tooth and its associated hardware.
- Position the new WFCYX cutting tooth (left, right, or straight as required) onto the cutting wheel. Ensure the hex pockets align correctly with the mounting bolts to prevent rotation.
- Insert the new bolts through the tooth and the cutting wheel, securing them with the provided nylon lock nuts and washers.
- Tighten the nuts securely. Do not overtighten, but ensure they are firm to prevent loosening during operation.
- Repeat the process for all teeth requiring replacement.
- Once all teeth are replaced, double-check all connections for tightness and proper alignment.
- Reconnect the machine's power source and test its operation in a safe environment.
Proper installation reduces equipment downtime and allows you to return to stump grinding tasks faster.

Image 5.1: Visual guide demonstrating the ease of installation, showing the teeth being mounted onto the grinder's cutting wheel.
6. Maintenance
Regular maintenance of your cutting teeth is crucial for prolonging their lifespan and ensuring consistent performance of your stump grinder.
- Inspection: Before each use, inspect all cutting teeth for signs of wear, damage, or looseness. Replace any teeth that are excessively worn, chipped, or cracked.
- Cleaning: After each use, clean any debris, dirt, or sap from the teeth and the cutting wheel. This prevents buildup that could hinder performance or cause premature wear.
- Tightness: Periodically check the tightness of the mounting bolts. Vibrations during operation can cause bolts to loosen over time.
- Storage: Store spare teeth in a dry environment to prevent rust and corrosion.
7. Troubleshooting
7.1. Reduced Cutting Efficiency
- Cause: Worn or dull cutting teeth.
- Solution: Inspect teeth for sharpness. Replace dull teeth with new ones as per the installation guide.
7.2. Excessive Vibration During Operation
- Cause: Loose or unevenly worn teeth.
- Solution: Check all mounting bolts for tightness. Ensure all teeth are securely fastened. Replace any teeth that show significant uneven wear or damage.
7.3. Teeth Breaking or Chipping Prematurely
- Cause: Impact with foreign objects (rocks, metal), improper installation, or extreme operating conditions.
- Solution: Always clear the work area of large debris before grinding. Ensure teeth are installed correctly and tightened to specifications. Avoid excessive force or impact during operation.
8. Specifications
| Attribute | Detail |
|---|---|
| Brand | WFCYX |
| Material | Tungsten Carbide |
| Color | Black |
| Item Weight | 9.11 pounds (4.14 Kilograms) |
| Package Dimensions | 6.02 x 5.83 x 4.06 inches |
| UPC | 788567553251 |
| Item Model Number | PK080308, PK0803, OPG777 |
| Manufacturer | WFCYX |
9. Warranty and Support
For information regarding product warranty, returns, or technical support, please refer to the seller's policy on the platform where the product was purchased. You may also contact WFCYX customer service directly through their official channels for assistance.
Please retain your proof of purchase for any warranty claims or support inquiries.