Introduction
This manual provides detailed instructions for the setup, operation, maintenance, and troubleshooting of your AOCHUAN SMART M2 Smartphone Gimbal Stabilizer. Please read this manual thoroughly before using the device to ensure proper function and longevity.
The AOCHUAN SMART M2 is a versatile device designed to enhance your smartphone photography and videography. It functions as a gimbal stabilizer, a selfie stick, and a tripod, featuring smart AI face tracking and an integrated magnetic RGB LED fill light.
Product Overview
The SMART M2 combines multiple functionalities into one compact device:
- Gimbal Stabilizer: Provides smooth, stable footage for videos and photos.
- Selfie Stick: Extends for wider shots and group photos.
- Tripod: Offers stable support for hands-free recording and time-lapses.
- Smart AI Face Tracking: Automatically tracks subjects without requiring a dedicated application.
- Magnetic RGB LED Fill Light: Provides adjustable lighting with multiple colors and brightness levels.
- Wireless Remote Control: Allows for convenient operation from a distance.
- Portable and Foldable Design: Easy to carry and store.
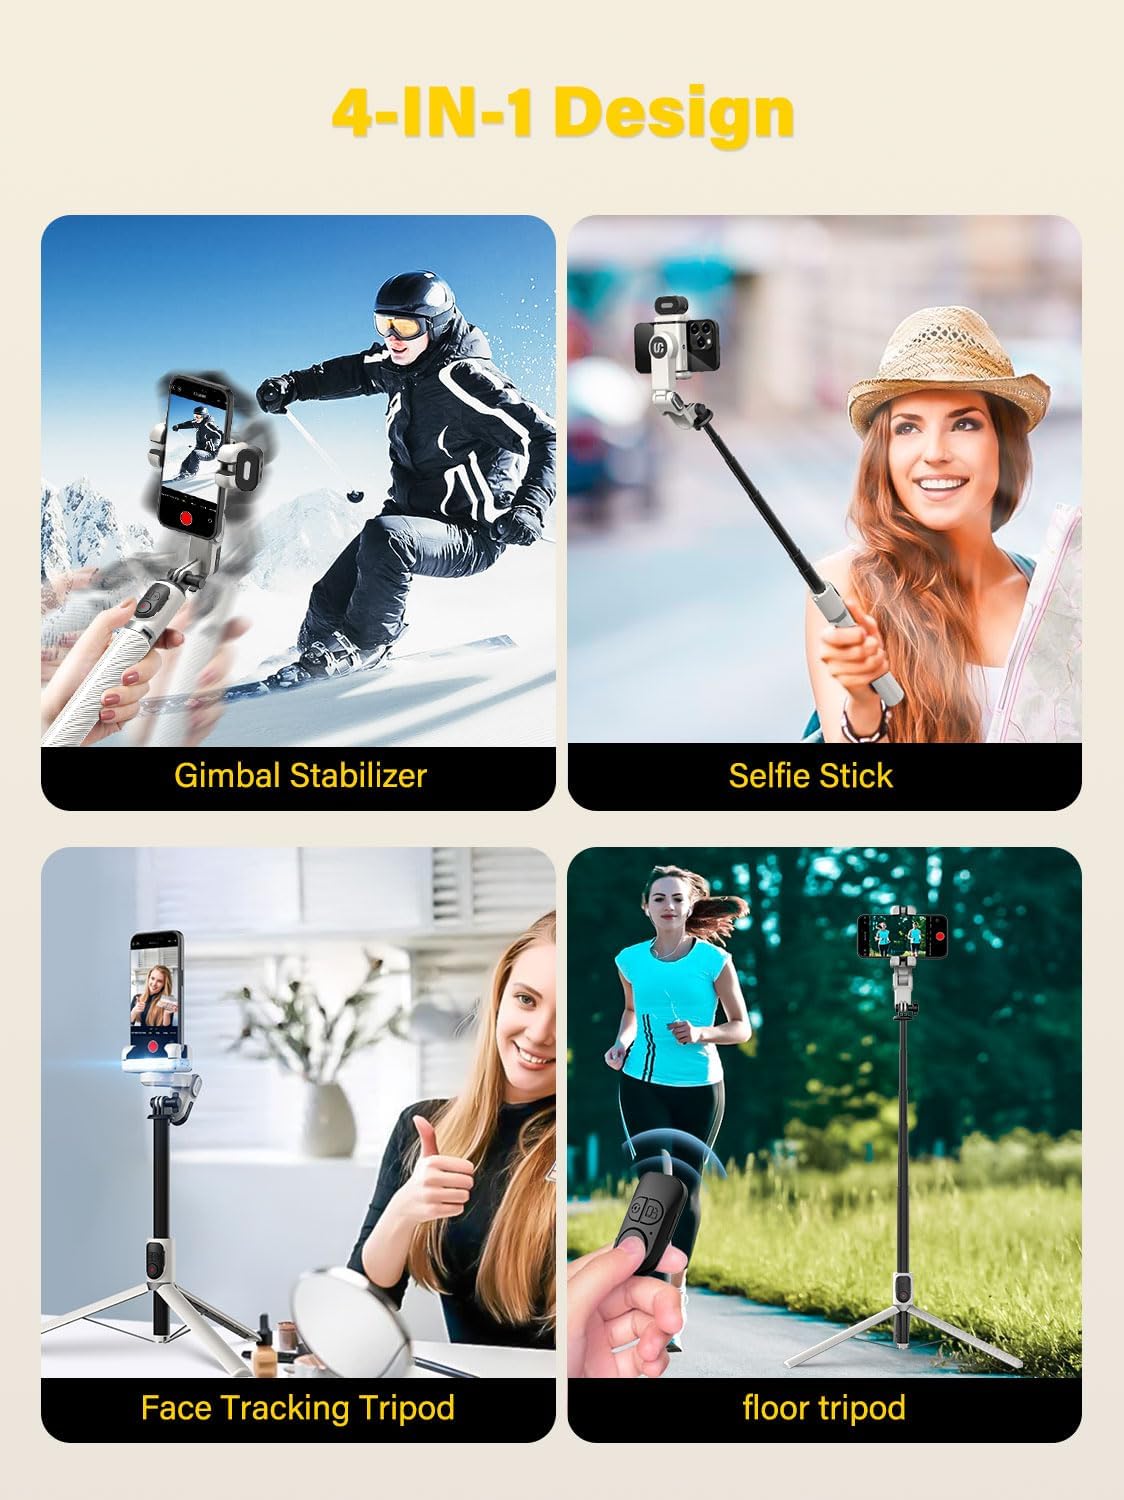
Figure 1: The AOCHUAN SMART M2's 4-in-1 design, illustrating its use as a gimbal stabilizer, selfie stick, face tracking tripod, and floor tripod.
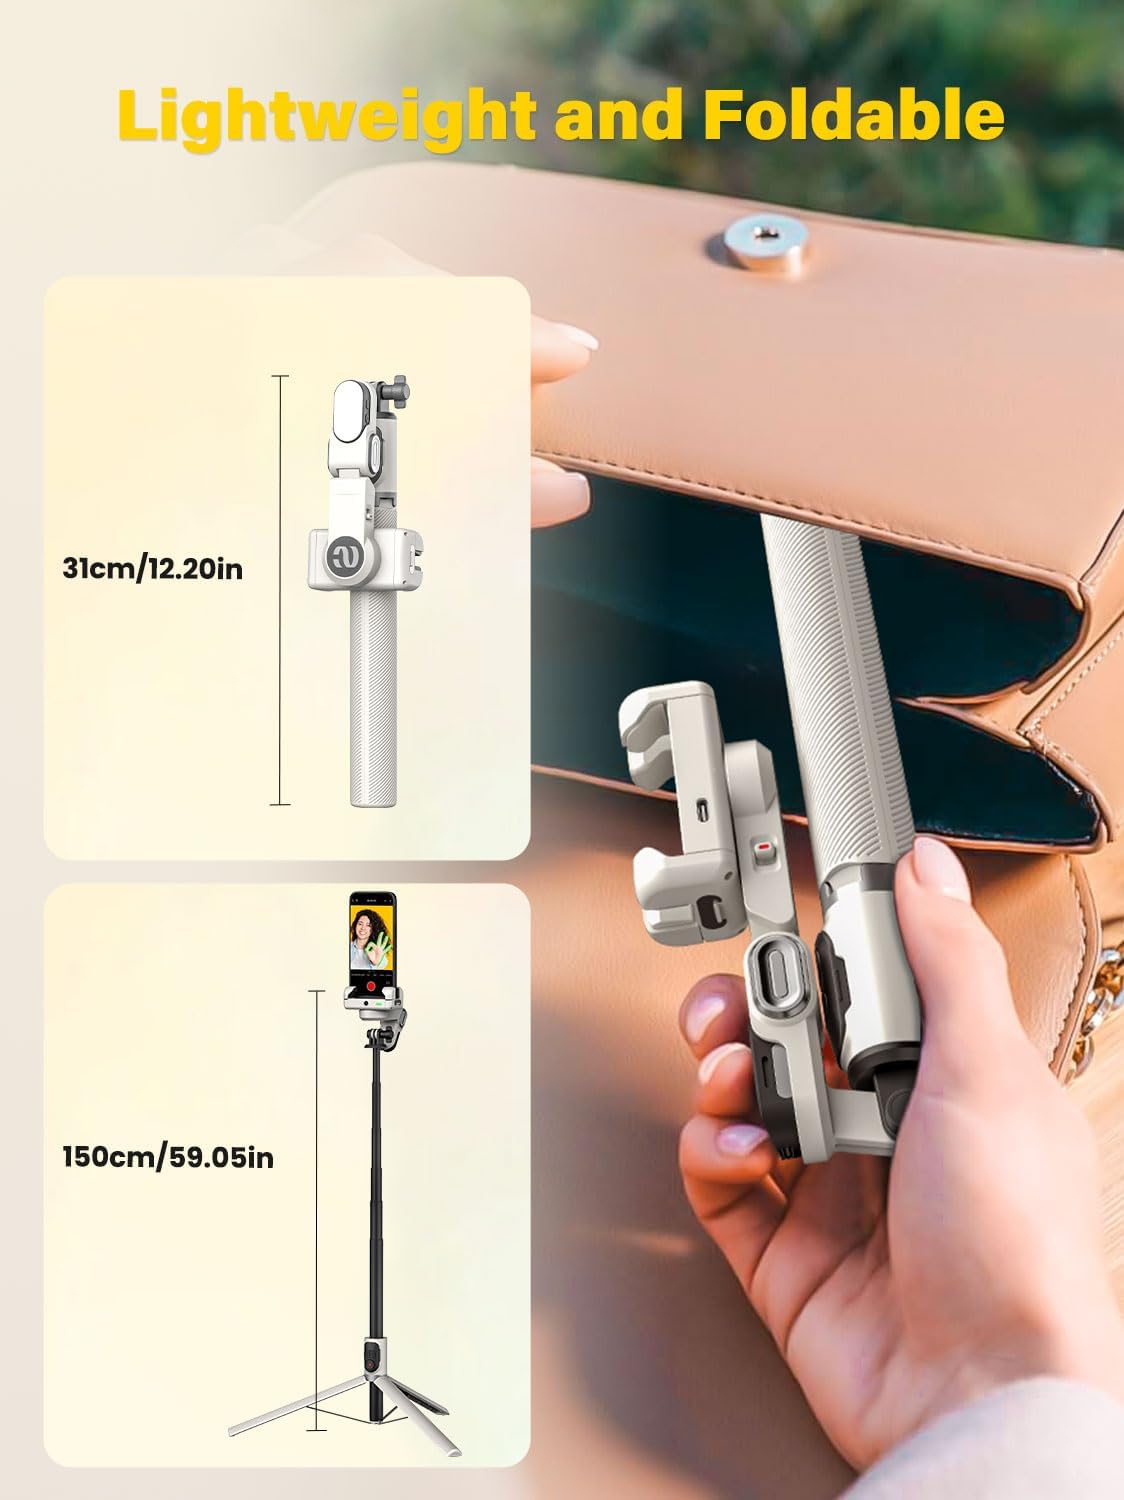
Figure 2: The compact, foldable design of the SMART M2, showing its folded length of 12 inches and extended length of 43 inches.
Setup
1. Unboxing and Initial Check
Upon opening the package, ensure all components are present:
- AOCHUAN SMART M2 Gimbal Stabilizer
- Magnetic Fill Light
- USB-C Charging Cable
- User Manual (this document)
2. Charging the Device
Before first use, fully charge the gimbal stabilizer and the magnetic fill light. Connect the provided USB-C cable to the charging port on the device and to a standard USB power adapter (not included). The battery can last up to 4-7 hours on standby after a full charge.
3. Attaching the Magnetic Fill Light
The RGB fill light attaches magnetically to the top of the phone clamp. Ensure it is securely seated before use.

Figure 3: Attaching the magnetic RGB fill light to the phone clamp.
4. Mounting Your Smartphone
Extend the phone clamp and carefully insert your smartphone. Ensure the phone is centered and securely held within the clamp. The clamp is compatible with smartphones ranging from 4.0 to 6.2 inches.
Operating Instructions
1. Power On/Off
Locate the power button on the device. Press and hold the power button for a few seconds to turn the gimbal on or off. An indicator light will confirm the power status.
2. Switching Between Gimbal, Selfie Stick, and Tripod Modes
The SMART M2 can be easily converted between its different modes:
- Gimbal Stabilizer: Ensure the device is unfolded and the phone clamp is free to rotate for stabilization.
- Selfie Stick: Extend the telescopic rod to the desired length. The gimbal head can be manually locked for selfie stick use.
- Tripod: Unfold the legs at the base of the device to create a stable tripod stand.

Figure 4: Transitioning from gimbal to selfie stick mode, including manual lock options.
3. Smart AI Face Tracking
The SMART M2 features built-in AI tracking that does not require a separate application. To activate or control face tracking:
- Start Tracking: Make an "OK" gesture with your hand in front of the camera.
- Pause Tracking: Present your palm to the camera.
- Toggle Gesture Recognition: Use a two-hand "L" gesture to turn gesture recognition on or off.
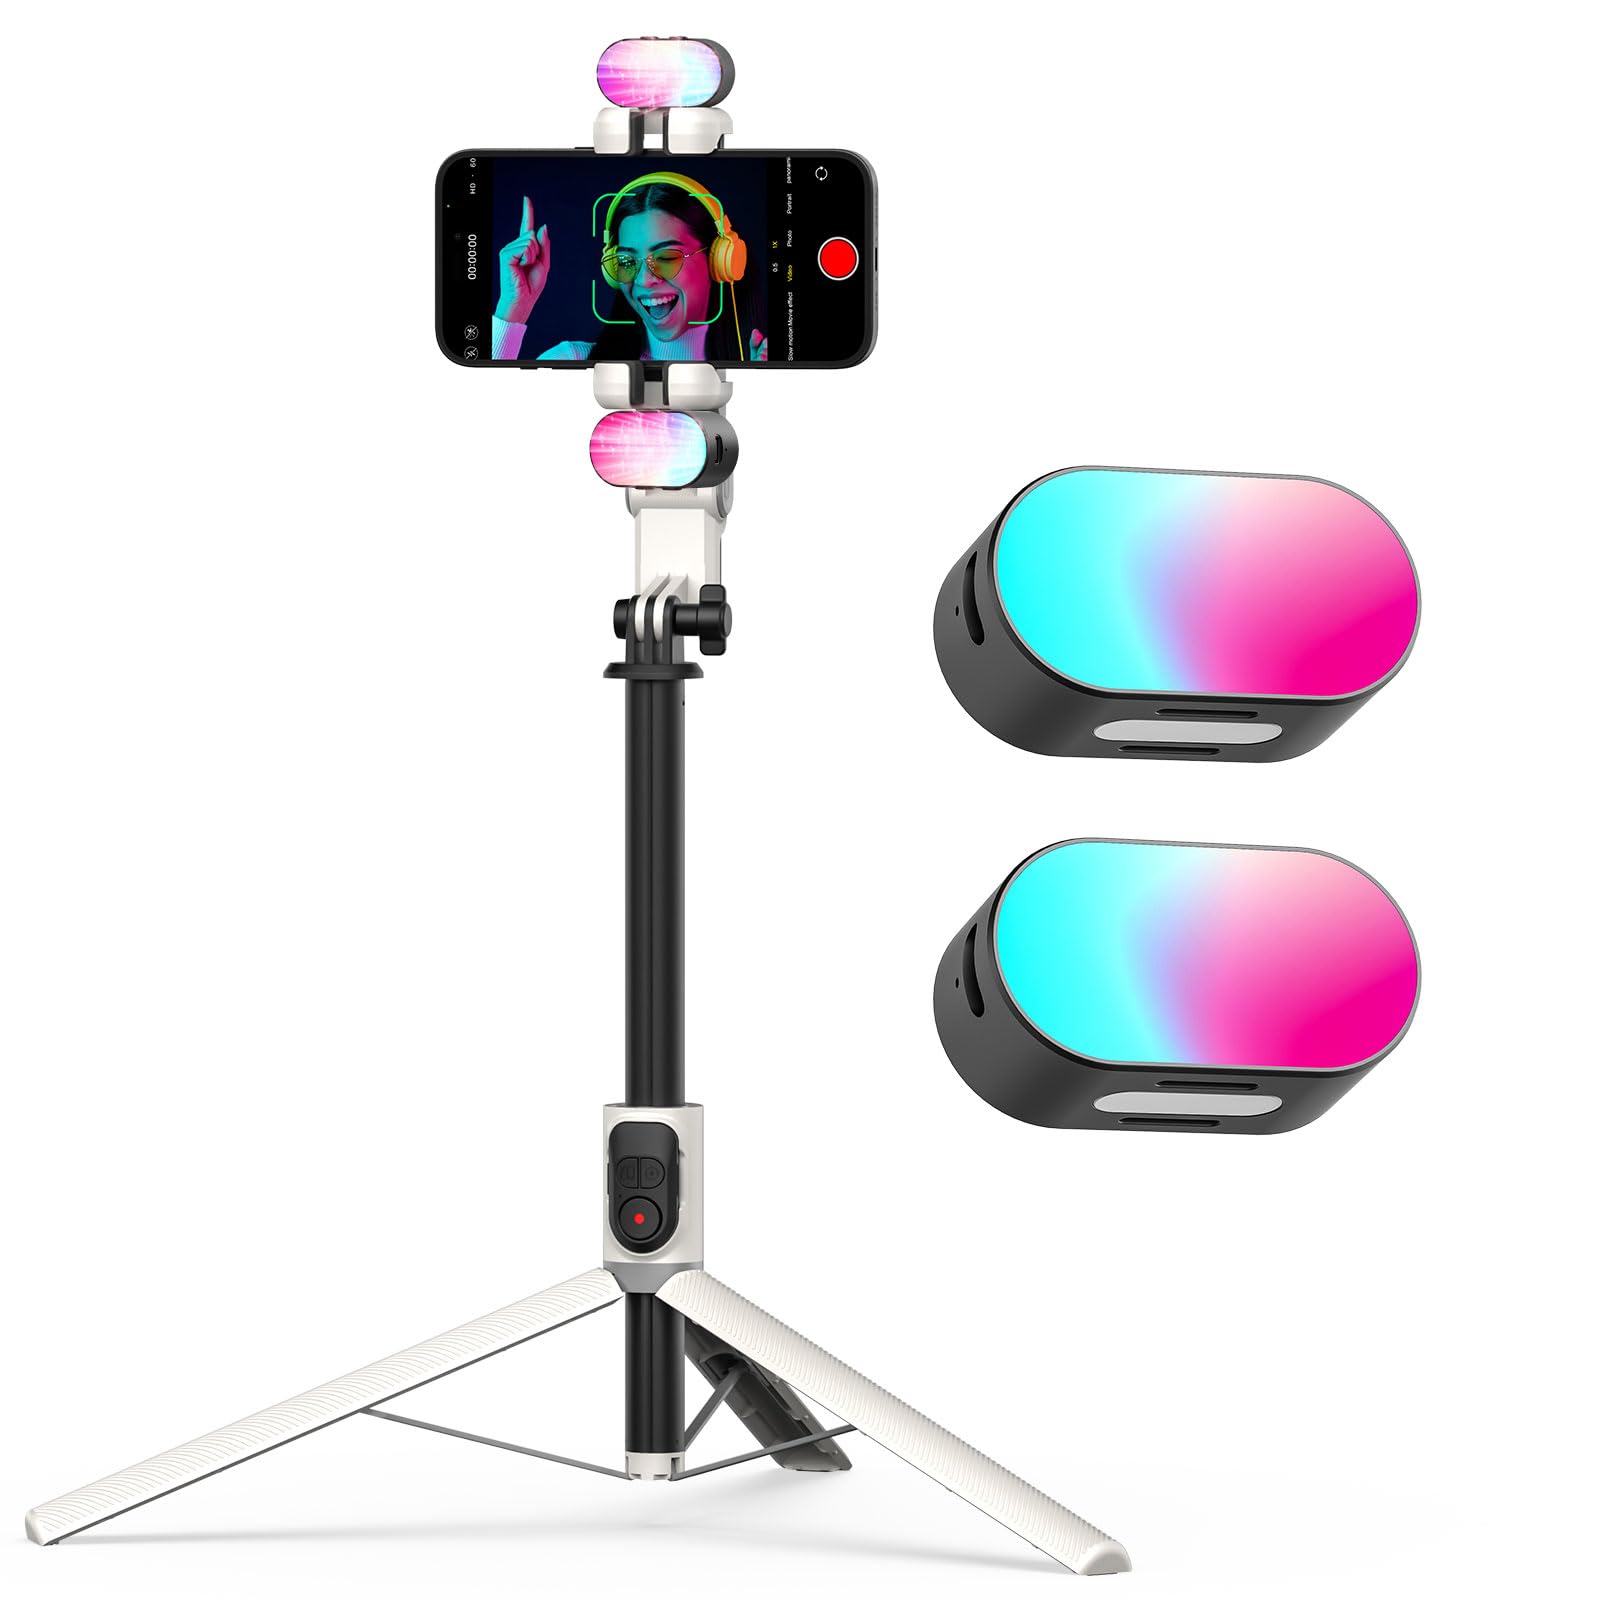
Figure 5: Using hand gestures to control AI face tracking.
4. Using the Wireless Remote Control
The included wireless remote control allows you to operate the gimbal from up to 32 feet away. It can be used to switch shooting modes or trigger the camera shutter. Refer to the remote control's specific instructions for pairing and function details.
5. Operating the RGB Magnetic Fill Light
The magnetic fill light provides customizable illumination:
- Power On/Off: Press the power button on the fill light to turn it on or off.
- Change Colors: Click the power button to cycle through 7 available RGB colors (red, blue, green, purple, cyan, yellow).
- Adjust Brightness: Press the "M" button to switch between three brightness levels.

Figure 6: Features and controls of the RGB magnetic fill light.
Maintenance
- Cleaning: Use a soft, dry cloth to clean the surface of the gimbal. Avoid using liquid cleaners or solvents.
- Storage: Store the device in a cool, dry place away from direct sunlight and extreme temperatures. Fold the gimbal to its compact size for storage.
- Battery Care: To prolong battery life, avoid fully discharging the battery frequently. Charge the device regularly, even if not in use for extended periods.
Troubleshooting
| Problem | Possible Cause | Solution |
|---|---|---|
| Gimbal does not power on. | Low battery. | Charge the gimbal using the provided USB-C cable. |
| Phone is not stable in the clamp. | Phone not centered or clamp not fully secured. | Ensure the phone is centered and the clamp holds it firmly. Check phone size compatibility (4.0-6.2 inches). |
| Face tracking is not working. | Gesture recognition is off or gestures are not recognized. | Ensure gesture recognition is enabled (use two-hand "L" gesture). Perform gestures clearly in front of the camera. |
| Remote control not connecting. | Remote battery low or not paired. | Replace remote battery if applicable. Refer to remote control instructions for pairing process. |
| Fill light not turning on or changing colors. | Low battery or incorrect button press. | Charge the fill light. Ensure you are pressing the correct buttons for power and color/brightness adjustment. |
Specifications
| Feature | Detail |
|---|---|
| Brand | AOCHUAN |
| Model | SMART M2 |
| Compatible Devices | Smartphones (4.0-6.2 inches) |
| Material | Aluminum |
| Maximum Height (Extended) | 43 Inches (approx. 109 cm) |
| Minimum Height (Folded) | 12 Inches (approx. 30.5 cm) |
| Weight | 0.87 pounds (approx. 395 grams) |
| Battery Life (Standby) | 4-7 hours |
| Fill Light Colors | 7 RGB colors (Red, Blue, Green, Purple, Cyan, Yellow) |
| Fill Light Brightness | 3 levels |
| Remote Control Range | Up to 32 feet (approx. 10 meters) |
Warranty and Support
The AOCHUAN SMART M2 comes with a standard manufacturer's warranty. Please refer to the warranty card included in your product packaging for specific terms and conditions. For technical support, troubleshooting assistance, or warranty claims, please contact AOCHUAN customer service through the retailer where the product was purchased or visit the official AOCHUAN website.
Note: Keep your purchase receipt as proof of purchase for warranty purposes.