Introduction
This manual provides detailed instructions for the installation, operation, and maintenance of your KETOTEK KT1000 Digital Temperature Controller. This device is designed for precise temperature control in various applications, including home brewing, refrigeration, pet breeding, reptile enclosures, tanks, incubation, fermentation, and seedling heat mats.
The controller features a 2-meter waterproof probe, dual relay outputs for simultaneous heating and cooling control, and a clear digital display. Please read this manual thoroughly before use to ensure proper function and safety.
Product Features
- 2m Waterproof Probe: The included NTC sensor probe is waterproof, allowing for use in humid or submerged environments.
- Dual Relay Output: Equipped with two independent relays, enabling simultaneous connection and control of both heating and cooling appliances.
- Automatic Mode Switching: Automatically switches between heating and cooling modes based on set temperature and difference values.
- High Accuracy: Provides precise temperature control with an accuracy of ±1°F.
- Wide Temperature Control Range: Operates within a range of -58°F to 212°F (-50°C to 99°C).
- Multi-functional Settings: Supports temperature calibration, compressor delay protection, and alarms for temperature limits or sensor errors.
- Memory Function: All parameter settings are saved automatically after power restart.
- Durable Construction: Made with an ABS heavy-duty and anti-flaming plastic shell for safety and energy efficiency.

What's in the Box
Upon opening the package, please verify that all components are present and undamaged:
- 1 x KETOTEK KT1000 Digital Temperature Controller
- 1 x 2-meter Waterproof NTC Sensor Probe
- 1 x Instruction Manual (this document)
Setup
Wiring Diagram
The KT1000 temperature controller requires wiring for both power supply and load connections. It supports two main connection methods: independent power supply for the load or the same power supply for the load. Ensure all wiring is done by a qualified professional and follow local electrical codes.

Connection 1: Independent Power Supply for Load
In this configuration, the controller's power supply is separate from the power supply for the heating and cooling loads. This provides isolation and can be useful in certain setups.
Connection 2: Same Power Supply for Load
This is a common setup where the controller and the loads share the same 110V AC power source. Ensure proper grounding (E) for safety.
Wiring Key:
- L: Line (Hot wire)
- N: Neutral wire
- E: Earth (Ground wire)
Installation
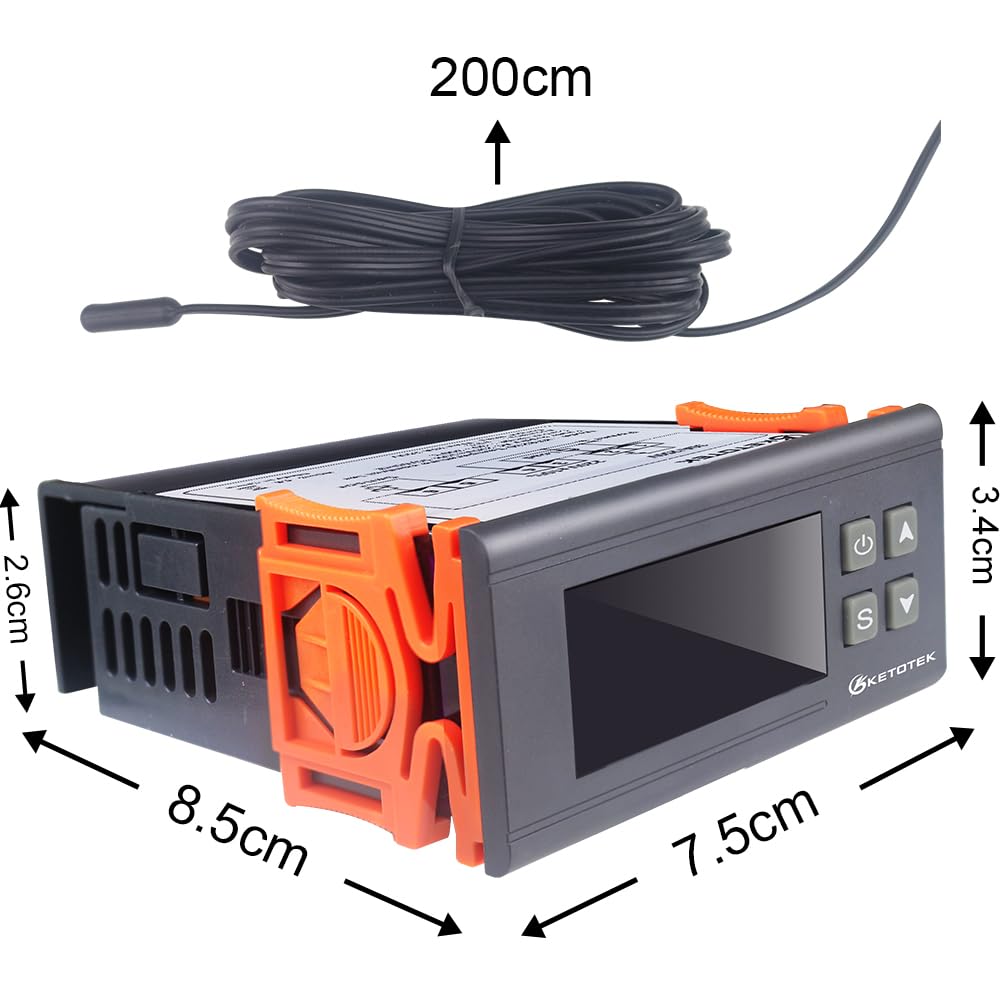
The KT1000 is designed for embedded installation. Ensure adequate space for ventilation around the unit. The dimensions are approximately 7.5cm (width) x 3.4cm (height) x 8.5cm (depth) for the main body, with a 200cm sensor cable.
Insert the controller into the prepared opening and secure it using the integrated clips on the sides. Connect the waterproof sensor probe to terminals 3 and 4. Position the sensor in the environment where temperature needs to be measured and controlled.
Operating Instructions
Control Panel Overview
Familiarize yourself with the buttons and indicators on the front panel:

- A: Power Key - Power On/Off, Confirm Setting Value, Save and Exit Function.
- B: Up Key - Choose Parameter, Increase Value, Check Setting Temperature Value.
- C: Down Key - Choose Parameter, Decrease Value, Check Setting Difference Value.
- D: Set Key - Entry, Exit, and Set Parameters.
- E: Setting Indicator Lamp - On: Setting Status.
- F: PV/SV Display - Displays Process Value (current temperature), Set Value, and Parameter Menu.
- G: Cool Indicator Lamp - On: Refrigerating Start; Off: Refrigerating Stop; Flash: Compressor Delay.
- H: Heat Indicator Lamp - On: Heating Start; Off: Heating Stop.
Basic Operation
- Power On/Off: Press and hold the Power Key (A) for 3 seconds to turn the device on or off.
- View Current Temperature: The main display (F) shows the current temperature measured by the sensor.
- View Set Temperature (SV): Briefly press the Set Key (D) once. The display will show the set temperature value. Press Set Key (D) again to return to the current temperature display.
Setting Parameters
To enter the parameter setting mode, press and hold the Set Key (D) for 3 seconds. Use the Up Key (B) and Down Key (C) to navigate through parameters and adjust values. Press the Power Key (A) to confirm a setting and move to the next, or to save and exit the menu.
| Parameter Code | Description | Default Value | Range |
|---|---|---|---|
| F1 | Temperature Set Value (SV) | 77°F (25°C) | -58°F to 212°F (-50°C to 99°C) |
| F2 | Difference Value (Hysteresis) | 3.6°F (2°C) | 0.1°F to 45°F (0.1°C to 25°C) |
| F3 | Compressor Delay Protection | 3 minutes | 0 to 10 minutes |
| F4 | Temperature Calibration | 0°F (0°C) | -18°F to 18°F (-10°C to 10°C) |
| F5 | High Temperature Alarm Limit | 212°F (99°C) | -58°F to 212°F (-50°C to 99°C) |
| F6 | Low Temperature Alarm Limit | -58°F (-50°C) | -58°F to 212°F (-50°C to 99°C) |
Note: The unit automatically determines heating or cooling mode based on the current temperature relative to the set temperature (F1) and difference value (F2).
Maintenance
The KETOTEK KT1000 Digital Temperature Controller is designed for low maintenance. Follow these guidelines to ensure its longevity and accurate performance:
- Cleaning: Wipe the unit's exterior with a soft, dry cloth. Do not use abrasive cleaners or solvents. Ensure no liquid enters the device.
- Sensor Care: The waterproof probe is durable, but avoid sharp bends or excessive pulling on the cable. Regularly check the sensor for any physical damage or buildup that might affect readings.
- Environmental Conditions: Operate the controller within its specified temperature and humidity ranges. Avoid exposing the main unit to direct water or extreme moisture.
- Wiring Inspection: Periodically check all wiring connections to ensure they are secure and free from corrosion or damage.
Troubleshooting
If you encounter issues with your temperature controller, refer to the table below for common problems and their solutions:
| Problem | Possible Cause | Solution |
|---|---|---|
| Display shows "HHH" or "LLL" | Sensor error (open circuit or short circuit) or temperature exceeds range. | Check sensor connection. Ensure sensor is not damaged. Verify temperature is within -58°F to 212°F. Replace sensor if faulty. |
| Controller not powering on | No power supply or incorrect wiring. | Check power source. Verify wiring according to the diagram in the Setup section. |
| Heating/Cooling device not activating | Incorrect temperature settings, compressor delay active, or faulty wiring to load. | Check F1 (Set Value) and F2 (Difference Value). Wait for compressor delay (F3) to expire. Verify wiring to heating/cooling device. Ensure device itself is functional. |
| Temperature reading is inaccurate | Sensor calibration needed or sensor placement issue. | Use F4 (Temperature Calibration) to adjust the reading. Ensure sensor is placed correctly and not affected by external heat sources. |
Specifications
| Attribute | Value |
|---|---|
| Model Number | KT1000 |
| Power Supply | 110VAC 50Hz/60Hz |
| Power Consumption | ≤3W |
| Temperature Control Range | -58°F to 212°F (-50°C to 99°C) |
| Measurement Accuracy | ±1°F |
| Output | 2 Relays (Heating: 10A/110-220VAC, Cooling: 10A/110-220VAC) |
| Sensor Type | NTC (10K/B3435 Waterproof) |
| Sensor Cable Length | 2 meters (6.56 feet) |
| Product Dimensions (L x W x H) | 3.35"D x 1.34"W x 3.35"H (8.5cm x 3.4cm x 8.5cm) |
| Installation Hole Size | Approx. 2.83" x 1.14" (72mm x 29mm) |
| Shell Material | ABS Flame Retardant Plastic |
Application Scenarios
The KETOTEK KT1000 Digital Temperature Controller is versatile and can be used in a wide array of applications requiring precise temperature management:

- Reptile Habitats: Maintain optimal temperatures for reptiles and amphibians.
- Greenhouses: Control climate for plant growth.
- Refrigerators/Freezers: Regulate temperatures for storage.
- Pet Keeping: Ensure comfortable temperatures for various pets.
- Cheese Making: Precise temperature control for fermentation and aging.
- Bacon Making: Manage curing and smoking temperatures.
- Fermentation: Ideal for brewing beer, wine, or other fermented products.
- Incubation: Critical for maintaining stable temperatures in egg incubators.
Warranty and Support
KETOTEK products are manufactured to high quality standards. For warranty information and technical support, please refer to the contact details provided with your purchase or visit the official KETOTEK website. Keep your purchase receipt as proof of purchase for warranty claims.
For further assistance or inquiries, please contact KETOTEK customer service.