1. Introduction
This manual provides detailed instructions for the installation, operation, and maintenance of your Run Bison LED High Bay Light with Motion Sensor. This high-performance lighting fixture is designed for commercial and industrial applications, offering adjustable power, selectable color temperature, 0-10V dimming, and an integrated motion sensor for enhanced energy efficiency.
2. Safety Information
- WARNING: Risk of electric shock. Disconnect power before installation or servicing.
- Installation should be performed by a qualified electrician in accordance with national and local electrical codes.
- Ensure the supply voltage is compatible with the fixture's requirements (120-277V).
- Do not handle the fixture with wet hands or when standing on wet surfaces.
- Ensure the fixture is securely mounted to prevent falling.
- Do not look directly into the LED light source when illuminated.
3. Package Contents
Verify that all components are present before beginning installation:
- LED UFO High Bay Light
- Pre-assembled Hook
- Installation accessories
4. Product Features
- Adjustable Power: Selectable wattage settings (150W/200W/240W) to optimize brightness and energy consumption.
- Adjustable Color Temperature (CCT): Choose between 3000K (Warm White), 4000K (Cool White), and 5000K (Daylight) to suit different environments.
- Integrated Motion Sensor: PIR induction sensor for intelligent, energy-saving operation.
- 0-10V Dimmable: Compatible with 0-10V dimmers for smooth brightness control.
- Durable Construction: Aluminum alloy body with anti-corrosion coating, active cooling heat sink, and IP65 waterproof/dustproof rating.
- Easy Installation: Compact design with a pre-assembled hook for quick and simple hanging mount.
- Certifications: UL, DLC, and FCC certified for quality and safety.
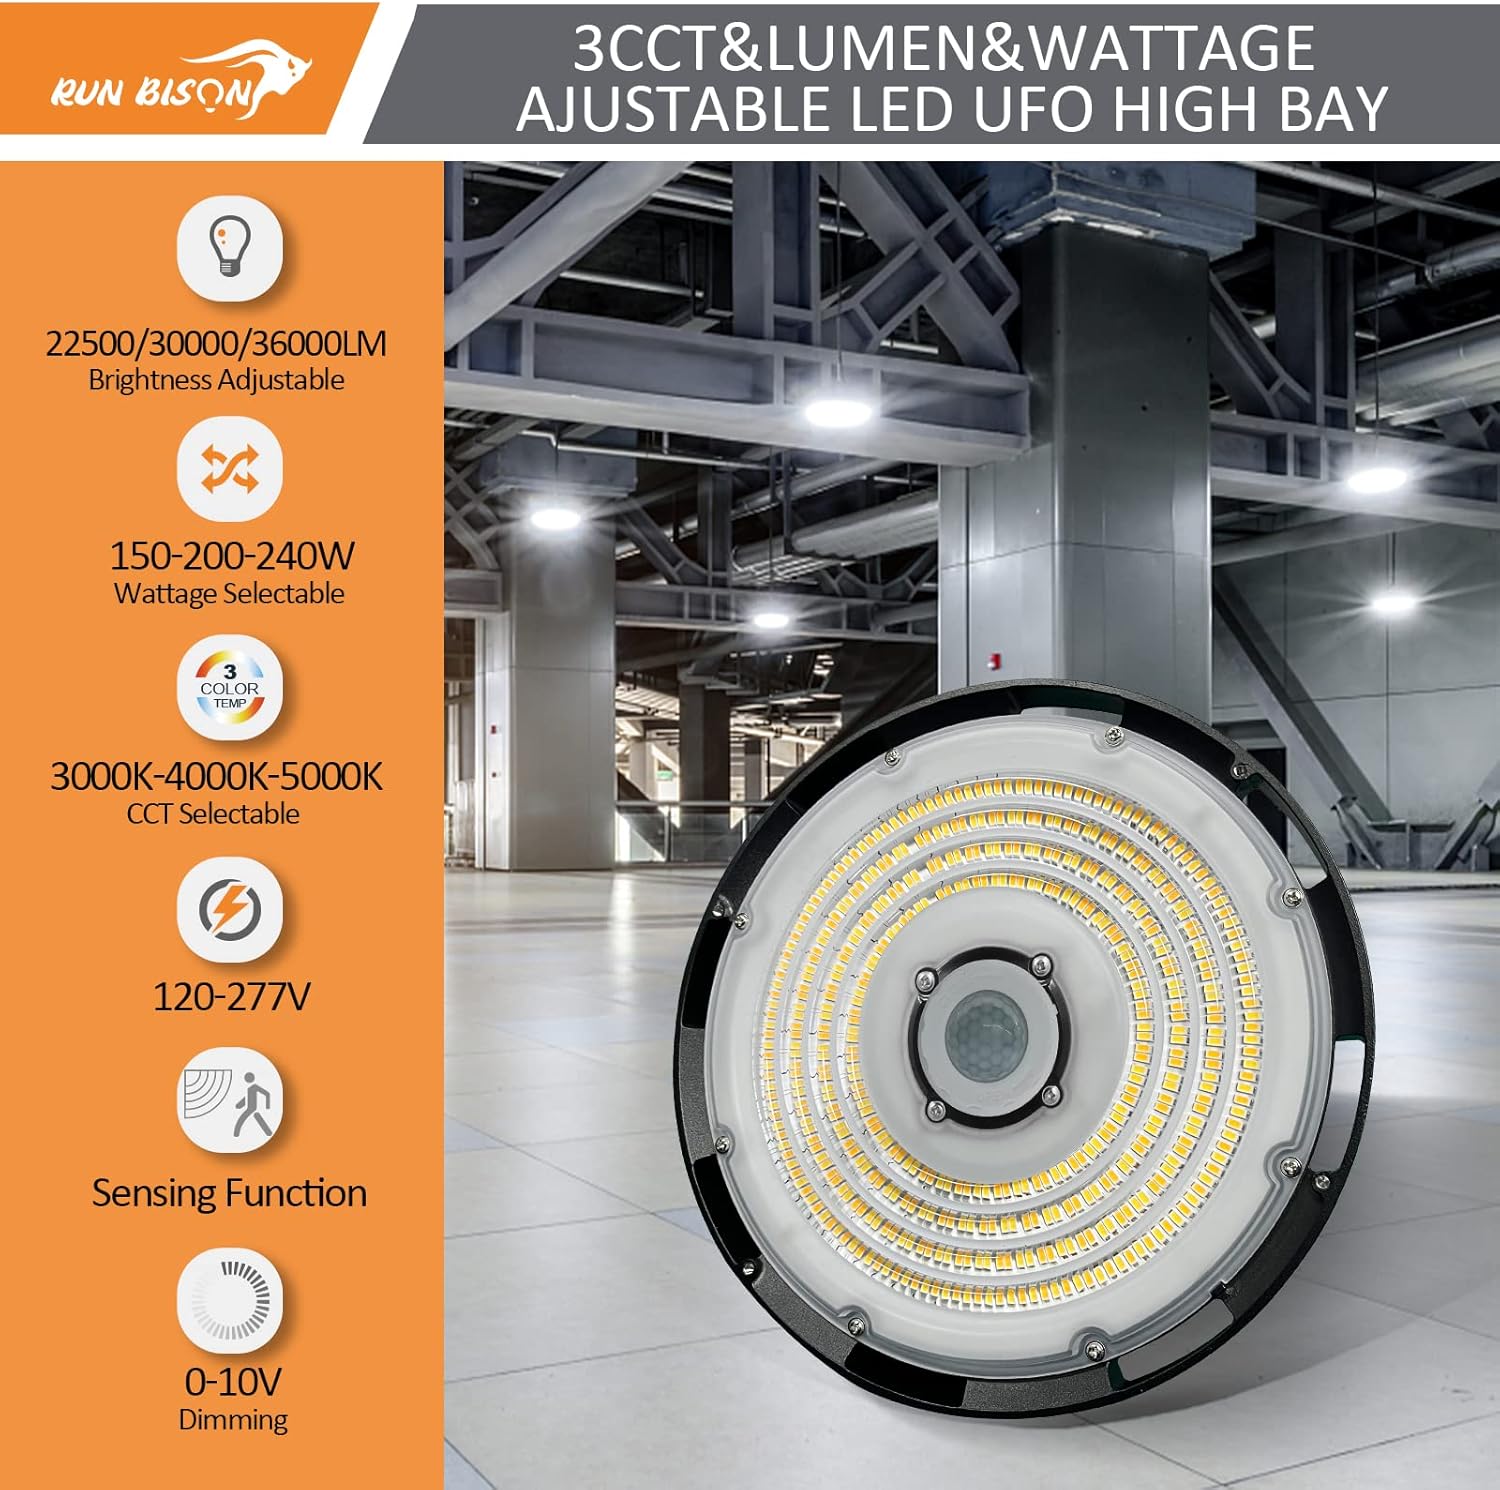
Image: Overview of the LED High Bay Light's key features including adjustable brightness, wattage, color temperature, voltage range, motion sensing, and dimming capabilities.

Image: Features emphasizing durability, including UL/FCC certifications, 5-year warranty, energy savings, water resistance, efficient heat dissipation, and temperature resilience.
5. Setup and Installation
5.1 Pre-Installation
- Turn off power at the circuit breaker before starting installation.
- Unpack the fixture and inspect for any damage.
- Ensure you have all necessary tools and safety equipment.
5.2 Mounting the Fixture
The high bay light comes with a pre-assembled hook for hanging installation. Securely attach the hook to a suitable ceiling structure capable of supporting the fixture's weight. Ensure the mounting point is stable and can withstand vibrations.

Image: Product dimensions and key components such as the preinstalled hook, efficient driver, anti-glare lens, and cooling heat sink.
5.3 Wiring
Connect the fixture's wires to the main power supply according to local electrical codes. The fixture supports 120-277V AC input. For 0-10V dimming functionality, connect the dimming wires to a compatible 0-10V dimmer switch.
5.4 Motion Sensor Installation
The motion sensor is typically placed inside the fixture's housing. Simply screw the motion sensor module to the designated port at the bottom of the luminaire. Ensure it is firmly seated for proper operation.

Image: Visual guide for installing the motion sensor by screwing it into the bottom of the high bay light.
5.5 Suggested Installation Height
Refer to the following guidelines for optimal lighting coverage based on wattage:
- 150W: 16-20 ft height, approximately 39 ft diameter coverage.
- 200W: 20-26 ft height, approximately 52 ft diameter coverage.
- 240W: 26-32 ft height, approximately 65 ft diameter coverage.

Image: Recommended installation heights and corresponding light coverage areas for different wattage settings.
6. Operating Instructions
6.1 Adjusting Power (Wattage)
Locate the power tunable slider switch on the fixture. Select the desired wattage (150W, 200W, or 240W) before powering on the light. This adjustment allows you to control the lumen output (22500lm, 30000lm, or 36000lm respectively).
6.2 Adjusting Color Temperature (CCT)
Locate the CCT tunable slider switch on the fixture. Select your preferred color temperature (3000K, 4000K, or 5000K) before powering on the light. This allows customization of the light's appearance.

Image: Close-up of the power and CCT selection switches, demonstrating the different color temperature options.
6.3 0-10V Dimming
The fixture is compatible with standard 0-10V dimming systems. Connect the dimming wires to a 0-10V dimmer switch to adjust the brightness from 10% to 100%.
7. Motion Sensor Operation
The integrated PIR motion sensor detects movement within its range to automatically control the light. The sensing range is approximately 30-49 feet.
7.1 Factory Default Settings
- Startup Time: Approximately 40 seconds after power-on.
- Hold Time: 5 minutes (duration the light stays at full brightness after motion is detected).
- Dimming after Absence: If no motion is detected for 5 minutes, the light dims to 30% brightness.
- Turn Off after Absence: The light turns off completely after 60 minutes of no motion detection while at 30% brightness.
7.2 Customization
The motion sensor's settings can be customized using a compatible remote controller (included). Refer to the remote controller's specific instructions for adjusting detection area, hold time, dimming level, and off delay.

Image: Depiction of the motion sensor's activation in a large space, its detection range, and details on default settings and remote customization.
8. Maintenance
To ensure optimal performance and longevity of your LED High Bay Light:
- Cleaning: Periodically clean the exterior of the fixture with a soft, damp cloth. Do not use abrasive cleaners or solvents.
- Inspection: Regularly inspect the fixture and wiring for any signs of damage or wear.
- Power Off: Always disconnect power before performing any maintenance.
9. Troubleshooting
| Problem | Possible Cause | Solution |
|---|---|---|
| Light does not turn on | No power supply Loose wiring connection Faulty fixture | Check circuit breaker and power source Verify all wiring connections are secure Contact customer support |
| Light flickers | Unstable power supply Incorrect dimmer compatibility Loose wiring | Ensure stable power Use a compatible 0-10V dimmer Check wiring connections |
| Motion sensor not working | Sensor obstructed Incorrect settings Sensor faulty | Clear obstructions around sensor Adjust settings using remote Contact customer support |
| Light stays on/off constantly | Motion sensor settings incorrect Continuous motion detected | Adjust motion sensor settings (hold time, dimming) Ensure no constant motion in detection area |
10. Specifications
| Specification | Detail |
|---|---|
| Brand | Run Bison |
| Model Number | LJC-UFO-32/277-8240C-30ED-S |
| Power Source | AC |
| Voltage | 120-277 Volts |
| Wattage | Adjustable: 150W/200W/240W |
| Brightness | Adjustable: 22500lm/30000lm/36000lm |
| Light Color (CCT) | Adjustable: 3000K/4000K/5000K |
| Dimmable | 0-10V Dimmable |
| Motion Sensor | PIR Induction, 30-49ft range |
| Material | Aluminum (body), Polycarbonate (shade) |
| Indoor/Outdoor Usage | Indoor (IP65 rated) |
| Mounting Type | Hanging Mount (Pre-assembled Hook) |
| Item Dimensions (L x W x H) | 12.6"L x 12.6"W x 6.89"H |
| Item Weight | 8.6 Pounds |
| Certifications | UL, DLC, FCC |
| Lifespan | 50,000 Hours |
11. Warranty and Support
This Run Bison LED High Bay Light is covered by a 5-year manufacturer's warranty. This warranty covers defects in materials and workmanship under normal use.
For technical guidance, troubleshooting assistance, or warranty claims, please contact Run Bison customer service. Our team is available to provide professional support and fast replacement service if needed.
Contact Information: Please refer to the product packaging or the official Run Bison website for the most current customer support contact details.