BONTEC ZP02
BONTEC 10x10ft Pop Up Canopy Tent ZP02 Instruction Manual
Model: ZP02
Safety Information
WARNING: Always ensure the canopy is properly anchored to the ground using the provided stakes and weight bags. Do not use in winds exceeding 20 mph. Keep away from heat sources and open flames. Always follow the manufacturer's instructions for setup, use, and dismantling.
Product Overview
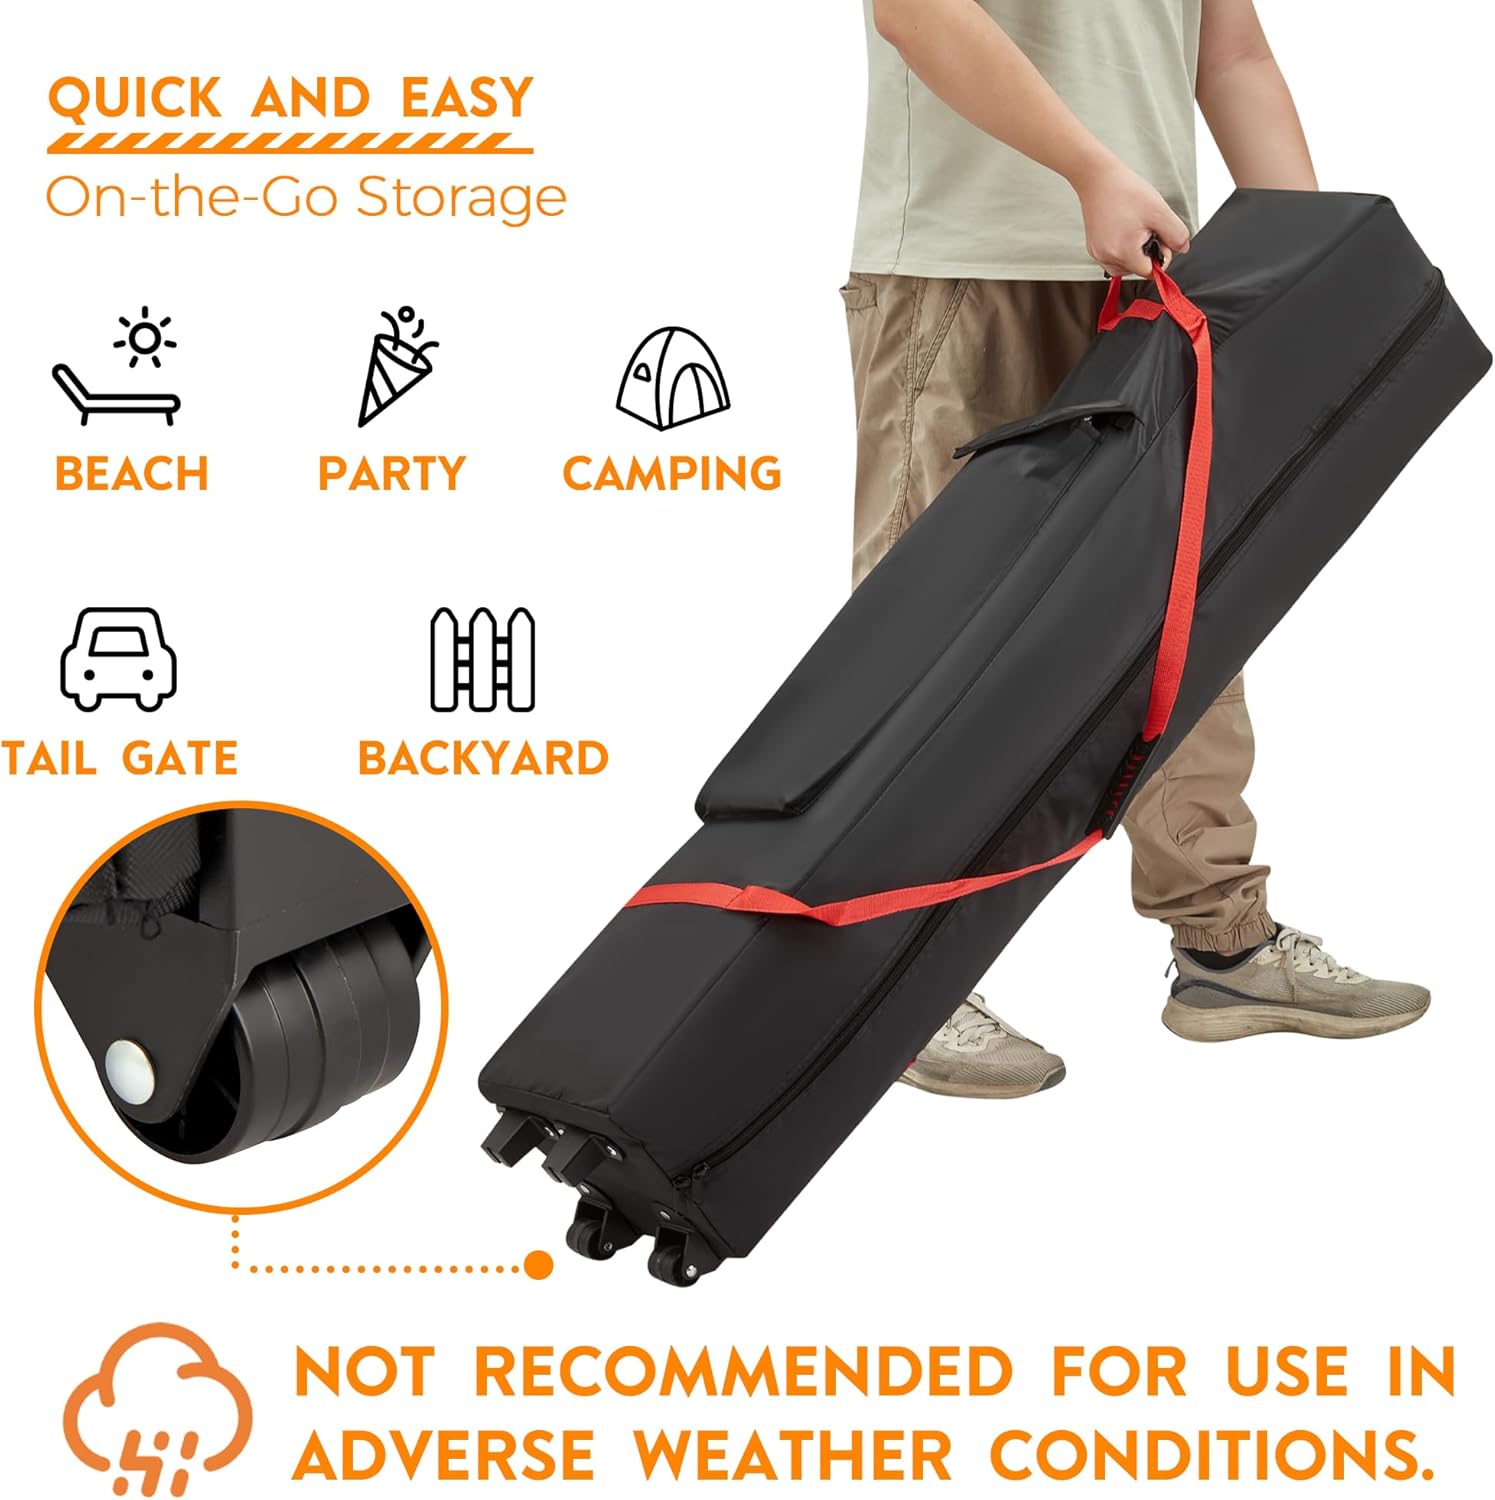
The BONTEC 10x10ft Pop Up Canopy Tent (Model ZP02) is designed for quick and easy setup, providing instant shade and shelter for various outdoor events. Its robust construction and user-friendly features make it suitable for beaches, parties, camping, and more.

Key Features:
- Easy Setup: One-button Center Locking Technology allows for immediate frame locking. Height adjustment is effortless with anti-pinch thumb buttons. Designed for 1-person setup in seconds without tools.
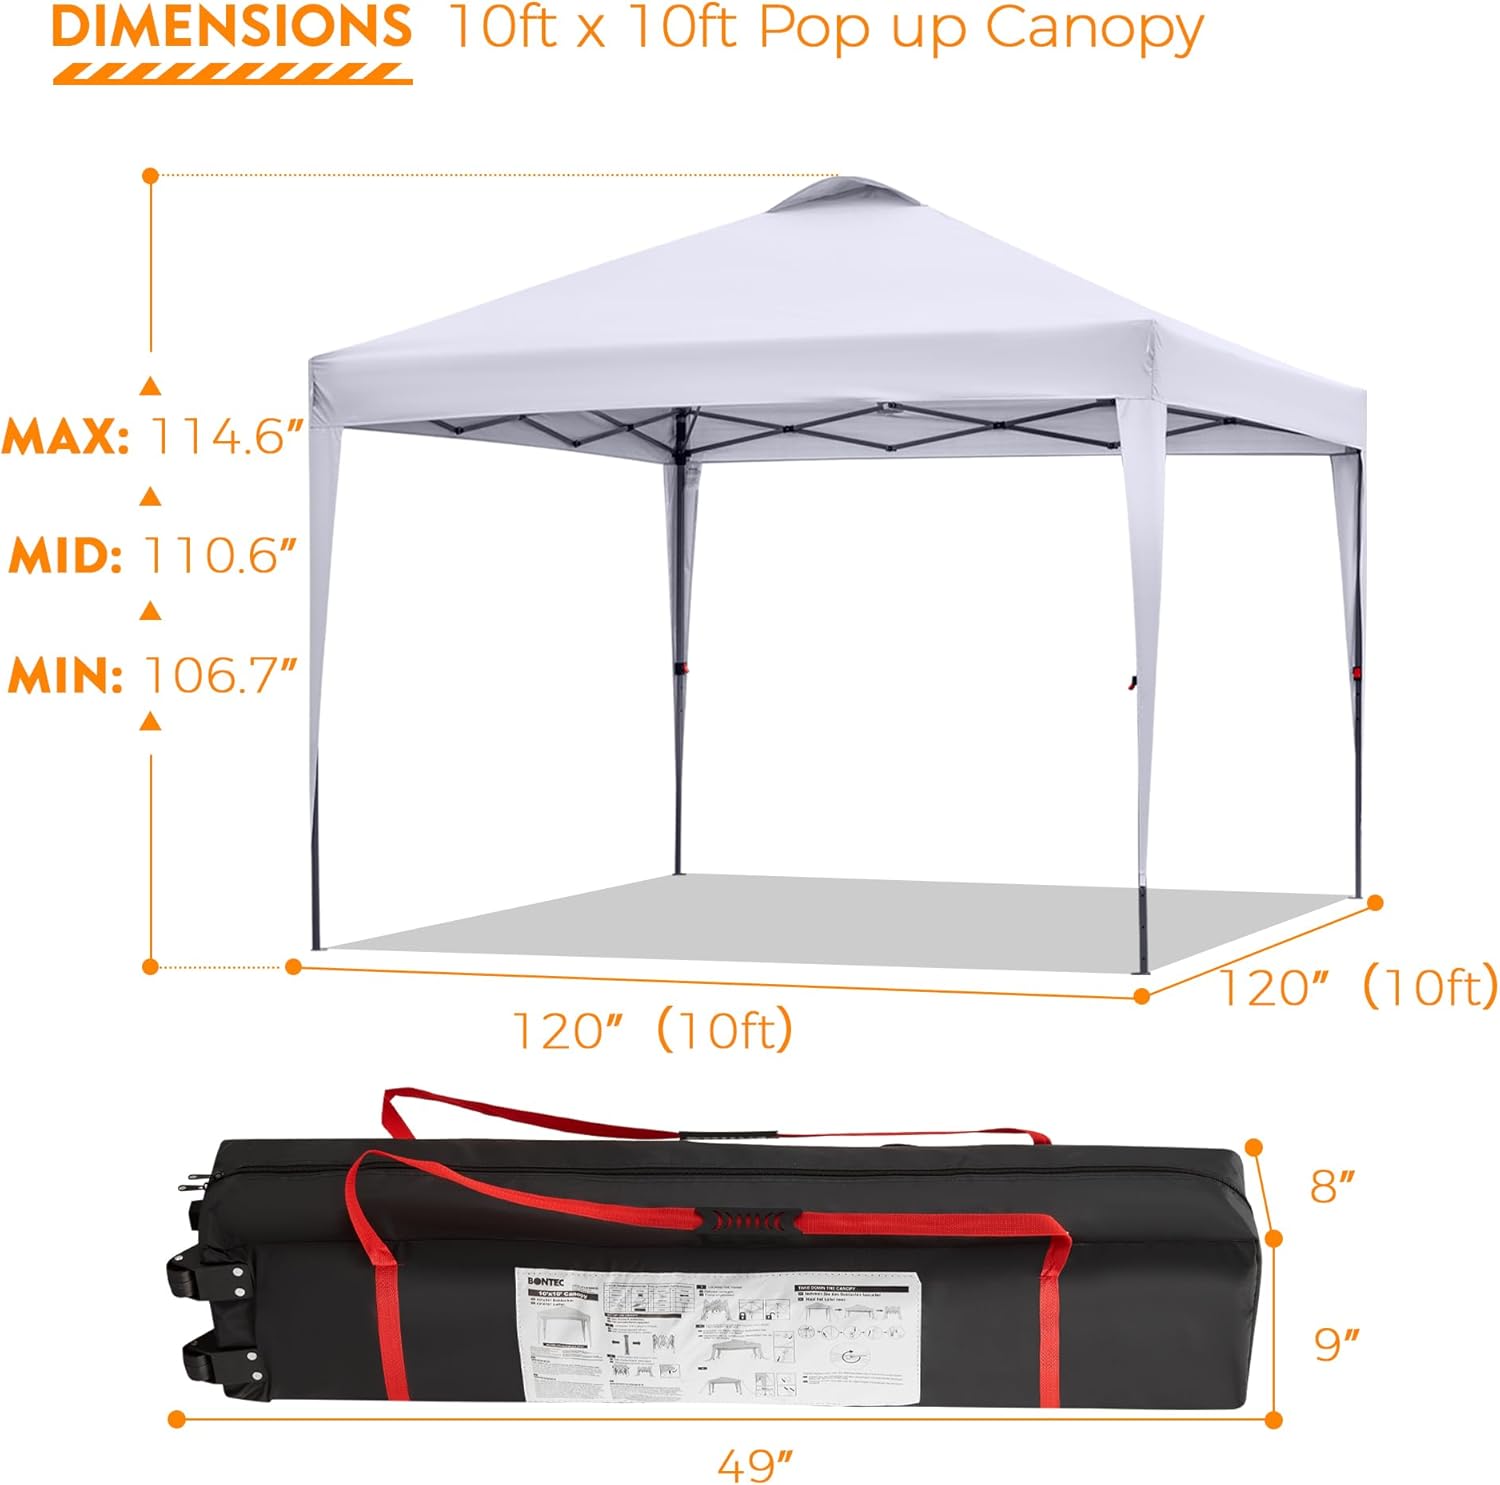
- Spacious Shade: Provides 97 square feet of shade (10 x 10 ft). Three-level height adjustment with a maximum interior height of 106.7 inches, comfortably accommodating 6 people.
- UV Protection & Water Resistance: Features rugged 150D silver-coated canopy fabric with UPF 50+ UV protection. High waterproof performance with a water resistance rating of 78.74 inches. All seams are stitched to prevent water seepage.
- Durable Frame: High-grade, silver-coated steel truss with hardened through bolts, pre-assembled for tool-free setup. Folds compactly for convenient packing.
- Portability & Stability: Includes a newly-designed storage bag with wheels for easy transport. Comes with four sand bags (approx. 22 lbs each), eight stakes, and eight hooks for secure anchoring.
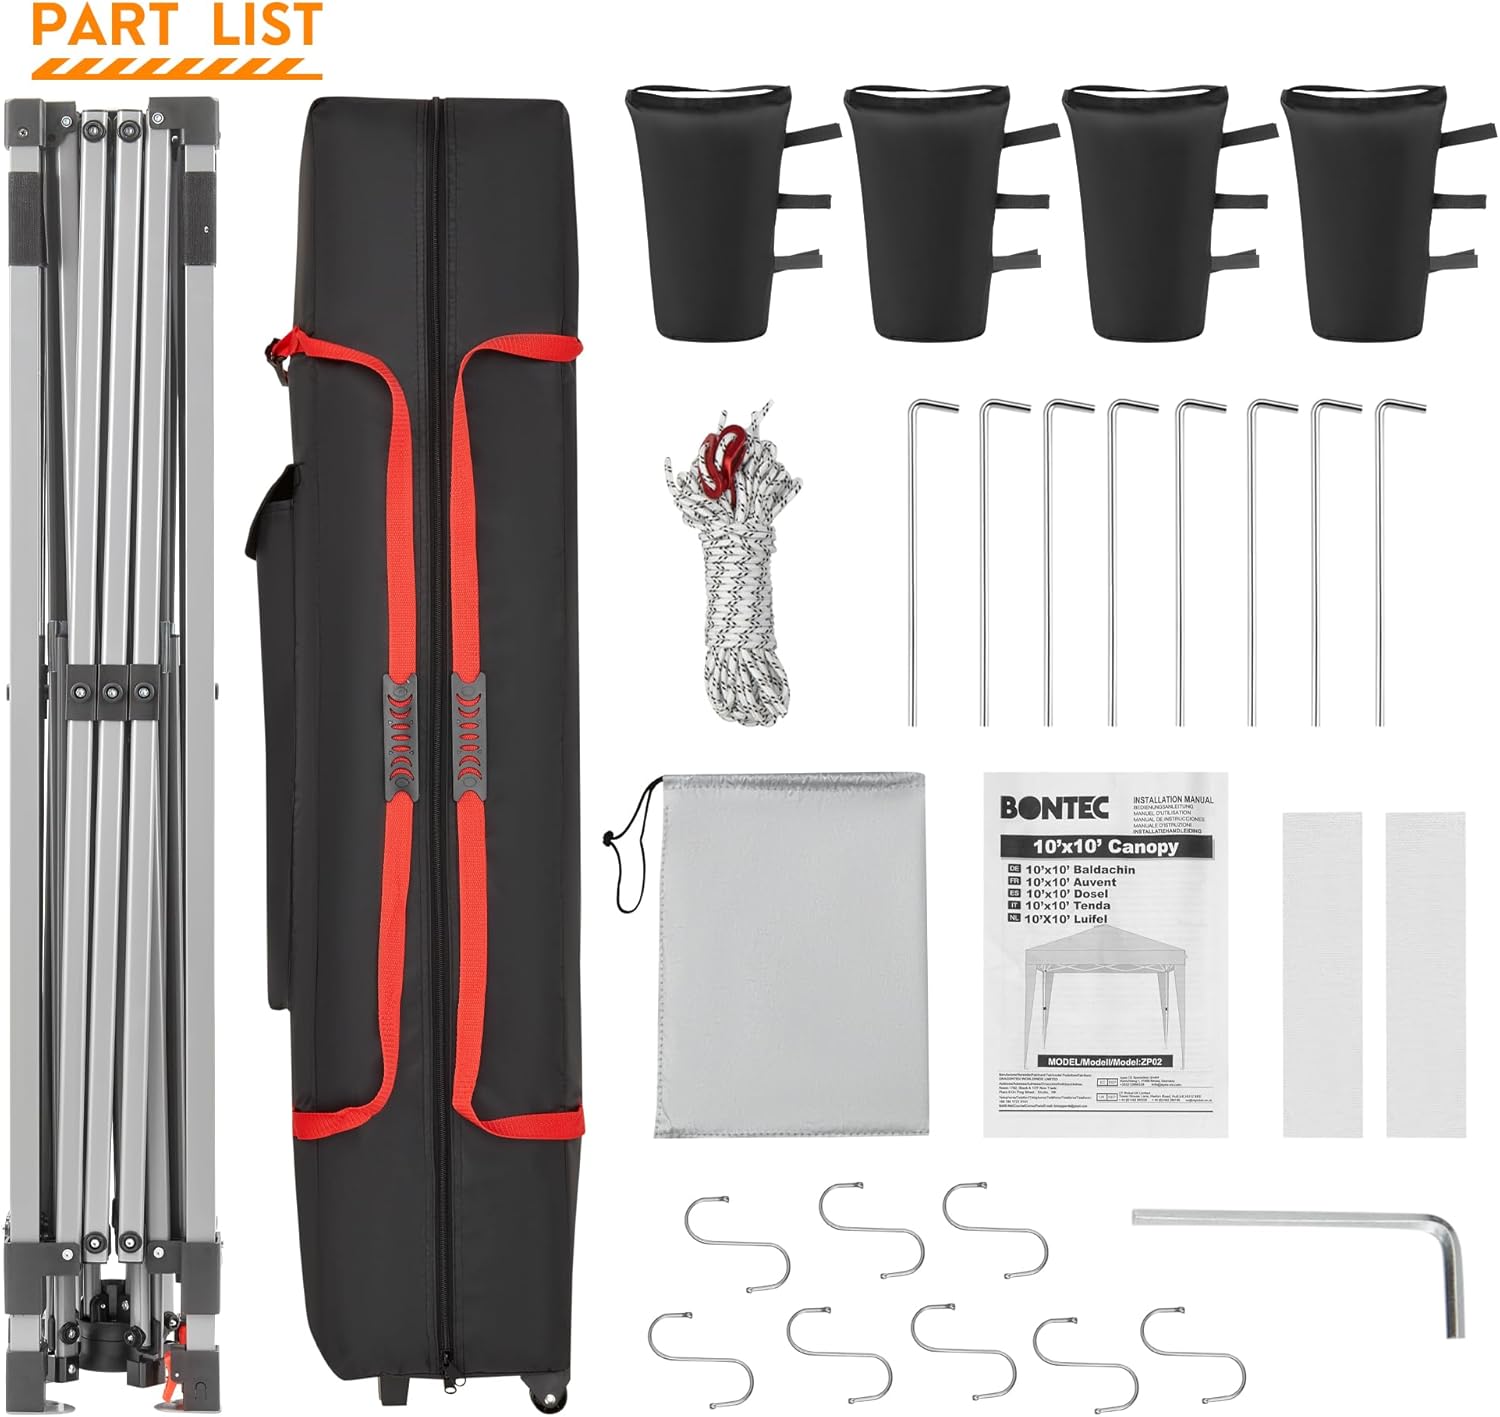
Parts List
Before beginning assembly, ensure all parts are present and accounted for. Refer to the image below for a visual guide.
- 1 x Pre-assembled Pop Up Frame
- 1 x Canopy Top Fabric (Silver-coated White)
- 1 x Roller Bag for transport
- 4 x Weight Bags (for sand filling)
- 8 x Ground Stakes
- 8 x S-Hooks
- Guy Lines (ropes for securing)
- 1 x Instruction Manual
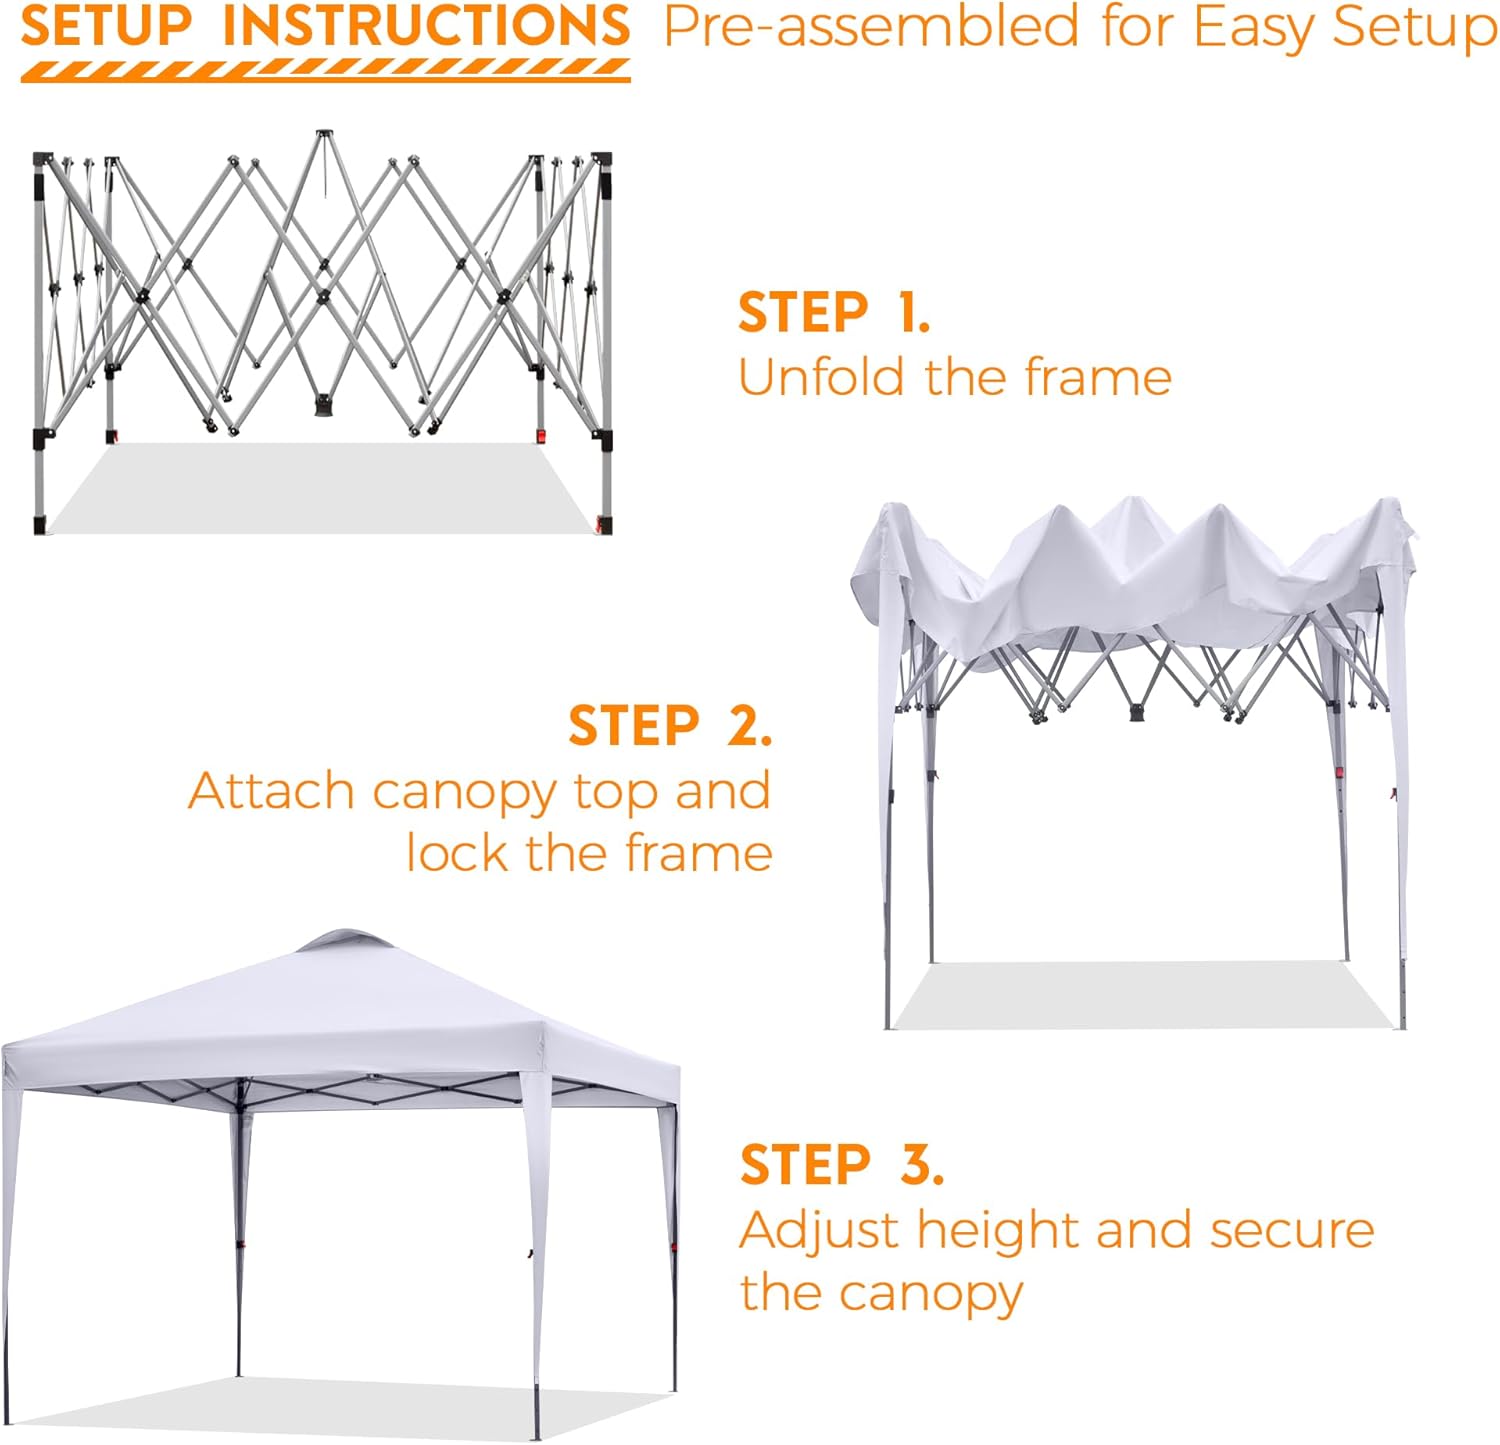
Setup Instructions
Follow these steps for a quick and easy setup of your BONTEC Pop Up Canopy Tent. While designed for one person, an additional person can make the process even smoother.
Step 1: Unfold the Frame
- Place the folded frame in the desired location.
- With a partner (or alone), gently pull the outer legs of the frame outwards to begin expanding it.

Official BONTEC video demonstrating the initial unfolding of the canopy frame.
Step 2: Attach Canopy Top and Lock the Frame
- Drape the canopy top fabric over the partially opened frame. Ensure the corners are aligned with the frame's corners.
- Push up the red central hub located underneath the canopy until it locks into place. This engages the one-button center locking technology.
- Secure the canopy fabric to the frame using the Velcro straps at each corner and along the trusses.


Step 3: Adjust Height and Secure the Canopy
- Press the anti-pinch thumb buttons on each leg and extend the legs to your desired height. There are three height levels available.
- Fill the four provided sand bags with sand (approximately 22 lbs each) and attach them to the canopy legs for added stability.
- Use the eight ground stakes to secure the canopy legs to the ground.
- Attach the guy lines to the canopy corners and stake them into the ground at an angle to provide additional wind resistance.

Operating Instructions
Using the Canopy
- Once fully set up and secured, the canopy provides a shaded area for various activities.
- The UPF 50+ silver-coated top offers protection from harmful UV rays.
- The water-resistant fabric provides shelter from light rain. In heavy rain or strong winds, it is recommended to dismantle the canopy.
- Utilize the included S-hooks to hang lightweight items such as lanterns or decorations from the frame for convenience.

Dismantling and Storage
- Remove all stakes, guy lines, and sand bags.
- Press the anti-pinch thumb buttons on the legs and retract them to their lowest height.
- Gently pull down the central hub to unlock the frame.
- Carefully remove the canopy top fabric.
- Fold the frame inwards until it is fully collapsed.
- Place the frame, canopy top, and all accessories into the roller bag for compact storage and easy transport.
Maintenance
- Cleaning: Clean the canopy fabric with mild soap and water. Do not use harsh chemicals or abrasive cleaners. Allow the fabric to air dry completely before folding and storing to prevent mildew.
- Frame Care: Inspect the steel frame periodically for any signs of rust or damage. Clean any dirt or debris from the frame. If rust appears, clean it and apply a rust-inhibiting paint.
- Storage: Store the canopy in its roller bag in a cool, dry place away from direct sunlight when not in use. Ensure all components are dry before storage.
- Inspection: Before each use, inspect all parts (frame, fabric, stakes, ropes) for wear and tear. Replace any damaged components to ensure safe operation.
Troubleshooting
| Problem | Possible Cause | Solution |
|---|---|---|
| Canopy difficult to open/close | Frame joints are stiff or misaligned. | Ensure the frame is on a flat surface. Apply a silicone-based lubricant to joints if necessary. Check for any obstructions. |
| Canopy not stable in light wind | Not properly anchored or weight bags are empty. | Ensure sand bags are filled and attached. Use all provided stakes and guy lines. |
| Water pooling on canopy top | Canopy not taut enough or heavy rainfall. | Ensure the canopy fabric is stretched tightly over the frame. Adjust leg heights if possible to create better runoff. Dismantle in heavy rain. |
| Height adjustment buttons stuck | Dirt/debris in mechanism or corrosion. | Clean the buttons and surrounding area. Apply a small amount of lubricant. Do not force the buttons. |
Specifications
- Brand: BONTEC
- Model Number: ZP02
- Product Dimensions (L x W x H): 118.1" x 118.1" x 114.6" (10ft x 10ft x 9.55ft)
- Floor Area: 97 Square Feet (9 Square Meters)
- Material Type: Metal (Frame), 150D Silver-coated Fabric (Canopy)
- Frame Material: Alloy Steel
- Pole Material Type: Iron
- Color: Silver-coated White
- Ultraviolet Light Protection: Yes (UPF 50+)
- Water Resistance Level: Water Resistant (78.74 inch rating)
- Required Assembly: Yes (Minimal, 1-person setup)
- Included Accessories: Roller Bag, 4 Weight Bags, 8 Stakes, 8 S-Hooks, Guy Lines
Warranty and Support
For warranty information, product support, or to purchase replacement parts, please contact BONTEC customer service. Refer to the contact details provided with your purchase documentation or visit the official BONTEC website.
Manufacturer: BONTEC
Contact: Please refer to your product packaging or the BONTEC official website for the most up-to-date customer support information.
Related Documents - ZP02
 |
BONTEC 116SB-v02 TILT TV Wall Mount Installation Manual Comprehensive installation manual for the BONTEC 116SB-v02 TILT TV Wall Mount, detailing parts list and step-by-step instructions for wood stud and concrete wall mounting. |
 |
BONTEC ST-13 Universal TV Stand Installation Manual Step-by-step installation guide for the BONTEC ST-13 Universal TV Stand Base Table Top Stand, featuring height adjustment and a tempered glass base. Includes a comprehensive parts list and essential safety information for proper assembly. |
 |
BONTEC Mobile Workstation Assembly Instructions MWS-001BK Detailed assembly instructions for the BONTEC MWS-001BK Mobile Workstation, a height-adjustable stand suitable for podium, lectern, and laptop use. |
 |
BONTEC GDM7501 Monitor Mount Installation Instructions Detailed installation guide for the BONTEC GDM7501 monitor mount, covering setup, adjustments, and cable management for desk mounting. |
 |
BONTEC CT135B TV Wall Mount Installation Instructions Comprehensive installation guide for the BONTEC CT135B TV Wall Mount, covering unpacking, safety information, parts list, and step-by-step assembly for flat and curved screens on various wall types. |
 |
BONTEC GDM7501 Gas Spring Monitor Mount Installation Instructions Detailed installation guide for the BONTEC GDM7501 gas spring monitor mount, covering clamp and grommet base setup, VESA plate attachment, arm installation, adjustments, and cable management. |
Ask a question about this manual
Ask about setup, troubleshooting, compatibility, parts, safety, or missing instructions. Manuals+ will review the question and use this page’s manual context to help answer it.