1. Introduction
The TERRAMASTER F6-424 Max is a high-performance 6-bay Network Attached Storage (NAS) device designed for business and advanced home users. It features an Intel Core i5 1235U 10-core 12-thread processor, 8GB DDR5 RAM, dual 10GbE ports, and dual M.2 NVMe slots for caching. This manual provides essential information for setting up, operating, and maintaining your F6-424 Max NAS.
2. Package Contents
Before proceeding with the installation, please verify that all items listed below are included in your package:
- TERRAMASTER F6-424 Max NAS Unit
- Power Adapter and Power Cord
- Ethernet Cable
- Quick Installation Guide
- Accessory Kit (screws for 2.5" drives, M.2 SSD screws)

Image: Included accessories for the F6-424 Max NAS.
3. Product Overview
3.1 Front Panel
The front panel features six drive bays for 3.5-inch or 2.5-inch hard drives/SSDs. Each bay has an LED indicator for drive status. The power button is located on the top right.

Image: Front view of the F6-424 Max NAS.
3.2 Rear Panel
The rear panel includes various ports for connectivity and cooling fans. Key ports include dual 10GbE Ethernet, USB 3.2 10Gbps, HDMI, and the power input.

Image: Rear view of the F6-424 Max NAS with port details.
3.3 Micro-Perforated Indicators
The NAS features micro-perforated indicators on the front panel for clear status display without excessive light emission.

Image: Micro-perforated indicators on the F6-424 Max.
4. Setup and Installation
4.1 Hard Drive Installation
The F6-424 Max supports tool-free installation for 3.5-inch HDDs. For 2.5-inch drives, screws from the accessory kit are required.
- Pull out an empty drive tray from the NAS.
- Remove the side strips from the tray.
- Place your 3.5-inch HDD into the tray and reattach the side strips to secure it. For 2.5-inch drives, use the provided screws to secure the drive to the tray.
- Slide the populated drive tray back into the NAS until it clicks into place.

Image: Hard drive installation into a push-lock tray.
Video: Installation guide for HDD, NVMe SSD, and RAM in the F6-424 Max NAS.
4.2 M.2 SSD and RAM Installation
The F6-424 Max features dual M.2 NVMe slots for caching and dual DDR5 RAM slots for memory expansion. To access these, you need to remove the top cover of the NAS.
- Ensure the NAS is powered off and disconnected from all cables.
- Remove the screws securing the top cover on the rear panel.
- Carefully slide off the top cover to reveal the internal components.
- For M.2 SSD: Locate the M.2 slots on the motherboard. Insert the M.2 SSD into the slot at an angle and gently push down, then secure it with the provided screw.
- For RAM: Locate the DDR5 RAM slots. Align the notch on the RAM module with the slot and push down firmly on both ends until the clips snap into place.
- Replace the top cover and secure it with the screws.

Image: Internal view of the F6-424 Max for M.2 SSD and RAM installation.
5. Operating Instructions
5.1 Initial Setup and TOS Operating System
After installing your drives, connect the NAS to your network and power it on. Follow the Quick Installation Guide to initialize the device and install the TerraMaster Operating System (TOS). TOS 6 offers a user-friendly interface for managing your NAS.
Video: Overview of the TERRAMASTER F6-424 Max NAS features and TOS operating system.
5.2 Data Management and Backup
The F6-424 Max supports various RAID configurations, including TerraMaster Flexible RAID Array (TRAID/TRAID+), RAID 5, and RAID 6, to optimize storage space and data protection. The Business Backup Suite (BBS) provides comprehensive backup solutions, including Centralized Backup, TerraSync, Duple Backup, and CloudSync for off-site and cloud recovery.
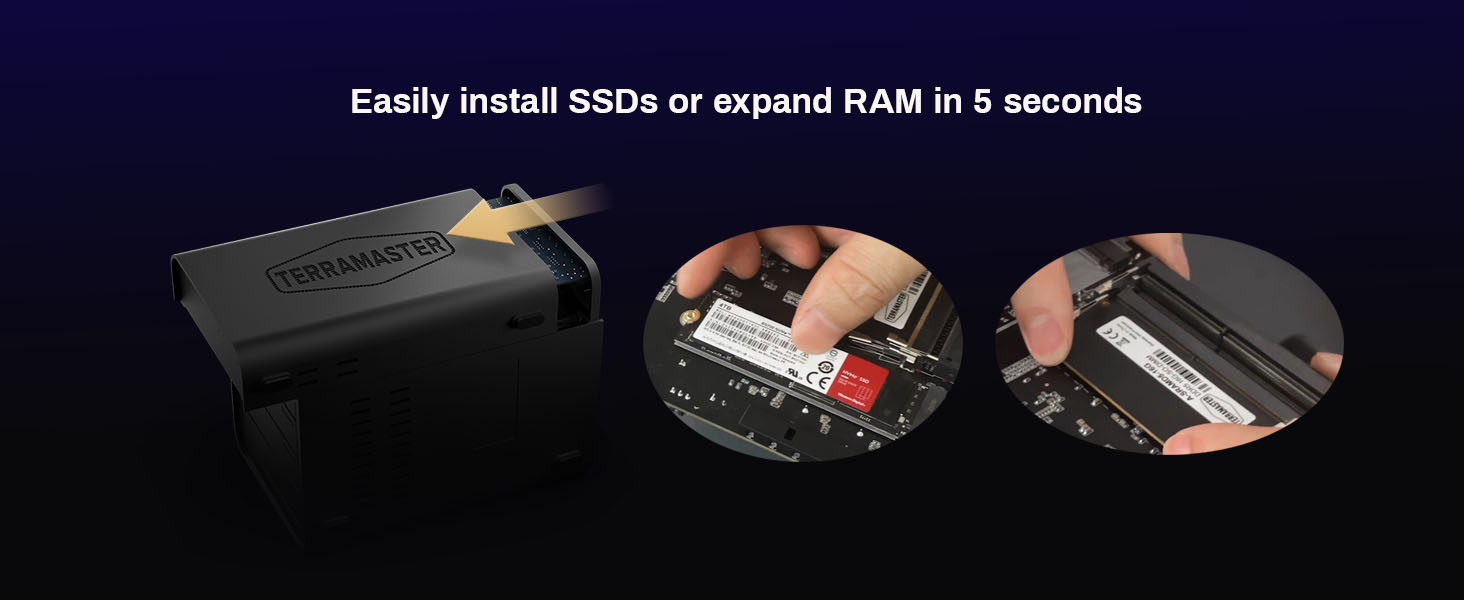
Image: Business Backup Suite (BBS) overview.
5.3 Multimedia Streaming
The NAS supports 4K video decoding and uPnP/DLNA, allowing for smooth streaming to various devices. It is compatible with TerraMaster’s Multimedia Server and third-party platforms like Plex, Emby, and Jellyfin.

Image: 4K video decoding and multimedia platform support.
5.4 Network Connectivity
Equipped with dual 10GbE Ethernet ports, the F6-424 Max provides high-speed data transfer, ideal for demanding tasks like 4K video editing. It supports SMB multichannel technology for enhanced performance.

Image: 10GbE network performance details.
6. Maintenance
6.1 Cooling System
The F6-424 Max incorporates two smart fans and vents to enhance airflow and extend the lifespan of the components. Regularly ensure that the fan vents are clear of dust and obstructions.

Image: Cooling innovation with smart fans.
6.2 Software Updates
Keep your TOS operating system updated to the latest version to ensure optimal performance, security, and access to new features. Updates can typically be managed through the TOS web interface.
7. Troubleshooting
7.1 Common Issues
- NAS not powering on: Check power cable connections and ensure the power adapter is functioning correctly.
- Drives not detected: Ensure drives are properly seated in their trays. Verify that the drives are compatible with the NAS.
- Network connectivity issues: Check Ethernet cable connections. Verify network settings in TOS. Ensure your router is functioning correctly.
- Slow performance: Check network bandwidth, drive health, and ensure M.2 NVMe caching is configured if desired.
For more detailed troubleshooting, refer to the official TerraMaster support website or contact customer service.
8. Specifications
| Feature | Specification |
|---|---|
| Brand | TERRAMASTER |
| Model Number | F6-424 Max |
| CPU | Intel Core i5 1235U (10-core, 12-thread, up to 4.4GHz) |
| GPU | Iris Xe Graphics (up to 1.2GHz) |
| RAM | 8GB DDR5 4800MHz (expandable) |
| Drive Bays | 6 (3.5"/2.5" SATA HDD/SSD) |
| M.2 Slots | 2 x M.2 NVMe slots |
| Ethernet Ports | 2 x 10GbE |
| USB Ports | USB 3.2 10Gbps |
| HDMI | Yes |
| Dimensions (D x W x H) | 9.5"D x 6.1"W x 8.7"H |
| Weight | 4.6 Pounds |
| Enclosure Material | Plastic |
| Compatible Devices | Android, Linux, Mac, Windows, iOS |
9. Warranty and Support
9.1 Warranty Information
The TERRAMASTER F6-424 Max NAS Storage comes with a 2-year limited warranty. Please retain your proof of purchase for warranty claims. The warranty covers defects in materials and workmanship under normal use.
9.2 Technical Support
For technical assistance, product inquiries, or warranty service, please visit the official TERRAMASTER website or contact their customer support team. You can find detailed FAQs, driver downloads, and contact information on their support pages.