1. Introduction
The ETON MA 4 is a high-performance 4-channel Class D compact amplifier designed for automotive and recreational vehicle audio systems. This amplifier combines advanced technology with a compact design, offering premium sound quality and high output performance. It is engineered for optimal compatibility and flexible installation in various vehicle types.
2. Key Features
- Advanced Class D Technology: Utilizes high-quality electronic components and multi-layer boards for high efficiency and superior sound reproduction with minimal distortion.
- Compact Aluminum Housing: Features a one-piece die-cast aluminum housing with a matte anodized finish, ensuring durability and efficient heat dissipation.
- Flexible Top Plate: The ETON logo top plate is removable and can be rotated 180° for flexible mounting options and optimal aesthetic integration.
- Comprehensive Adjustment Options: Hidden beneath the top plate are controls for 12 dB/octave high-pass and low-pass filters, high-level input voltage control, high-level input resistance (input load), and gain settings.
- Integrated Adjustment Tool: A specialized tool is integrated into the heatsink for convenient adjustment of filter functions and gain.
- LED Status Bar: An indirect LED light bar assists in setting controls accurately.
- Removable Connectors: Features detachable connectors for power and audio signals, simplifying installation and maintenance.
- Variable Mounting Feet: Adjustable mounting feet allow for versatile installation, including hidden setups.
- Stackable Design: MA series amplifiers are stackable, enabling compact, multi-amplifier installations.
- German Engineering: Designed in Germany, ensuring high standards of quality and performance.
3. Setup and Installation
Proper installation is crucial for optimal performance and safety. It is recommended that installation be performed by a qualified professional.
3.1 Unpacking and Inspection
Carefully remove the amplifier from its packaging. Inspect for any signs of damage during transit. Ensure all components listed in the package contents are present.
- ETON MA 4 Amplifier
- 1 Power Plug
- 3 Speaker Connectors
- 3 High-Level Cables
- Level Remote Control
- 4 Mounting Feet
- Mounting Screws
3.2 Mounting the Amplifier
The MA 4's compact size and variable mounting feet allow for flexible installation. Consider a location that provides adequate ventilation and is protected from moisture and excessive heat.

Figure 3.2.1: ETON MA 4 Amplifier, showing its compact design and connection ports.

Figure 3.2.2: Exploded view illustrating the stackable design and mounting points for multiple MA series amplifiers.

Figure 3.2.3: Detail of the variable mounting feet, allowing for flexible installation options.
- Choose a suitable mounting location.
- Use the provided mounting feet and screws to secure the amplifier.
- For stacked installations, utilize the additional mounting points and blind holes.
3.3 Wiring Connections
Ensure the vehicle's battery is disconnected before making any electrical connections.

Figure 3.3.1: Rear panel showing power, speaker, and RCA input/output connections.
- Power Connection: Connect the power plug to the amplifier. Ensure proper polarity (+12V, GND, Remote). Use appropriate gauge wiring for power and ground.
- Speaker Connections: Use the provided speaker connectors to connect your speakers to the amplifier's output terminals (CH1-CH4). Observe correct polarity.
- Audio Input:
- High-Level Input: If your head unit does not have RCA outputs, use the high-level input cables provided. Connect them to the speaker outputs of your head unit.
- Low-Level (RCA) Input: Connect RCA cables from your head unit's pre-out to the amplifier's RCA input jacks (CH1/2, CH3/4).
- Remote Control: Connect the level remote control if desired for convenient volume adjustment.
4. Operation and Adjustments
The ETON MA 4 offers various controls to fine-tune your audio system. These controls are located under the removable top plate.
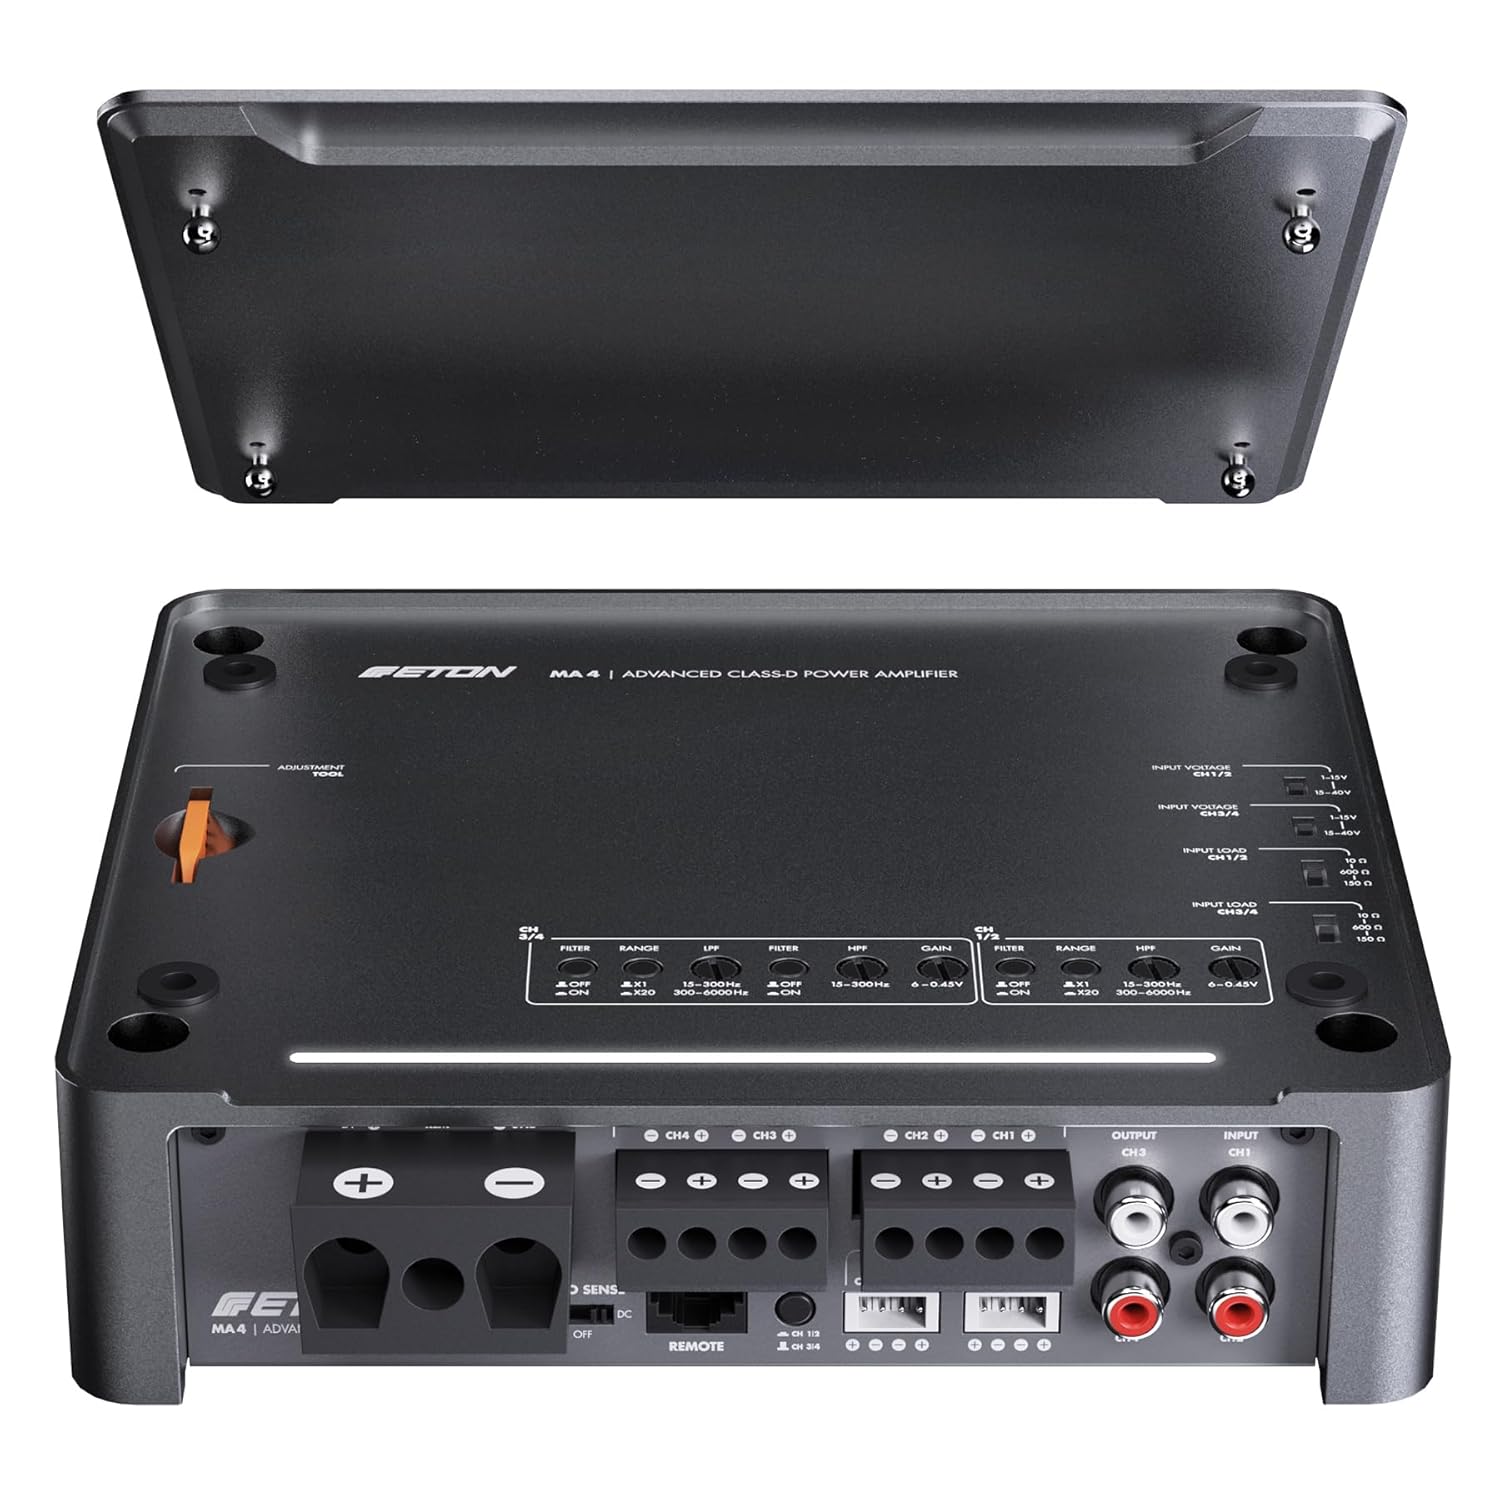
Figure 4.1.1: Amplifier with top cover removed, revealing the adjustment controls for filters, gain, and input settings.

Figure 4.1.2: Detail of the orange adjustment tool integrated into the heatsink for precise control adjustments.
4.1 Initial Power-Up
- After all connections are made, reconnect the vehicle's battery.
- Turn on your head unit. The amplifier should power on, indicated by the LED status bar.
4.2 Adjusting Controls
Use the integrated adjustment tool to set the following parameters:
- Gain Control: Adjust the gain for each channel (CH1/2, CH3/4) to match the output level of your head unit. Start with the gain at minimum and slowly increase until desired volume is achieved without distortion. The LED status bar can assist in this process.
- Filter Settings (HPF/LPF):
- HPF (High-Pass Filter): Allows frequencies above the set point to pass. Useful for protecting smaller speakers from low bass frequencies.
- LPF (Low-Pass Filter): Allows frequencies below the set point to pass. Typically used for subwoofers.
- Input Voltage Control: Adjust this setting based on whether you are using high-level or low-level inputs to ensure proper signal matching.
- Input Resistance (Input Load): For high-level inputs, adjust the input resistance to optimize signal transfer from the head unit.
5. Maintenance
The ETON MA 4 amplifier is designed for durability and requires minimal maintenance.
- Cleaning: Use a soft, dry cloth to clean the amplifier's exterior. Avoid abrasive cleaners or solvents.
- Ventilation: Ensure that the amplifier's heatsink fins are free from dust and debris to maintain proper cooling. Do not obstruct airflow around the amplifier.
- Connections: Periodically check all wiring connections to ensure they are secure and free from corrosion.
6. Troubleshooting
If you experience issues with your ETON MA 4 amplifier, refer to the following common problems and solutions:
| Problem | Possible Cause | Solution |
|---|---|---|
| No Power / Amplifier does not turn on |
|
|
| No Sound Output |
|
|
| Distorted Sound |
|
|
| Amplifier Overheating |
|
|
7. Technical Specifications
| Feature | Specification |
|---|---|
| Model Number | MA 4 |
| Output Power (RMS) |
|
| Signal-to-Noise Ratio | 83 dB |
| Damping Factor @ 4 ohms | > 165 |
| Dimensions (L x W x H) | 184 x 160 x 51 mm |
| Number of Channels | 4 |
| Material | Die-cast Aluminum |
| Mounting Type | Through-hole mounting |
| Compliance | TÜV |
8. Warranty Information
Specific warranty details are typically provided with the product packaging or available on the manufacturer's official website. Please refer to the documentation included with your purchase or visit the ETON website for the most current warranty terms and conditions.
9. Customer Support
For technical assistance, troubleshooting beyond this manual, or service inquiries, please contact ETON customer support. Contact information can usually be found on the manufacturer's website or in the product documentation.
Manufacturer: ETON
For more information, you may visit the official ETON website: www.eton-gmbh.com