
1. Product Overview
The PRIMOS Trail Camera PRM119220CT is designed for wildlife monitoring, security surveillance, and outdoor observation. This robust camera captures high-quality images and videos, providing valuable insights into animal activity or property security. Its durable construction ensures reliable performance in various environmental conditions.
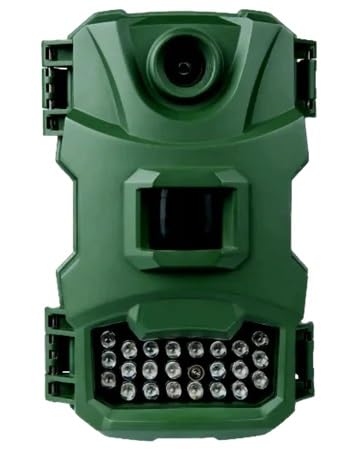
Figure 1: Front view of the PRIMOS Trail Camera PRM119220CT, showing the lens and sensor area.
2. Setup Guide
2.1. Battery Installation
The camera requires a specific number of AA batteries (not included). Ensure correct polarity when inserting batteries.
- Open the battery compartment latch, typically located on the side or bottom of the camera.
- Insert the required AA batteries, matching the positive (+) and negative (-) terminals as indicated inside the compartment.
- Close the battery compartment securely to ensure a watertight seal.
2.2. SD Card Installation
A Class 10 or higher SD card (up to 32GB recommended, not included) is required to store photos and videos.
- Locate the SD card slot, usually next to the battery compartment or under a protective flap.
- Insert the SD card with the metal contacts facing down (or as indicated) until it clicks into place.
- To remove, press the card gently until it springs out.
2.3. Mounting the Camera
The camera can be mounted using the included strap or a tripod mount.
- Strap Mounting: Thread the provided mounting strap through the slots on the back of the camera. Securely fasten the camera to a tree or post at the desired height and angle.
- Tripod Mounting: Use the 1/4"-20 threaded insert on the bottom of the camera to attach it to a tripod or other compatible mounting accessory.
Tip: Position the camera to avoid direct sunlight into the lens, which can cause overexposure. Clear any obstructing branches or foliage from the camera's field of view.
3. Operating Instructions
3.1. Powering On and Basic Settings
- After installing batteries and SD card, slide the power switch to the "ON" position.
- The camera will typically enter a setup mode or display a live preview.
- Use the navigation buttons (Up, Down, Left, Right, OK/Menu) to access the camera's settings.
- Important Settings to Configure:
- Date and Time: Set the correct date and time for accurate timestamps on your media.
- Mode: Select Photo, Video, or Photo+Video mode.
- Photo Resolution: Choose desired image quality (e.g., 12MP, 8MP).
- Video Resolution: Select video quality (e.g., 1080p, 720p).
- PIR Sensitivity: Adjust the Passive Infrared sensor sensitivity based on the environment to prevent false triggers.
- Detection Delay: Set the time interval between consecutive triggers.
- Save your settings before exiting the menu.
3.2. Capturing Media
Once configured, the camera will automatically capture images or videos when motion is detected within its PIR sensor range, according to your selected mode and settings.
- Photo Mode: Captures still images when triggered.
- Video Mode: Records video clips of a specified duration when triggered.
- Photo+Video Mode: Captures a still image followed by a video clip when triggered.
3.3. Retrieving Media
To view or transfer your captured photos and videos:
- Turn off the camera.
- Remove the SD card.
- Insert the SD card into a computer's SD card reader or a compatible device.
- Access the files on the SD card to view, copy, or delete them.
- Alternatively, some cameras may allow direct connection via a USB cable (if available) to a computer for file transfer.
4. Maintenance
4.1. Cleaning
- Wipe the camera's exterior with a soft, damp cloth. Avoid harsh chemicals.
- Gently clean the lens and PIR sensor window with a lens cleaning cloth to ensure clear images and proper detection.
- Ensure the battery and SD card compartments are free of dirt and moisture.
4.2. Battery Management
- Replace batteries when the low battery indicator appears or when performance degrades.
- Always use fresh, high-quality batteries for optimal performance and longevity.
- Remove batteries if the camera will be stored for an extended period to prevent leakage.
4.3. SD Card Care
- Format the SD card periodically using the camera's format function to maintain optimal performance and prevent data corruption.
- Avoid removing the SD card while the camera is powered on or actively writing data.
5. Troubleshooting
| Problem | Possible Cause | Solution |
|---|---|---|
| Camera not powering on. | Dead or incorrectly inserted batteries. | Replace batteries with fresh ones, ensuring correct polarity. |
| No photos/videos captured. | SD card full, corrupted, or not inserted correctly; PIR sensitivity too low; camera in wrong mode. | Format or replace SD card; increase PIR sensitivity; check camera mode settings. |
| Poor image/video quality. | Dirty lens; low light conditions; incorrect resolution settings. | Clean the lens; ensure adequate lighting; set higher resolution. |
| False triggers. | PIR sensitivity too high; camera pointed at moving branches or heat sources. | Decrease PIR sensitivity; reposition camera to avoid obstructions or heat sources. |
6. Specifications
| Feature | Detail |
|---|---|
| Model Number | PRM119220CT |
| Brand | PRIMOS |
| Product Dimensions | 13.97 x 9.53 x 7.62 cm; 453.59 g |
| Material | Stainless Steel (Enclosure) |
| ASIN | B0D9YRWS5S |
| UPC | 010135009755 |
| GTIN | 010135009755 |
| Manufacturer | Primos |
| First Available Date | Nov. 22 2024 |
7. Warranty and Support
For warranty information and technical support, please refer to the official PRIMOS website or contact their customer service department. Keep your purchase receipt as proof of purchase for warranty claims.
PRIMOS Official Website: www.primos.com (Note: This is a placeholder link as no specific support link was provided in the product data.)


