
1. Introduction
Thank you for choosing the Rebel Brett Inflatable Stand-Up Paddleboard (SUP) with Swim Seat. This manual provides essential information for the safe and effective use, setup, operation, and maintenance of your SUP. Please read it thoroughly before first use and keep it for future reference.
2. Package Contents
Verify that all items listed below are included in your package:
- Inflatable SUP Board (335 cm)
- Adjustable 4-piece Paddle
- Hand Pump with Manometer
- Transport Backpack
- Kayak Seat
- 3 Slide-in Fins (1 central, 2 side)
- Leash
- Repair Kit

Image: Complete Rebel Brett SUP package contents.
3. Safety Instructions
Always prioritize safety when using your SUP. Failure to follow these guidelines may result in injury or damage.
- Always wear a personal flotation device (PFD) approved for your region.
- Do not exceed the maximum load capacity of 170 kg (375 lbs) or maximum user weight of 140 kg (308 lbs).
- Never use the SUP under the influence of alcohol or drugs.
- Be aware of weather conditions, currents, and water hazards. Avoid using in strong winds or rough waters.
- Always attach the leash to your ankle and the board to prevent separation in case of a fall.
- Ensure the board is inflated to the recommended pressure (12-15 PSI) before use. Over-inflation or under-inflation can affect performance and safety.
- Supervise children at all times.
4. Setup
4.1. Board Inflation
- Unroll the SUP board on a clean, flat surface.
- Locate the inflation valve. Ensure the inner pin is in the 'up' position (closed) to prevent air from escaping after inflation.
- Connect the hose of the hand pump to the valve by twisting it clockwise until secure.
- Begin pumping. The manometer on the pump will start showing pressure once the board becomes firm. Continue pumping until the pressure reaches 12-15 PSI. Do not over-inflate.
- Once inflated, quickly disconnect the pump hose and replace the valve cap.

Image: Hand pump for board inflation.
4.2. Fin Installation
The Rebel Brett SUP features three slide-in fins for stability.
- Locate the fin boxes on the underside of the board.
- Slide each fin into its respective slot. The larger fin goes into the central box, and the two smaller fins go into the side boxes.
- Secure each fin by inserting the small retaining clip or pin (if applicable) through the hole in the fin box and fin base.

Image: Fin installation detail.
4.3. Paddle Assembly
The 4-piece adjustable paddle can be configured for SUP or kayak use.
- Connect the paddle sections by aligning the push-button clips with the holes and pushing them together until they click into place.
- For SUP use, assemble with one blade and the handle. Adjust the height using the quick-release clamp to suit your height (typically 6-8 inches taller than you).
- For kayak use, assemble with two blades and the central connecting piece.
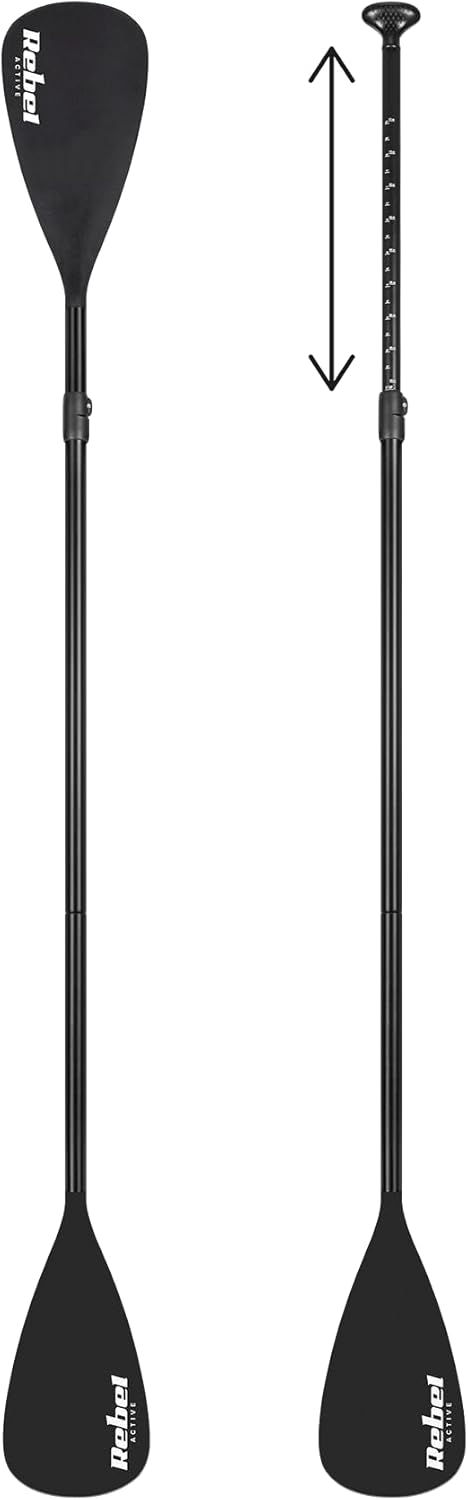
Image: Adjustable paddle assembly.
4.4. Kayak Seat Attachment
The included kayak seat provides comfort for longer tours.
- Unfold the kayak seat.
- Locate the D-rings on the board, specifically designed for seat attachment.
- Attach the straps of the seat to the corresponding D-rings on the board. Adjust the strap length to achieve a comfortable and secure seating position.

Image: SUP board with kayak seat attached.

Image: Kayak seat detail.
4.5. Leash Attachment
The leash is a critical safety device.
- Attach one end of the leash to the D-ring at the tail of the board.
- Secure the other end of the leash (cuff) around your ankle.

Image: Ankle leash.
5. Operating the SUP
Once your SUP is set up, you are ready to enjoy the water.
5.1. Paddling Techniques
- Standing: Start on your knees to get a feel for the board's stability. Once comfortable, slowly stand up, placing your feet shoulder-width apart, parallel to the board's stringer. Keep your knees slightly bent and your core engaged.
- Paddling Stroke: Hold the paddle with one hand on the top of the handle and the other on the shaft. Insert the blade fully into the water, pull it back towards your feet, and then lift it out. Alternate sides for straight tracking.
- Turning: To turn, paddle on one side only, or perform a sweep stroke (a wide arc) on the opposite side of the desired turn.

Image: Person using the SUP on water.
5.2. Using the Kayak Seat
When using the kayak seat, adjust your paddle to the two-blade configuration for efficient paddling from a seated position.
5.3. Action Camera Mount & Luggage Bungee
- The integrated action camera mount at the bow allows you to capture your adventures. Ensure your camera is securely attached before launching.
- Use the integrated luggage bungee cords at the bow to secure dry bags or other gear.
6. Maintenance
6.1. Cleaning
After each use, especially in saltwater, rinse your SUP board, paddle, and fins with fresh water. Use mild soap and water for stubborn dirt. Ensure all components are thoroughly dry before storage to prevent mold and mildew.
6.2. Deflation and Storage
- Remove all accessories (fins, leash, seat).
- Open the valve cap and press the inner pin down to the 'open' position to release air. Allow the board to deflate naturally.
- Once mostly deflated, you can use the pump in reverse (if it has a deflate function) or manually roll the board from the tail towards the valve to push out remaining air.
- Fold or roll the dry board neatly and place it into the transport backpack for compact storage. Store in a cool, dry place away from direct sunlight and extreme temperatures.
6.3. Repair Kit Usage
The repair kit is for minor punctures or tears. For significant damage, consult a professional or contact customer support.
- Locate the leak.
- Clean and dry the area around the leak thoroughly.
- Cut a patch from the repair material slightly larger than the damaged area, ensuring rounded corners.
- Apply adhesive (not included, typically PVC glue) evenly to the patch and the damaged area.
- Press the patch firmly onto the damaged area, smoothing out any air bubbles.
- Allow at least 24 hours for the adhesive to cure before re-inflating.

Image: Repair kit contents.
7. Troubleshooting
| Problem | Possible Cause | Solution |
|---|---|---|
| Board loses air quickly | Valve not closed properly; Puncture/Leak | Ensure valve pin is in 'up' position and cap is tight. Check for leaks using soapy water and repair with kit. |
| Board feels unstable | Under-inflated; Fins not installed correctly | Inflate to recommended PSI (12-15 PSI). Ensure fins are fully seated and secured. |
| Paddle feels wobbly | Sections not fully connected; Clamp not tightened | Ensure all paddle sections click into place. Tighten the quick-release clamp firmly. |
8. Specifications
| Feature | Detail |
|---|---|
| Length | 335 cm (11 ft) |
| Width | 84 cm (33 inches) |
| Thickness | 15 cm (6 inches) |
| Weight | 10 kg (22 lbs) |
| Displacement | 185 - 258 Liters |
| Recommended Pressure | 12-15 PSI |
| Maximum Load | 170 kg (375 lbs) |
| Maximum User Weight | 140 kg (308 lbs) |
| Paddle Length | 205 ~ 225 cm (adjustable) |
| Material (Board) | Drop-Stitch Technology, EVA Deck |
| Material (Paddle) | Aluminum shaft, Nylon blade |
| Material (Kayak Seat) | Polyester, Nylon |
9. Warranty and Support
For warranty information, technical support, or replacement parts, please contact Rebel Electro customer service directly. Refer to the product packaging or the manufacturer's official website for contact details.