Introduction
The PRUNUS J-555 is a compact and lightweight portable AM/FM radio designed for ease of use and excellent reception. Featuring dual power options, including a built-in rechargeable battery and support for AAA batteries, it is ideal for daily listening, travel, and emergency situations. This manual provides detailed instructions for setting up, operating, and maintaining your radio.
Product Features
- Ultra-Compact Design: Measures approximately 9.9 x 5.8 x 2.5 cm (3.9 x 2.3 x 1 inch) and weighs only 100g (3.6 oz), making it highly portable. Includes a lanyard and belt clip for convenient carrying.
- Dual Power Options: Equipped with an 800mAh built-in rechargeable battery (USB-C charging) and an option to use 2x AAA batteries (not included) for extended use or emergencies.
- Exceptional Signal Reception: Features a 19.5 cm telescopic antenna and an integrated DSP chip for stable and clear reception across FM (87-108 MHz) and AM (520-1730 KHz) bands.
- User-Friendly Operation: Simple AM/FM switch, rotary tuning and volume knobs, a built-in flashlight, and a clear tuning indicator for easy station finding.
- Clear Audio: Integrated magnetic speaker provides clear sound. A 3.5mm headphone jack allows for private listening.
Package Contents
Please check the package for the following items:
- PRUNUS J-555 Portable AM/FM Radio
- USB-C Charging Cable
- User Manual (this document)
Controls and Functions
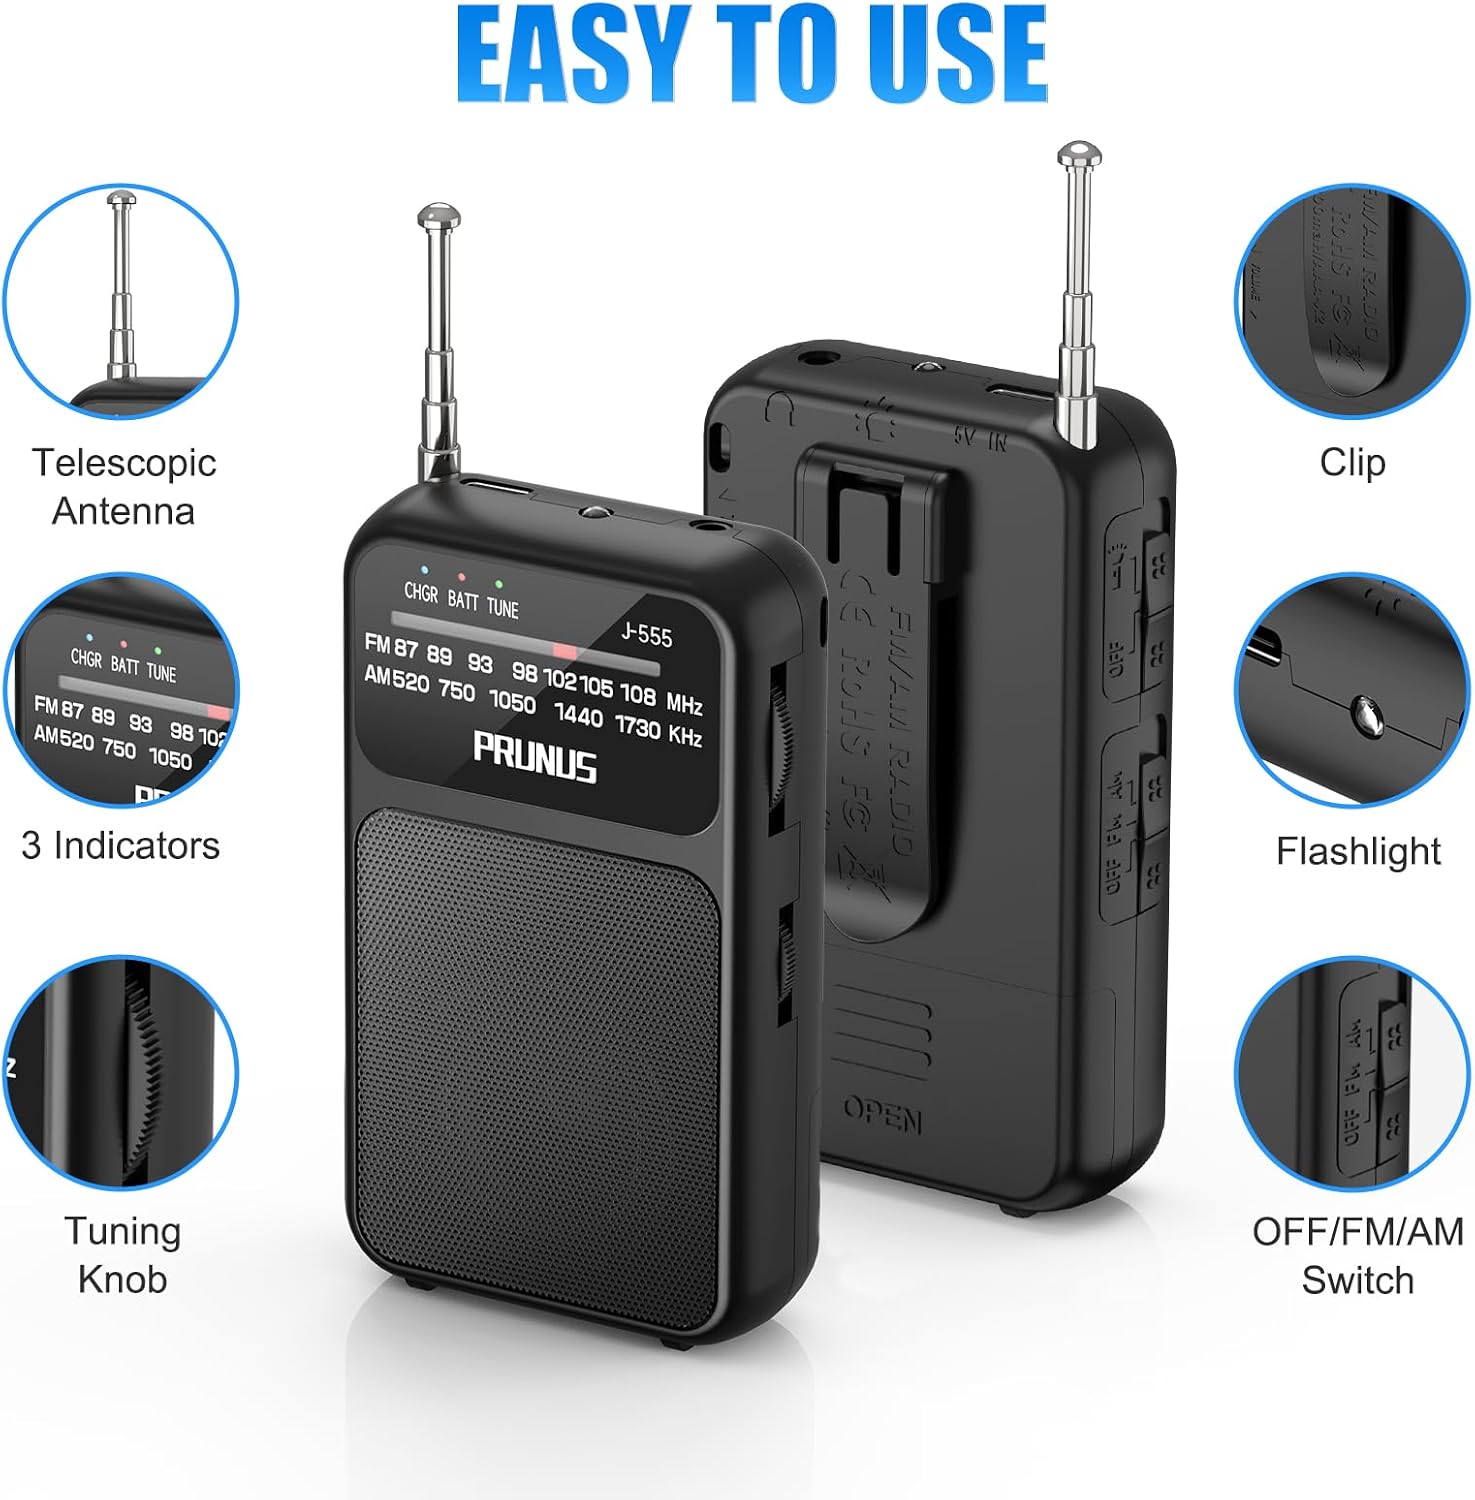
Image: Detailed view of the PRUNUS J-555 radio's controls and features.
- Telescopic Antenna: Extend for optimal FM and AM reception.
- OFF/FM/AM Switch: Slides to turn the radio off, or select between FM and AM bands.
- Tuning Knob: Rotates to scan and select radio stations.
- Volume Knob: Rotates to adjust the audio output level.
- Flashlight: Integrated LED light for illumination.
- 3.5mm Headphone Jack: For connecting headphones for private listening.
- USB-C Charging Port: For charging the built-in rechargeable battery.
- Battery Compartment: Located on the back, for optional AAA battery installation.
- Belt Clip: For attaching the radio to clothing or a bag.
- Lanyard Attachment Point: For securing the radio with a wrist strap.
- Tuning Indicator: Visual indicator to help pinpoint station frequency.
- Battery Indicator: Shows the charging status or battery level.
Setup
Initial Charging

Image: PRUNUS J-555 radio demonstrating USB-C charging and AAA battery installation.
- Before first use, fully charge the built-in 800mAh rechargeable battery.
- Connect the provided USB-C charging cable to the radio's USB-C port.
- Plug the other end of the cable into a standard USB power adapter (not included) or a computer's USB port.
- The battery indicator light will show charging status. Once fully charged, the indicator will change (refer to the indicator behavior section in the full manual for specifics).
Optional AAA Battery Installation
For backup power or when the rechargeable battery is depleted, you can use 2x AAA batteries.
- Locate the battery compartment on the back of the radio.
- Open the battery compartment cover.
- Insert 2 new AAA batteries, ensuring correct polarity (+/-).
- Inside the battery compartment, there is a small red slider switch. This switch allows you to select between the internal rechargeable battery and the external AAA batteries. Ensure it is set to the correct position for the power source you intend to use.
- Close the battery compartment cover securely.
Operating Instructions
Power On/Off and Band Selection
- Slide the OFF/FM/AM switch to either 'FM' or 'AM' to turn on the radio and select your desired band.
- To turn off the radio, slide the switch to 'OFF'.
Tuning to a Station

Image: PRUNUS J-555 radio demonstrating signal reception with extended antenna.
- Extend the telescopic antenna fully for better reception, especially for FM stations.
- Slowly rotate the Tuning Knob to scan through frequencies.
- Observe the tuning indicator to help identify strong signals for clear reception.
Adjusting Volume
- Rotate the Volume Knob clockwise to increase the volume and counter-clockwise to decrease it.
Using Headphones

Image: User enjoying private listening with headphones connected to the PRUNUS J-555 radio.
- Plug any standard 3.5mm headphones into the headphone jack on the side of the radio.
- The internal speaker will automatically mute when headphones are connected.
Using the Flashlight
- Locate the flashlight switch (refer to the 'Controls and Functions' section for its position).
- Slide the switch to turn the flashlight ON or OFF.
Power Options
The PRUNUS J-555 offers flexible power solutions:
- Internal Rechargeable Battery: The radio has a built-in 800mAh lithium-ion battery. Charge it using the provided USB-C cable. This is the primary power source for daily use.
- External AAA Batteries: For situations where recharging is not possible, or for extended listening, you can use 2x AAA batteries. Remember to set the internal red slider switch in the battery compartment to the correct power source (internal rechargeable or external AAA) before use.
Maintenance
- Cleaning: Wipe the radio with a soft, dry cloth. Do not use abrasive cleaners or solvents.
- Battery Care: If using AAA batteries, remove them if the radio will not be used for an extended period to prevent leakage. For the rechargeable battery, avoid completely draining it frequently to prolong its lifespan.
- Storage: Store the radio in a cool, dry place away from direct sunlight and extreme temperatures.
- Water Resistance: This radio is not waterproof. Avoid exposure to water or high humidity.
Troubleshooting
| Problem | Possible Cause | Solution |
|---|---|---|
| Radio does not turn on. | Battery is depleted or incorrectly installed. Power source switch is in the wrong position. | Charge the internal battery. If using AAA batteries, check their polarity and ensure the internal red slider switch is set to 'AAA'. Replace AAA batteries if necessary. |
| Poor reception or static. | Antenna not extended. Weak signal area. Interference. | Extend the telescopic antenna fully. Try repositioning the radio. Rotate the radio for better signal. |
| No sound. | Volume too low. Headphones connected. | Increase the volume. Disconnect headphones if you want to use the internal speaker. |
| Flashlight not working. | Flashlight switch off. Battery depleted. | Ensure the flashlight switch is ON. Charge the radio or check AAA batteries. |
Specifications

Image: PRUNUS J-555 radio demonstrating its compact size compared to a smartphone.
| Feature | Detail |
|---|---|
| Model | J-555 |
| Brand | PRUNUS |
| Dimensions (L x W x H) | Approx. 9.9 x 5.8 x 2.5 cm (3.9 x 2.3 x 1 inch) |
| Weight | Approx. 100g (3.6 oz) |
| Frequency Range | FM: 87-108 MHz, AM: 520-1730 KHz |
| Power Source | Built-in 800mAh rechargeable battery, 2x AAA batteries (not included) |
| Charging Port | USB-C |
| Audio Output | Integrated speaker, 3.5mm headphone jack |
| Antenna | Telescopic |
| Material | Acrylonitrile Butadiene Styrene (ABS) |
| Special Features | Flashlight, Lanyard, Belt Clip |
| Water Resistance | Not waterproof |
| Country of Origin | China |
Safety Information
For important safety guidelines and warnings, please refer to the official safety document provided by PRUNUS. You can access it via this link: Safety Information (PDF).
Warranty and Support
PRUNUS is a trusted brand committed to product quality and customer satisfaction. For any questions, technical assistance, or warranty inquiries, please contact PRUNUS customer support. Details regarding specific warranty periods can be obtained directly from customer service.
- Customer Support: Available 24/7. Refer to your purchase platform or PRUNUS official website for contact information.