Introduction
Thank you for choosing the VEVOR Rolling Metal Ferret Cage. This multi-tier cage is designed to provide a spacious and secure living environment for various small animals, including ferrets, chinchillas, guinea pigs, hedgehogs, rats, hamsters, sugar gliders, and small rabbits. Constructed from durable metal with a powder coating, it offers stability, rust resistance, and ease of cleaning. This manual provides essential information for assembly, operation, maintenance, and troubleshooting to ensure optimal use and the well-being of your pets.
Safety Instructions
- Read all instructions carefully before assembly and use.
- Ensure all parts are securely fastened during assembly to prevent collapse or injury.
- Regularly inspect the cage for any damaged or loose components. Replace or repair as necessary.
- The narrow 0.5-inch wire spacing is designed to prevent small animals from escaping. Always ensure doors are properly latched.
- Position the cage in a well-ventilated area, away from direct sunlight, extreme temperatures, or drafts.
- This cage is intended for indoor use with the specified small animal types.
- Keep children and other pets supervised around the cage to prevent accidental injury or disturbance to the caged animals.
- Thoroughly clean all components before introducing pets to the cage.
Package Contents
Verify that all components are present before beginning assembly:
- Cage Panels (sides, front, back, top, bottom)
- Platforms (4)
- Ramps (3)
- Pull-out Trays (ABS-coated metal)
- Lockable Caster Wheels (4)
- Hammock (1)
- Hex Key (1)
- Hex Wrench (1)
- Assembly Hardware (screws, nuts, bolts)

Figure 1: Cage dimensions and included tools (Hex Key, Hex Wrench).
Setup and Assembly Instructions
Assembly typically requires two people. Follow these steps carefully:
- Unpack and Identify Parts: Carefully remove all components from the packaging. Lay them out and compare them against the package contents list to ensure everything is present and undamaged.
- Assemble the Base: Attach the four lockable caster wheels to the bottom frame of the cage. Ensure they are securely tightened using the provided wrench.
- Construct the Lower Level: Connect the side panels, front panel, and back panel for the lower section of the cage to the base frame. Use the provided hardware (screws and hex key) to secure all connections. Do not fully tighten all screws until the entire frame is assembled.
- Install Lower Platforms and Ramps: Insert the platforms and ramps into the designated slots within the lower section. Ensure ramps are positioned for easy access between levels.
- Assemble the Upper Level: Place the middle frame section on top of the lower section. Connect the upper side, front, and back panels. Install the remaining platforms and ramps.
- Attach Top Panel: Secure the top panel to the upper frame.
- Install Doors and Latches: Attach all doors to their respective openings. Ensure the twist-lock door latches are properly aligned and functional.
- Insert Trays: Slide the pull-out ABS-coated metal trays into the bottom of each level.
- Final Tightening: Once all panels and components are in place and aligned, fully tighten all screws and bolts.
- Add Accessories: Hang the hammock in a suitable location within the cage.

Figure 2: Cage with doors open, illustrating internal structure and accessories.
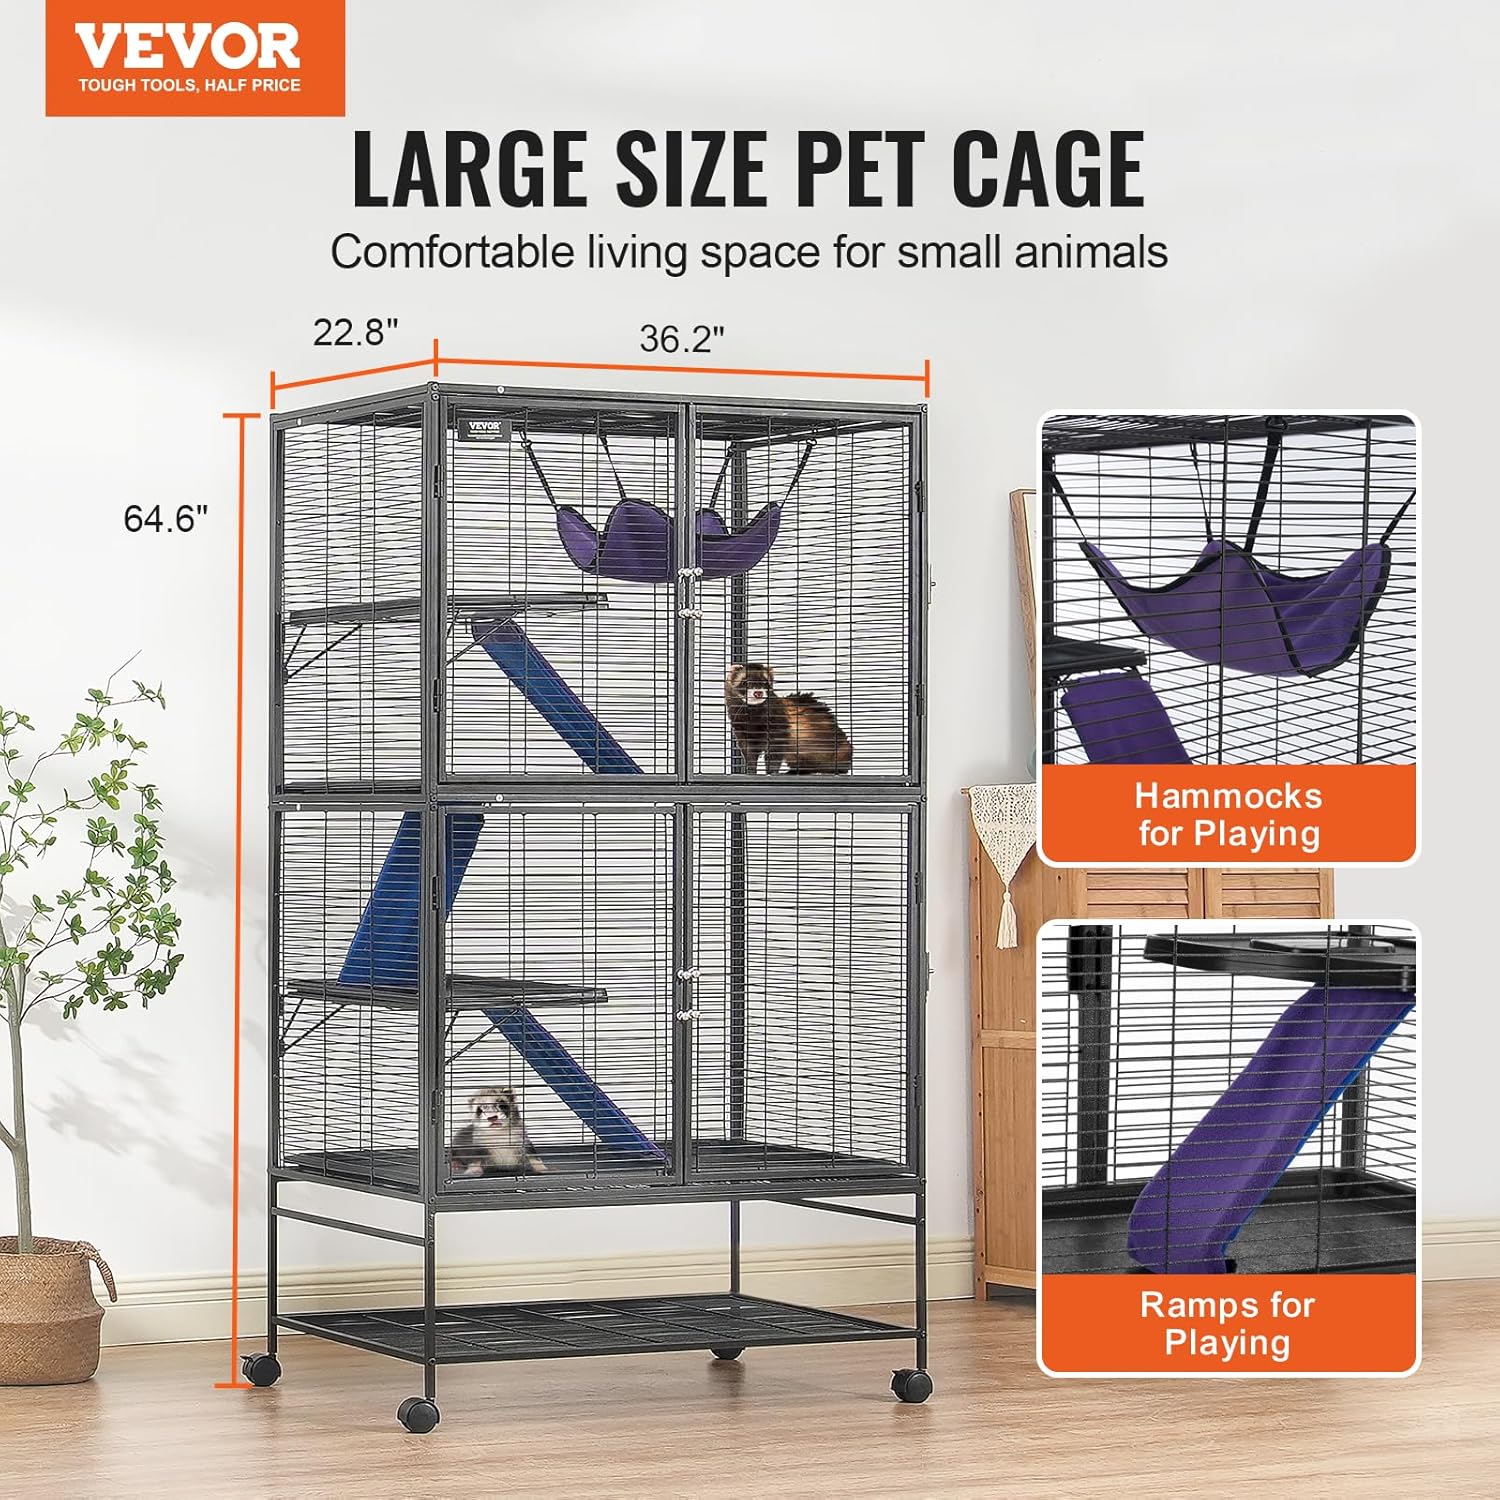
Figure 3: Overall view of the assembled cage with dimensions.
Operating Instructions
Accessing the Cage
- The cage features dual-layer double doors on the front for easy access to all levels. To open, disengage the twist-lock latches and swing the doors outward.
- Ensure doors are securely latched after each use to prevent pets from escaping.
Mobility
- The cage is equipped with 360° swivel lockable caster wheels for easy movement.
- To move the cage, unlock all four wheels. Gently push or pull the cage to its desired location.
- Once positioned, lock all four wheels to ensure stability and prevent accidental movement.

Figure 4: Pull-out tray and lockable caster wheels for easy cleaning and mobility.
Maintenance
Cleaning
- Daily Cleaning: Remove and clean the pull-out trays daily. The ABS-coated metal trays are designed to prevent urine leakage and are easy to wipe clean.
- Weekly Deep Cleaning: For a thorough cleaning, the platforms and grids are removable. This allows for easy access to all internal surfaces. Use a pet-safe cleaner and warm water. Rinse thoroughly and ensure all parts are completely dry before reassembling and returning pets.
- The large front doors provide full access for convenient cleaning of the entire cage interior.
Inspection
- Regularly check all cage components, including wire mesh, frame connections, doors, and latches, for any signs of wear, damage, or rust.
- Ensure the powder coating remains intact to maintain rust resistance.
- Inspect ramps and platforms for stability and integrity.
Troubleshooting
- Problem: Doors do not close or latch properly.
- Solution: Check the alignment of the door frame and the latch mechanism. Ensure the cage is assembled squarely. Minor adjustments to the door's position or the latch can often resolve this. If a door feels loose, consider adding small bumper pads to improve fit.
- Problem: Difficulty fitting parts together during assembly.
- Solution: Ensure all parts are oriented correctly according to the instructions. Sometimes, a gentle tap with a rubber mallet (or a hammer with a cloth) can help align stubborn connections. Do not fully tighten all screws until the entire frame is loosely assembled to allow for minor adjustments.
- Problem: Cage feels unstable or wobbly.
- Solution: Verify that all screws and bolts are fully tightened. Ensure the cage is placed on a flat, level surface. Check that all caster wheels are locked when the cage is stationary.
- Problem: Presence of metal shavings after unpacking.
- Solution: Before introducing pets, thoroughly inspect and clean all cage components to remove any residual metal shavings or debris. Use a vacuum cleaner and a damp cloth. This is crucial for pet safety.
Specifications
| Model Number | JM-XC-084 |
| Product Dimensions (L x W x H) | 92L x 58W x 164H cm (36.2" x 22.8" x 64.6") |
| Wire Spacing | 0.5 inches (1/2") |
| Material | Metal (Iron), Plastic (Trays), Velvet (Hammock) |
| Color | Black |
| Product Weight | 30.3 kg (66.8 lbs) |
| Number of Levels | 4 |
| Number of Doors | 2 |
| Target Species | Ferrets, Chinchillas, Guinea Pigs, Hedgehogs, Rats, Hamsters, Sugar Gliders, Small Rabbits |

Figure 5: Cage suitability for various small animals and wire spacing detail.

Figure 6: Solid metal construction details and load-bearing capacity.
Warranty Information
This VEVOR product comes with a limited warranty. For specific details regarding the warranty period and coverage, please refer to the warranty card included with your purchase or visit the official VEVOR website.
Customer Support
For any questions, concerns, or assistance with your VEVOR Rolling Metal Ferret Cage, please contact VEVOR customer support. You can find contact information on the official VEVOR website or through your purchase platform.
Visit the official VEVOR Store: VEVOR Store on Amazon


