Karienvir KEC-US-D23262
Karienvir 2 Burner Electric Cooktop KEC-US-D23262 User Manual
Model: KEC-US-D23262
Introduction
This manual provides essential information for the safe installation, operation, and maintenance of your Karienvir 12-inch 2 Burner Electric Cooktop, Model KEC-US-D23262. Please read these instructions thoroughly before using the appliance and retain them for future reference.
Important Safety Information
To reduce the risk of fire, electric shock, injury to persons, or damage when using the appliance, follow basic precautions, including the following:
- Read all instructions before using the cooktop.
- Ensure the cooktop is properly installed and grounded by a qualified technician.
- Do not touch hot surfaces. Use handles or knobs.
- Never leave the cooktop unattended during operation.
- Do not store items of interest to children above the cooktop.
- Use only dry pot holders. Moist or damp pot holders on hot surfaces may result in burns from steam.
- Do not use aluminum foil or plastic containers on the cooktop.
- Clean the cooktop regularly to prevent grease buildup.
- In case of a cooktop surface breaking, immediately turn off the appliance and disconnect from power.
- This appliance is not intended for use by persons (including children) with reduced physical, sensory or mental capabilities, or lack of experience and knowledge, unless they have been given supervision or instruction concerning use of the appliance by a person responsible for their safety.
Product Features
The Karienvir KEC-US-D23262 electric cooktop is designed for efficient and versatile cooking. Key features include:
- Dual Ring Burner Design: The larger burner features an inner ring of 1000W and an outer ring that extends to 2000W, allowing flexible adjustment for various cooking needs. The smaller burner provides 1200W.
- High Power Output: Operates on 240V with a total power of 3200W for rapid heating and efficient cooking.
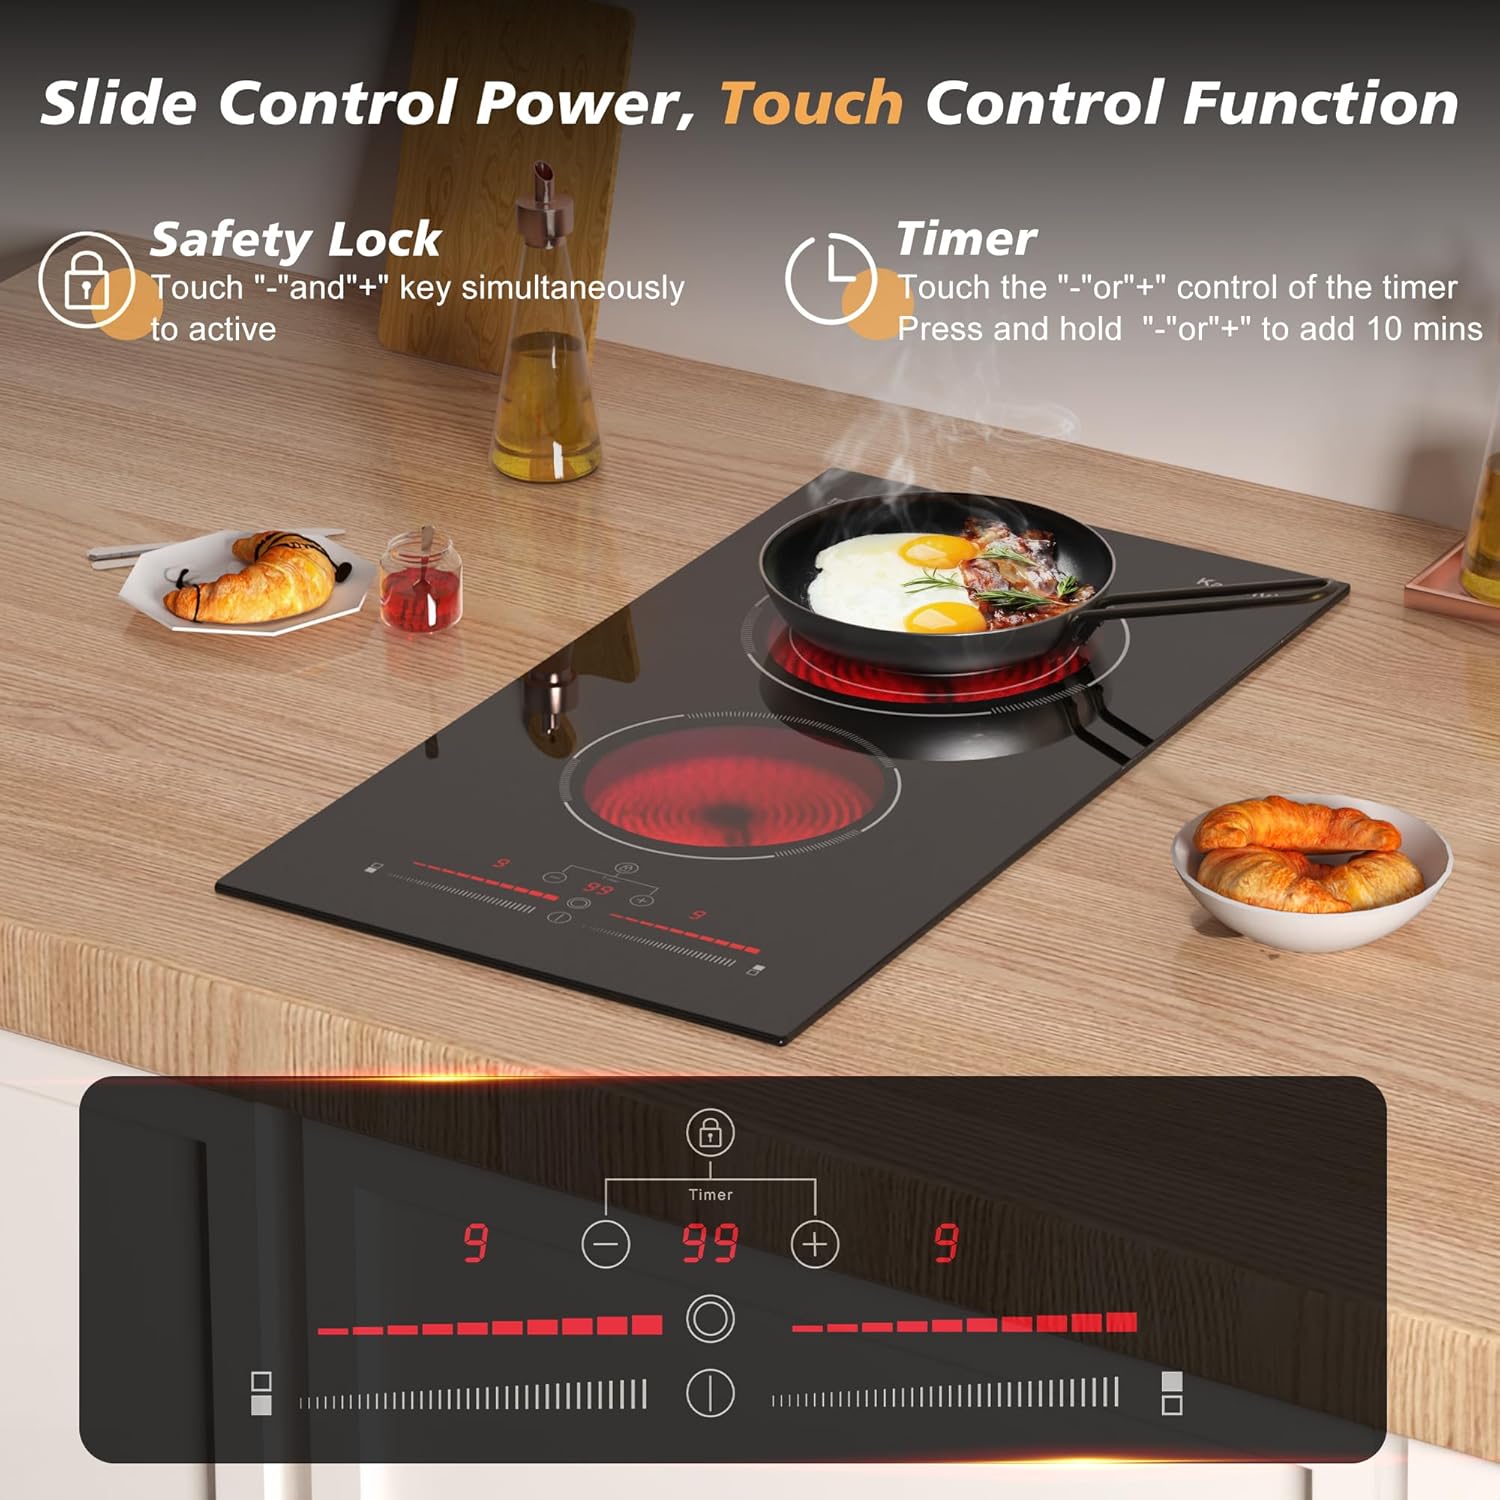
- 9 Power Levels: Precise temperature control from low simmering to high-temperature frying via a sensitive slide control.
- 99-Minute Timer: Allows for precise cooking time management, automatically turning off the burner when the set time expires.
- Safety Lock: Prevents accidental operation, especially useful in households with children.
- Extended Zone Function: Adjusts the cooking area diameter from 13.8cm to 18.5cm on the larger burner.
- Universal Cookware Compatibility: Suitable for all types of cookware, including ceramic, iron, and non-stick pans.
- Easy-to-Clean Surface: Smooth glass ceramic top without raised knobs for effortless cleaning.


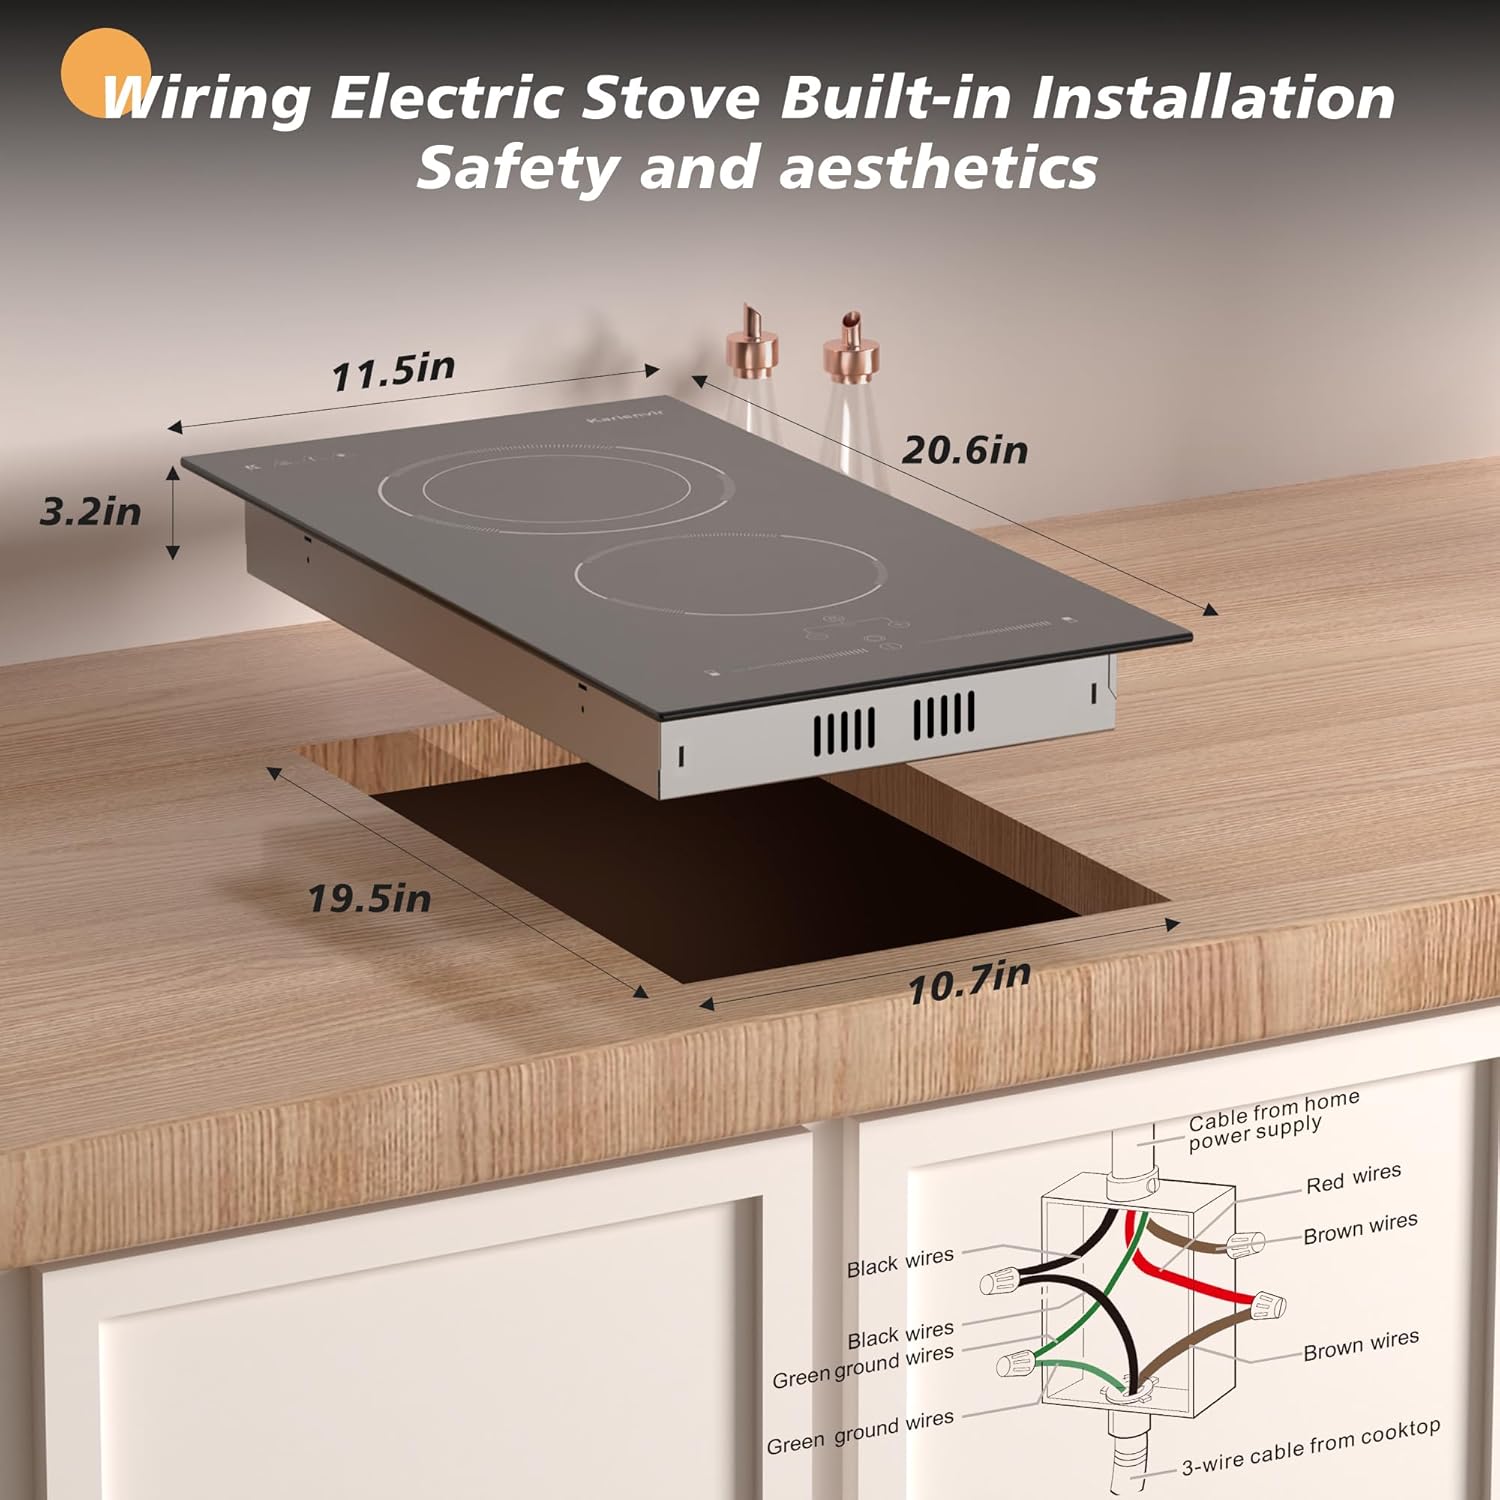
Setup and Installation
This electric cooktop is designed for built-in installation and requires hard wiring. Installation should only be performed by a qualified electrician in accordance with local electrical codes.
Pre-Installation Checklist:
- Verify that the power supply meets the cooktop's requirements (240V).
- Ensure the countertop cutout dimensions are accurate.
- Confirm adequate ventilation space around and beneath the cooktop.
- Gather necessary tools: measuring tape, saw, screwdriver, wire strippers, electrical tape, wire nuts.
Countertop Cutout Dimensions:
- Length: Approximately 19.5 inches (49.5 cm)
- Width: Approximately 10.7 inches (27.2 cm)
Wiring Instructions:
- Disconnect Power: Before beginning any electrical work, ensure the main power supply to the installation area is turned off at the circuit breaker.
- Prepare Wiring: The cooktop comes with a hard wire connection (no plug). Connect the cooktop's wires to your home's power supply wires.
- Color Code:
- Cooktop Green Ground Wire to Home Green Ground Wire.
- Cooktop Black Wire to Home Black Wire.
- Cooktop Brown Wires (typically two) to Home Red Wires.
- Secure Connections: Use appropriate wire nuts and electrical tape to secure all connections.
- Mounting: Carefully lower the cooktop into the prepared countertop cutout. Secure it using the provided mounting brackets and screws from underneath the countertop.
- Restore Power: Once installation is complete and all connections are secure, restore power at the circuit breaker.

Operating Instructions
Your Karienvir electric cooktop features intuitive touch controls for easy operation.
Powering On/Off:
- Touch the power symbol (Ⓜ) to turn the cooktop on.
- Touch and hold the power symbol to turn the cooktop off.
Adjusting Power Levels:
- Select the desired burner by touching its corresponding zone indicator.
- Use the slide control (─────────) to adjust the power level from 1 (low) to 9 (high).
Extended Zone Function (Larger Burner):
- For the larger burner, touch the "Extended Zone" button (often indicated by concentric circles) to switch between the inner (13.8cm) and outer (18.5cm) heating elements.
Using the Timer:
- Select the burner you wish to set a timer for.
- Touch the timer button (⏲).
- Use the '+' and '-' buttons to set the desired cooking time, up to 99 minutes.
- The burner will automatically turn off when the timer expires.
Safety Lock Function:
- To activate the safety lock, touch and hold the '+' and '-' buttons simultaneously. A lock indicator will appear.
- To deactivate, touch and hold the '+' and '-' buttons simultaneously again until the lock indicator disappears.
Care and Maintenance
Proper care ensures the longevity and optimal performance of your cooktop.
Cleaning the Glass Ceramic Surface:
- Allow the cooktop to cool completely before cleaning.
- For light spills and daily cleaning, wipe with a damp cloth and mild dish soap. Dry thoroughly with a clean cloth.
- For stubborn stains or burnt-on food, use a ceramic cooktop cleaner and a non-abrasive pad. Follow the cleaner's instructions.
- A specialized scraper blade (if provided) can be used for very tough, burnt-on residue. Use it at a shallow angle to avoid scratching the surface. Always refer to the scraper's instructions.
- Avoid abrasive cleaners, scouring pads, or harsh chemicals, as these can damage the glass surface.
General Care:
- Do not use the cooktop as a cutting surface or storage area.
- Avoid dropping heavy or sharp objects on the glass surface.
- Ensure cookware bottoms are clean and dry before placing them on the cooktop to prevent residue transfer.
Troubleshooting
If you encounter issues with your cooktop, refer to the following common problems and solutions:
| Problem | Possible Cause | Solution |
|---|---|---|
| Cooktop does not turn on. | No power supply; Safety lock activated; Control panel error. | Check circuit breaker. Deactivate safety lock. Disconnect power for 1 minute and reconnect. |
| Burner not heating. | Incorrect power level selected; Cookware not suitable; Internal fault. | Increase power level. Ensure cookware has a flat bottom and is appropriate for electric cooktops. Contact customer support if issue persists. |
| Controls are unresponsive. | Control panel is wet or dirty; Safety lock activated. | Clean and dry the control panel. Deactivate safety lock. |
| "H" indicator remains on after use. | Residual heat. | This is normal. The "H" indicates the surface is still hot. It will turn off when the surface cools down. |
| Cooktop makes unusual noises. | Normal expansion/contraction of materials; Fan operation. | Light clicking or humming sounds are often normal during heating and cooling. If sounds are loud or persistent, contact customer support. |
If the problem persists after attempting these solutions, please contact Karienvir customer support.
Specifications
| Feature | Detail |
|---|---|
| Brand | Karienvir |
| Model Number | KEC-US-D23262 |
| Installation Type | Drop-In |
| Heating Elements | 2 Electric Burners |
| Burner Power (Large) | 1000W (inner) / 2000W (extended) |
| Burner Power (Small) | 1200W |
| Total Wattage | 3200W |
| Voltage | 240 Volts |
| Power Levels | 9 |
| Control Type | Slide Touch Control |
| Timer | Up to 99 minutes |
| Special Features | Safety Lock, 99-minute Timer, Extended Zone |
| Heater Surface Material | Glass Ceramic |
| Product Dimensions (L x W x H) | 20.47 x 11.42 x 1.73 inches (52 x 29 x 4.4 cm) |
| Item Weight | 12.43 pounds (5.64 kg) |

Warranty and Customer Support
For warranty information, technical assistance, or customer support, please refer to the contact details provided with your purchase documentation or visit the official Karienvir website. Keep your purchase receipt as proof of purchase for any warranty claims.
Online Resources: Karienvir Official Store on Amazon
Ask a question about this manual
Ask about setup, troubleshooting, compatibility, parts, safety, or missing instructions. Manuals+ will review the question and use this page’s manual context to help answer it.