1. Product Overview
This manual provides instructions for the COREBAY Universal Ceiling Fan Remote Control Kit, designed to add remote control functionality to most 3-speed ceiling fans. The kit includes a remote transmitter (RC-82T) and a receiver module (RC-82R).

Image: The COREBAY remote control and receiver unit.
Package Contents:
- 1 x Remote Control (RC-82T)
- 1 x Receiver Module (RC-82R)
- 1 x Wall Mount Holder for Remote
- 2 x Expansion Screws
- 6 x Plastic Wire Connectors
- 1 x User Manual (this document)

Image: All components included in the COREBAY remote control kit.
2. Safety Information
- WARNING: To avoid possible electrical shock, ensure power is turned off at the circuit breaker or fuse box before installation.
- All wiring must be in accordance with national and local electrical codes.
- If you are unfamiliar with electrical wiring, consult a qualified electrician.
- Do not use with solid-state fan speed controllers.
- Ensure the ceiling fan canopy has sufficient space to accommodate the receiver module.
3. Compatibility
This remote control kit is designed for use with most 3-speed ceiling fans, including popular brands like Hunter, Hampton Bay, Westinghouse, and Honeywell. It is compatible with most downrod style fans.

Image: Compatibility details for fan types and light bulbs.
Light Bulb Compatibility:
- Incandescent & Halogen Lamps: Fully compatible with dimming functionality.
- Dimmable LED & Dimmable CFL Lamps: Compatible with dimming functionality.
- Non-Dimmable LED & Non-Dimmable CFL Lamps: Only supports ON/OFF function; dimming will not work.
Note: This receiver does not have a reverse function for fan direction. Ensure your fan's reverse function is controlled via a switch on the fan motor housing if needed.
4. Setup and Installation
Follow these steps carefully to install the receiver and pair the remote control.
4.1 Receiver Installation:
- Turn off Power: Before starting, ensure the power to the ceiling fan is completely disconnected at the circuit breaker.
- Access Wiring: Remove the canopy cover of your ceiling fan to access the wiring.
- Disconnect Existing Wiring: Carefully disconnect the existing wiring from the ceiling fan.
- Install Receiver: Connect the receiver (RC-82R) according to the wiring diagram provided below. Use the included plastic wire connectors to secure connections. Ensure all connections are tight and insulated.
- Position Receiver: Place the receiver inside the fan canopy. Ensure it fits without obstruction and that no wires are pinched.
- Secure Canopy: Reattach the fan canopy cover.

Image: Wiring diagram for receiver installation.
Wiring Connection Guide:
- Hot Wire (Black): Connect from house supply to receiver's black wire.
- Neutral Wire (White): Connect from house supply to receiver's white wire.
- Light Wire (Blue): Connect from receiver to fan's light wire.
- Motor Wire (Yellow): Connect from receiver to fan's motor wire.
4.2 Remote Control Setup:
- Install Battery: Open the battery compartment on the back of the remote control (RC-82T) and insert a CR2032 battery (not included).
- Power On: Restore power to the ceiling fan at the circuit breaker.
- Pairing (Learn Key): Within 30 seconds of restoring power, press and hold the "Learn Key" button located in the battery compartment of the remote control for approximately 3-5 seconds. The fan light should blink or the fan should briefly turn on, indicating successful pairing.
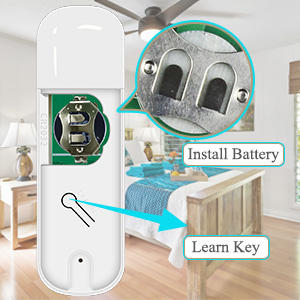
Image: Location of battery and 'Learn Key' on the remote.
The remote and receiver are now paired and ready for operation.
5. Operating Instructions
The remote control provides convenient operation of your ceiling fan and light functions.

Image: Remote control button functions.
| Button | Action | Function |
|---|---|---|
| Light Bulb Icon | Quick Press | Light On/Off |
| Light Bulb Icon | Long Press | Light Dimming (for compatible bulbs) |
| Fan Icon | Quick Press | Fan On/Off |
| Up Arrow | Quick Press | Raise Fan Speed (Low → Medium → High) |
| Down Arrow | Quick Press | Lower Fan Speed (High → Medium → Low) |
| Long Press Up Arrow | Long Press | Set Fan to High Speed |
| Long Press Down Arrow | Long Press | Set Fan to Low Speed |
| Long Press Up + Down Arrows | Long Press Simultaneously | Dimming Mode On/Off (for light) |
The remote offers a strong signal, allowing control of the fan from up to 60 feet away.
6. Maintenance
- Cleaning: Wipe the remote control and receiver with a soft, dry cloth. Do not use abrasive cleaners or solvents.
- Battery Replacement: Replace the CR2032 battery in the remote control when its range decreases or it stops responding. Ensure correct polarity when inserting the new battery.
- Environmental Conditions: Avoid exposing the remote or receiver to excessive moisture, extreme temperatures, or direct sunlight.
7. Troubleshooting
| Problem | Possible Cause | Solution |
|---|---|---|
| Fan or Light does not respond to remote. |
|
|
| Light does not dim. |
|
|
| Fan operates but light does not, or vice versa. |
|
|
| Remote range is poor. |
|
|
8. Specifications
| Feature | Detail |
|---|---|
| Model Numbers | RC-82T (Remote), RC-82R (Receiver) |
| Product Dimensions (Remote) | 4.48 x 1.38 x 0.59 inches (11.4 x 3.5 x 1.5 cm) |
| Product Dimensions (Receiver) | 4.65 x 2.08 inches (11.8 x 5.3 cm) |
| Item Weight | 6.1 ounces (total kit) |
| Max Motor Amps | 1A |
| Max Light Watts | 240W (Incandescent/CFL/LED) |
| Electrical Rating | AC 120V 60Hz |
| Remote Battery Type | CR2032 (not included) |
| Control Range | Up to 60 feet |
| Special Features | Universal compatibility, 3 fan speeds, light dimmer function |

Image: Product dimensions of the remote and receiver.
9. Warranty and Support
COREBAY is committed to providing high-quality products. If you encounter any issues or have questions regarding the installation or operation of your remote control kit, please contact COREBAY customer support. Refer to your purchase documentation for specific warranty details and contact information.
We strive to provide satisfactory service and support for our products.