1. Product Overview
The Ant Esports 205 Mini 6F is a compact mini-tower computer case designed for Micro-ATX and Mini-ITX motherboards. It features a stylish tempered glass side panel and comes with six pre-installed ARGB fans for efficient cooling and aesthetic appeal. This manual provides instructions for assembly, operation, and maintenance.

Image 1.1: Ant Esports 205 Mini 6F Mini-Tower Computer Case in White.
Key Features:
- Compact Mini-Tower design (280 x 205 x 425 mm).
- Stylish Tempered Glass Side Panel for component visibility.
- Pre-installed 6 ARGB Fans for enhanced cooling and lighting.
- Support for Micro-ATX and Mini-ITX motherboards.
- Dedicated storage for 1 HDD and up to 4 SSDs.
- Front I/O Panel with 1 x USB 3.0, 2 x USB 2.0, Audio In, Mic, and LED Control Button.
- Optimized airflow with front mesh panel design.
- Magnetic dust filter on top for easy maintenance.
2. Setup and Installation
2.1. Preparing the Case
Before installing components, ensure the case is placed on a stable, flat surface. Remove the tempered glass side panel by unscrewing the thumb screws at the rear and carefully sliding it off. Store it safely to prevent damage.

Image 2.1: Tempered glass side panel removal for component installation.
2.2. Motherboard Installation
Install the appropriate standoffs for your Micro-ATX or Mini-ITX motherboard. Carefully place the motherboard into the case, aligning it with the standoffs and the rear I/O shield opening. Secure the motherboard with screws.
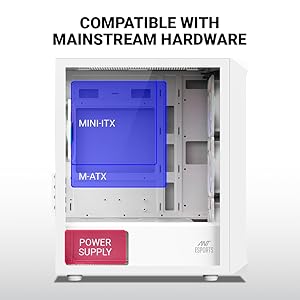
Image 2.2: Illustration of Micro-ATX and Mini-ITX motherboard compatibility within the case.
2.3. Power Supply Unit (PSU) Installation
The case supports a bottom-mount power supply. Slide the PSU into its designated compartment at the bottom rear of the case and secure it with screws from the exterior rear panel.
2.4. Storage Drive Installation
The case provides support for one 3.5-inch HDD and up to four 2.5-inch SSDs. Mount your drives in the designated bays using the provided screws.

Image 2.3: Locations for HDD and SSD installation.
2.5. Graphics Card and Expansion Cards
Install your graphics card and other expansion cards into the motherboard's PCIe slots. The case offers 4 expansion slots and supports VGA cards up to 285mm in length.
2.6. Cooling System Installation
The case comes with 6 pre-installed ARGB fans. Additional fan support includes:
- Front: 3 x 120mm or 2 x 140mm
- Top: 2 x 120mm
- Rear: 1 x 120mm
- Front AIO: 120mm, 240mm, or 280mm
- Top AIO: 120mm or 240mm
- Rear AIO: 120mm

Image 2.4: Diagram illustrating fan placement and sizes.
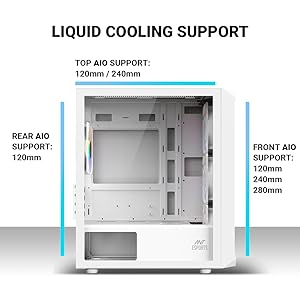
Image 2.5: Diagram illustrating liquid cooling radiator support.
2.7. Cable Management
Utilize the cable routing cutouts and tie-down points behind the motherboard tray to manage cables. Proper cable management improves airflow and aesthetics.
3. Operating Instructions
3.1. Front I/O Panel Functions
The front I/O panel provides convenient access to essential ports and controls:
- Power Button: Press to power on or off the system.
- LED Control Button: Cycles through various ARGB lighting modes for the pre-installed fans.
- USB 3.0 Port (x1): For high-speed data transfer.
- USB 2.0 Ports (x2): For connecting peripherals.
- Audio In (Microphone) Jack: For microphone input.
- Audio Out (Headphone) Jack: For headphone or speaker output.

Image 3.1: Detailed view of the front I/O panel and its functions.
4. Maintenance
4.1. Dust Filter Cleaning
The Ant Esports 205 Mini 6F includes a magnetic dust filter on the top panel. Regularly clean this filter to maintain optimal airflow and prevent dust buildup inside the case. Simply lift the magnetic filter, clean it with a soft brush or cloth, and reattach.

Image 4.1: Location and removal of the magnetic dust filter for cleaning.
4.2. General Cleaning
Use a soft, damp cloth to wipe down the exterior surfaces of the case. For the tempered glass panel, use a glass cleaner and a microfiber cloth to avoid streaks. Avoid using abrasive cleaners or solvents.
5. Troubleshooting
5.1. No Power After Assembly
- Ensure the power supply is properly connected to the wall outlet and switched on.
- Verify all power cables (24-pin ATX, 8-pin CPU, PCIe for GPU) are securely connected to the motherboard and components.
- Check that the front panel power switch cable is correctly connected to the motherboard's front panel header. Refer to your motherboard manual for correct pin assignments.
5.2. Poor Airflow or Overheating
- Ensure all pre-installed fans are spinning correctly.
- Clean the dust filters regularly, especially the top magnetic filter.
- Verify that fans are oriented correctly for optimal airflow (intake at front, exhaust at rear/top).
- Improve cable management to reduce obstructions to airflow.
5.3. ARGB Fans Not Lighting Up or Syncing
- Check that the ARGB fan cables are properly connected to the fan controller or motherboard's ARGB header.
- Ensure the fan controller (if present) is receiving power.
- Use the LED Control Button on the front I/O panel to cycle through modes.
- If connected to the motherboard, ensure the motherboard's RGB software is installed and configured correctly.
6. Specifications
| Feature | Detail |
|---|---|
| Brand | Ant Esports |
| Model Name | 205 Mini 6F |
| Case Type | Mini Tower |
| Dimensions (D x W x H) | 280 x 205 x 425 mm |
| Motherboard Compatibility | Micro ATX, Mini ITX |
| Expansion Slots | 4 |
| Drive Bays | 1 x 3.5" HDD, 4 x 2.5" SSD |
| I/O Panel | 1 x USB 3.0, 2 x USB 2.0, Audio In, Mic, LED Control Button, Power Button |
| Pre-installed Fans | 6 ARGB Fans (3 Front, 2 Top, 1 Rear) |
| Fan Support (Additional) | Front: 3x120mm / 2x140mm; Top: 2x120mm; Rear: 1x120mm |
| Liquid Cooling Support | Front: 120/240/280mm; Top: 120/240mm; Rear: 120mm |
| VGA Card Length (Max) | 285 mm |
| CPU Cooler Height (Max) | 160 mm |
| Power Supply Mounting | Bottom Mount |
| Materials | ABS + SPCC + Tempered Glass |
| Item Weight | 3.47 Kilograms |
| Country of Origin | China |

Image 6.1: Detailed dimensions of the Ant Esports 205 Mini 6F case.

Image 6.2: Manufacturer's detailed specifications table.
7. Warranty and Support
This Ant Esports product comes with a 1-Year Warranty from the date of purchase. For warranty claims or technical support, please contact Ant Esports customer service.
Manufacturer Contact Information: Ant Esports
Importer Contact Information: Acro Engineering Company
Please retain your proof of purchase for warranty validation.


