Introduction
Thank you for choosing the WLIVE ACTG010 LED Nightstand with Charger Station. This versatile bedside table is designed to enhance your bedroom with convenient features including a colorful LED light strip, integrated charging ports, and ample storage. This manual provides detailed instructions for assembly, operation, maintenance, and troubleshooting to ensure you get the most out of your new nightstand.

Image: The WLIVE LED Nightstand with Charger Station, featuring a rustic brown finish, LED lighting, and a built-in charging panel.
Safety Information
- Read all instructions carefully before assembly and use.
- Keep small parts away from children to prevent choking hazards.
- Ensure all screws are securely tightened before using the nightstand.
- Do not overload the shelves or drawer; refer to specifications for weight limits.
- Keep liquids away from electrical components (charging station, LED lights).
- Do not attempt to modify the electrical components.
- Place the nightstand on a flat, stable surface to prevent tipping.
- Use a soft, dry cloth for cleaning. Avoid harsh chemicals.
Parts List
Please verify that all parts are present before beginning assembly. If any parts are missing or damaged, please contact customer support.
| Part | Description | Quantity |
|---|---|---|
| A | Long Screws | 8 |
| B | Short Screws | 8 |
| C | Wood Screws | 8 |
| D | Small Screws | 4 |
| E | Drawer Handle | 1 |
| F | Power Outlet Unit | 1 |
| G | Power Outlet Screws | 2 |
| H | Adjustable Feet | 4 |
| I | Allen Wrench | 1 |
| J | Metal Brackets | 4 |
| K | LED Light Strip Kit | 1 |
| L | Cable Ties | 1 |
| 1 | Top Panel | 1 |
| 2 | Left Side Frame | 1 |
| 3 | Right Side Frame | 1 |
| 4 | Middle Shelf | 1 |
| 5 | Back Panel for Power Unit | 1 |
| 6 | Bottom Shelf | 1 |
| 7 | Crossbars | 2 |
| 8 | Fabric Drawer (Front) | 1 |
| 9 | Fabric Drawer (Bottom) | 1 |
| 10 | Fabric Drawer (Sides) | 1 |
| 11 | Support Bars | 2 |

Image: Detailed diagram of all components included with the WLIVE ACTG010 Nightstand.
Assembly Instructions
Follow these steps to assemble your WLIVE LED Nightstand. It is recommended to place a blanket or soft material under the parts during assembly to prevent scratches.
Step 1: Assemble Side Frames
Connect the Left Side Frame (2) and Right Side Frame (3) using screws (B) and metal brackets (J). Do not fully tighten screws until all are in place.
Video: Assembly steps 1-3 demonstrating how to connect the side frames of the nightstand.
Step 2: Attach LED Light Strip
Peel the adhesive backing from the LED Light Strip (K) and attach it to the designated area on the underside of the top panel or middle shelf. Ensure the strip is securely placed.

Image: A person attaching the LED light strip to the underside of a shelf, showing the adhesive backing.
Step 3: Install Back Panel and Shelves
Secure the Back Panel for Power Unit (5) using wood screws (C). Then, place the Middle Shelf (4) and Bottom Shelf (6) into position and secure them with wood screws (C). Ensure the color of the shelves matches the countertop.
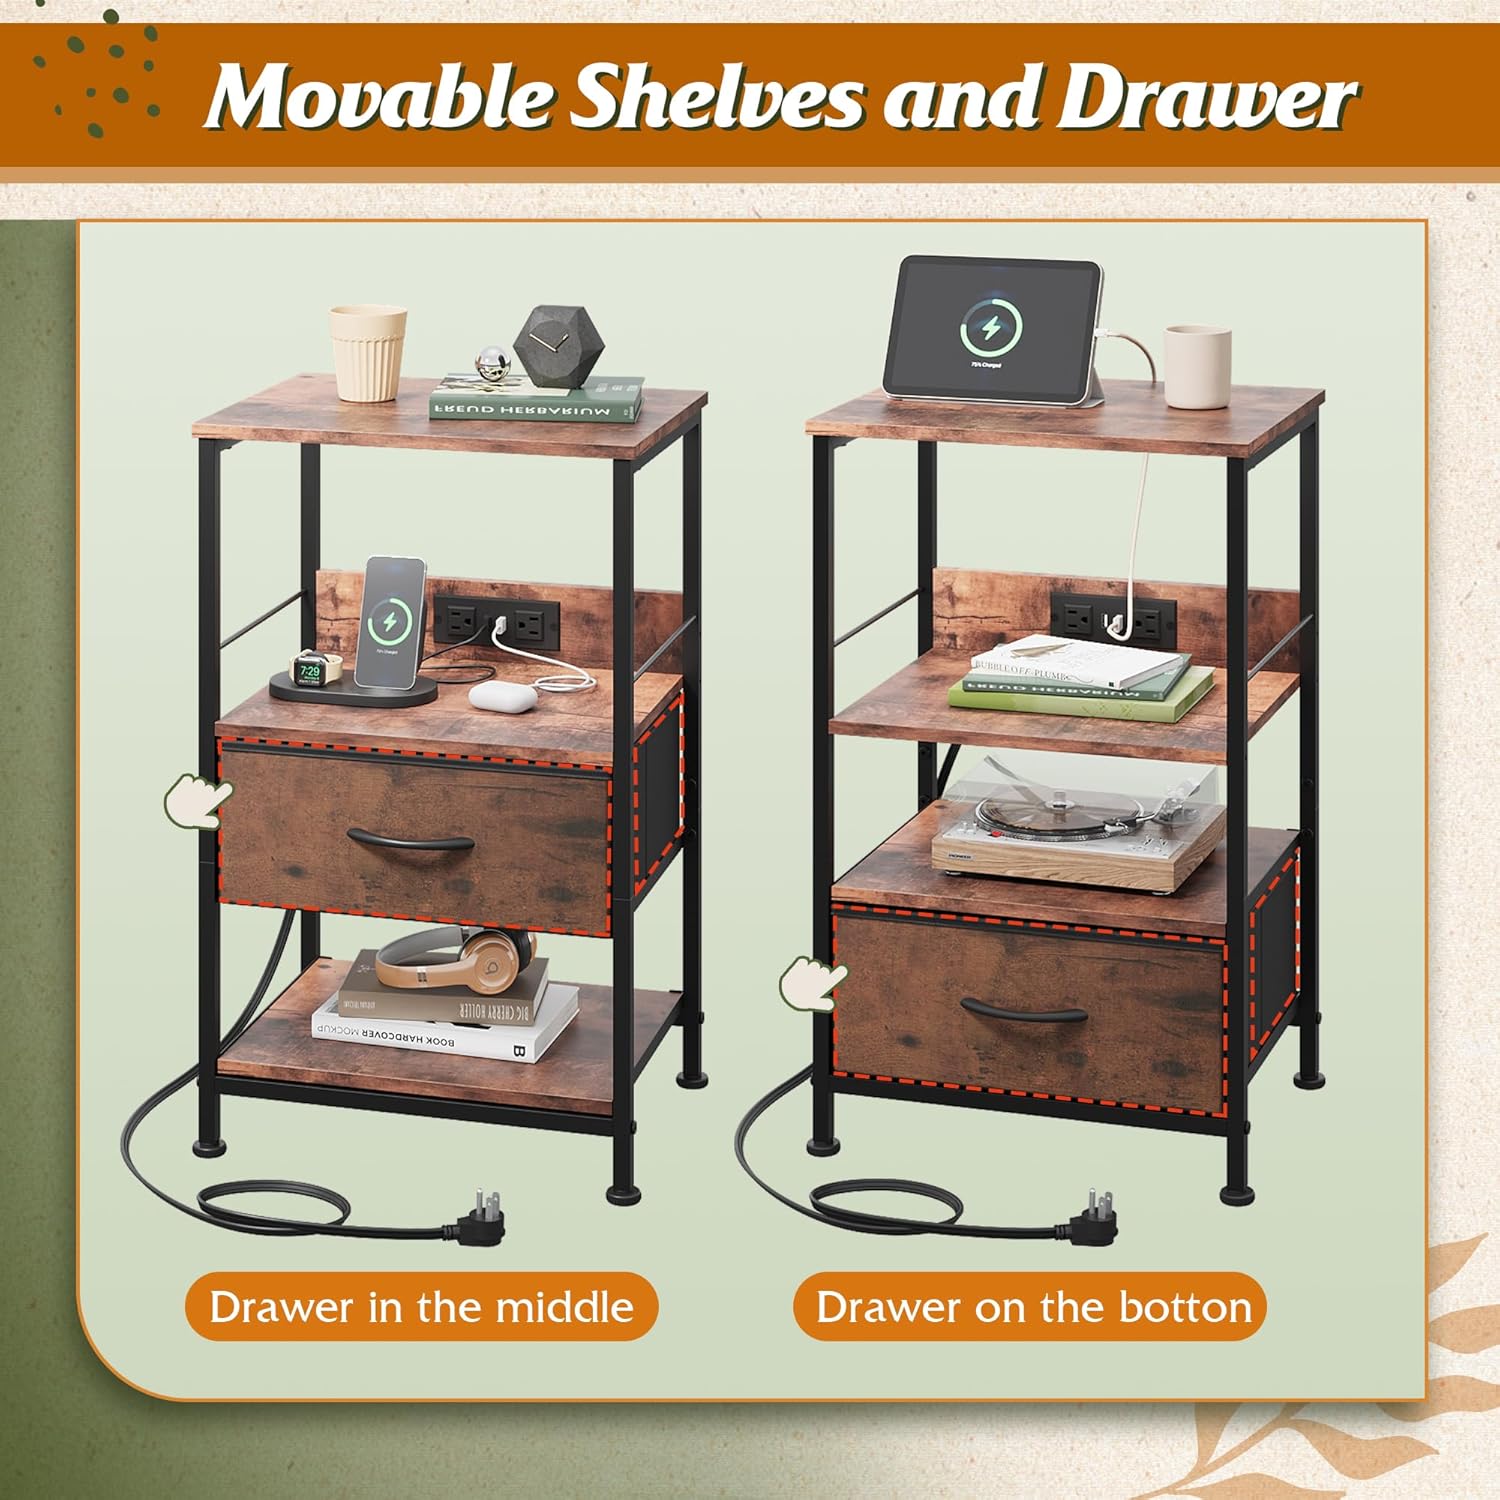
Image: Diagram illustrating the movable shelves and drawer, highlighting their adjustable positions within the nightstand frame.
Step 4: Attach Support Bars and Adjustable Feet
Attach the Support Bars (11) to the top of the side frames using long screws (A). Screw in the Adjustable Feet (H) to the bottom of the nightstand legs. These feet help stabilize the unit on uneven floors and protect surfaces.

Image: A close-up view of the adjustable foot on the nightstand, designed for floor protection and stability.
Step 5: Install Power Outlet Unit
Insert the Power Outlet Unit (F) into the designated slot on the back panel. Secure it with the power outlet screws (G). Ensure the unit is flush and stable.

Image: The nightstand's integrated charging station with 3 USB ports and 2 AC outlets.
Step 6: Assemble and Insert Fabric Drawer
Assemble the Fabric Drawer (8, 9, 10) by inserting the bottom panel (9) and folding the sides (10) into shape. Attach the Drawer Handle (E) to the front panel (8) using small screws (D). Once assembled, slide the fabric drawer into its designated slot.

Image: A close-up of the fabric drawer, highlighting its texture and handle.
Step 7: Final Tightening and Cable Management
Once all components are in place, fully tighten all screws using the Allen Wrench (I). Use the provided Cable Ties (L) to neatly organize any excess wiring from the LED lights and charging station.
Video: A demonstration of the final assembly steps, including cable management and drawer insertion.
Operating Instructions
LED Nightstand Functionality
The nightstand features a colorful LED light strip. To control the LED lights, download the "iStrip+" app from your phone's App Store or Google Play. Once installed, you can adjust colors, brightness, and turn the lights on/off directly from your phone. Key control is also available.

Image: The nightstand displaying different LED light colors, with a smartphone screen showing the "iStrip+" app interface for control.
Charger Station Usage
The built-in charger station includes 3 USB ports (5V/2.1A) and 2 AC outlets (125V/12A). Simply plug your devices into the appropriate ports for convenient charging. The integrated design helps keep your tabletop clear and organized.

Image: The nightstand's charging station in use, with a smartphone and other devices connected to the USB and AC outlets.
Maintenance
- Cleaning: Wipe the nightstand surfaces with a dry cloth. For stubborn marks, use a slightly damp cloth and immediately dry the area.
- Water Resistance: The tabletop is designed to be water-resistant, allowing you to place drinks without immediate worry. However, promptly wipe up any spills to maintain the finish.
- Stability: Periodically check and tighten all screws to ensure the nightstand remains stable. Adjust the leveling feet as needed to prevent wobbling.
- Fabric Drawer Care: The fabric drawer can be spot cleaned with a mild detergent and damp cloth. Allow to air dry completely.

Image: A close-up shot showing water droplets on the nightstand's surface, indicating its water-resistant properties.
Troubleshooting
- Wobbling Nightstand: Adjust the leveling feet at the bottom of each leg until the nightstand is stable on your floor.
- LED Lights Not Working:
- Ensure the LED strip is properly connected to its power source.
- Check if the "iStrip+" app is correctly installed and connected via Bluetooth to the LED controller.
- Verify that the power outlet is functioning.
- Charging Station Not Working:
- Ensure the nightstand's main power cord is securely plugged into a working wall outlet.
- Check if the device you are trying to charge is properly connected to the USB port or AC outlet.
- Drawer Sticking: Ensure the fabric drawer is correctly assembled and inserted. Check for any obstructions in the drawer slot.
Specifications
| Feature | Detail |
|---|---|
| Product Dimensions | 11.73"D x 15.67"W x 25.19"H |
| Item Weight | 11.79 Pounds |
| Maximum Weight Recommendation | 55 Pounds |
| Frame Material | Alloy Steel |
| Top Material Type | Engineered Wood |
| Material Type | MDF board, Non-woven fabric, Steel frame |
| Number of Drawers | 1 |
| Charging Station | 3 USB ports (5V/2.1A), 2 AC outlets (125V/12A) |
| LED Lights | App and key control, adjustable brightness, multiple colors |
| Color | Rustic Brown Wood Grain Print |
| Required Assembly | Yes |
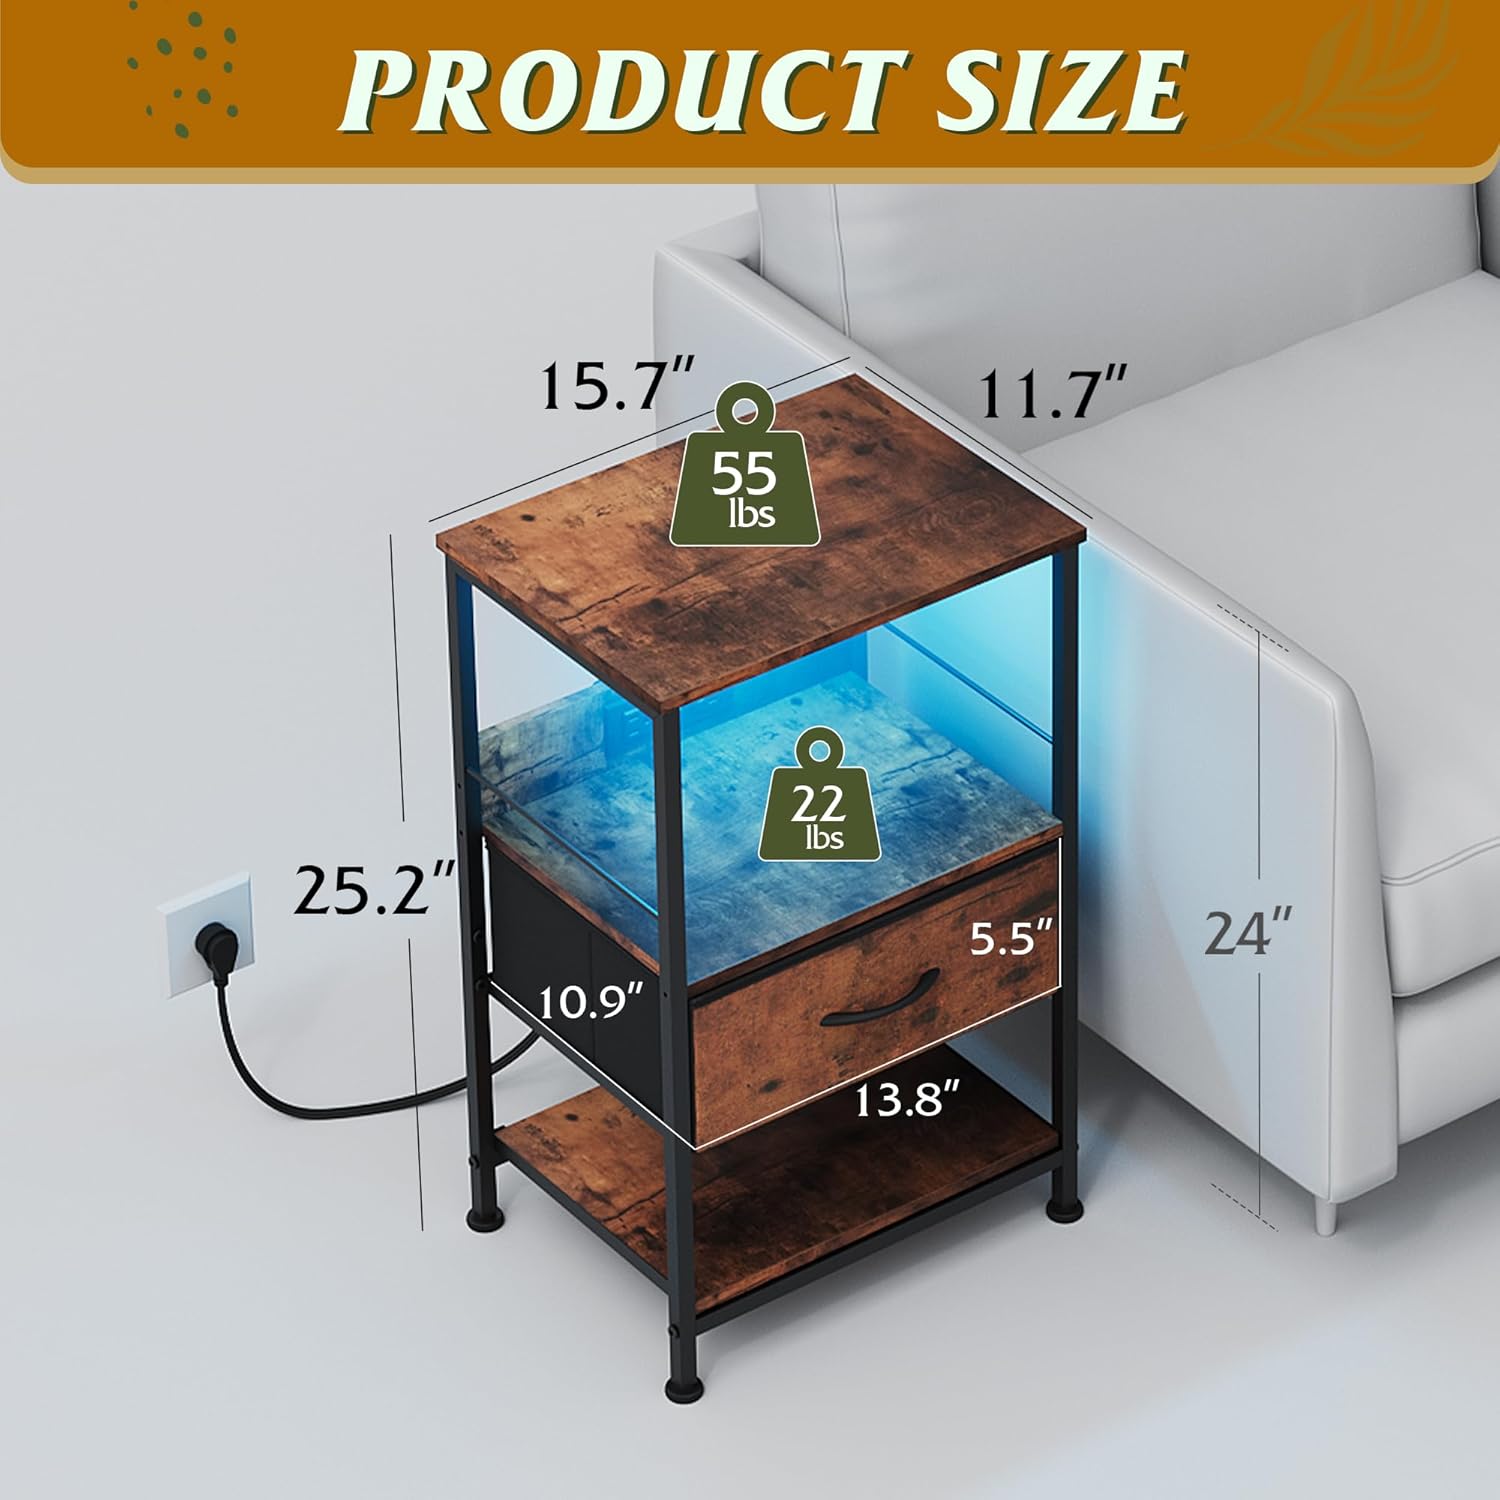
Image: Product dimensions and weight capacity of the WLIVE nightstand.
Warranty and Support
WLIVE products are designed for durability and customer satisfaction. For specific warranty details, please refer to the product packaging or contact WLIVE customer service directly. Optional protection plans are available for purchase, including 2-Year and 3-Year plans, as well as a Complete Protect plan.
If you encounter any issues or have questions about your product, please do not hesitate to reach out to WLIVE customer support for assistance.