Introduction
Thank you for choosing the Valley Sportsman #12 Commercial Electric Meat Grinder. This heavy-duty appliance is designed for efficient meat processing, capable of grinding up to 450 lbs of meat per hour. Constructed from durable stainless steel, it features a powerful 0.75 HP motor with overload protection, an enhanced auger design, and includes various accessories for grinding and sausage stuffing. Please read this manual thoroughly before initial use to ensure safe operation and optimal performance.
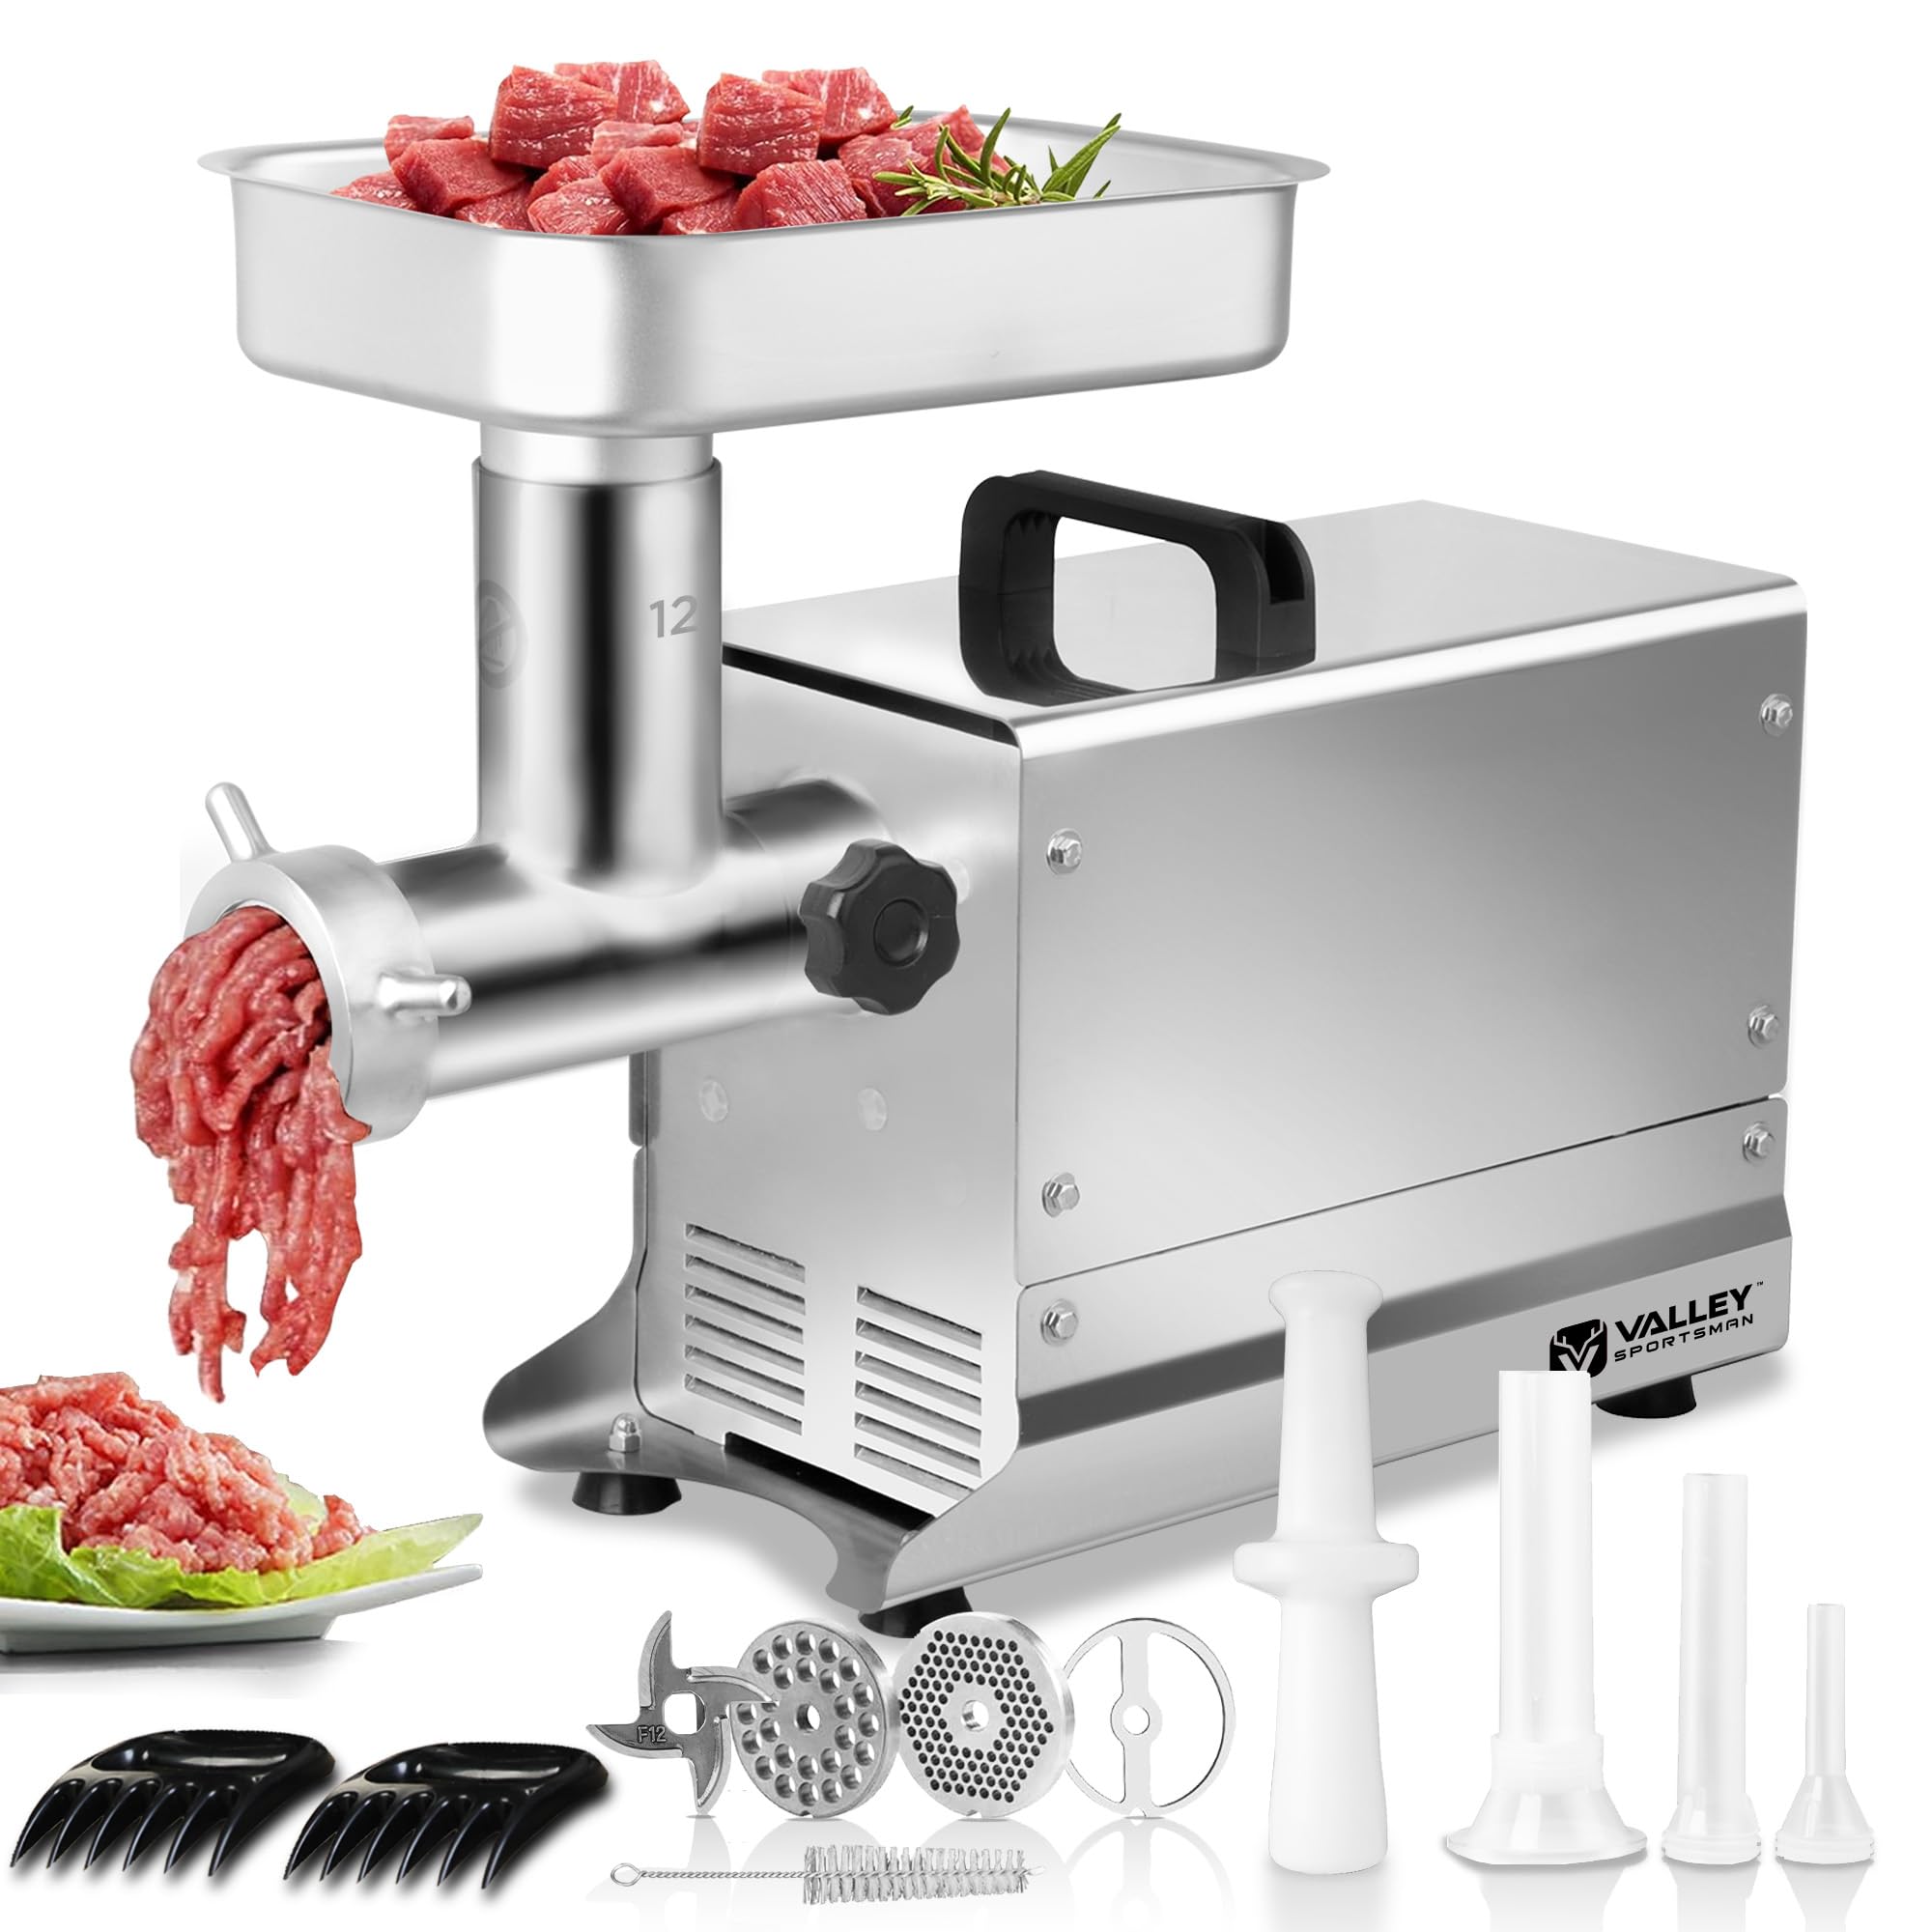
Image: The fully assembled Valley Sportsman #12 Commercial Electric Meat Grinder, showcasing its stainless steel construction.
Important Safety Instructions
Always follow basic safety precautions when using electrical appliances to reduce the risk of fire, electric shock, and injury.
- Read all instructions before operating the meat grinder.
- Ensure the power supply matches the voltage specified on the appliance.
- Always unplug the grinder from the outlet when not in use, before assembling or disassembling parts, and before cleaning.
- Keep hands and utensils away from moving parts during operation to prevent injury. Always use the provided meat stomper to feed meat.
- Do not operate the grinder with a damaged cord or plug, or after the appliance malfunctions or has been damaged in any manner.
- Avoid using attachments not recommended or sold by the manufacturer, as this may cause fire, electric shock, or injury.
- Do not use outdoors. This appliance is for indoor use only.
- Do not let the cord hang over the edge of a table or counter, or touch hot surfaces.
- Do not immerse the motor unit in water or other liquids.
- Close supervision is necessary when any appliance is used by or near children.
- The motor is equipped with overload protection. If the motor overheats, the grinder will automatically shut off. Allow it to cool down before restarting.
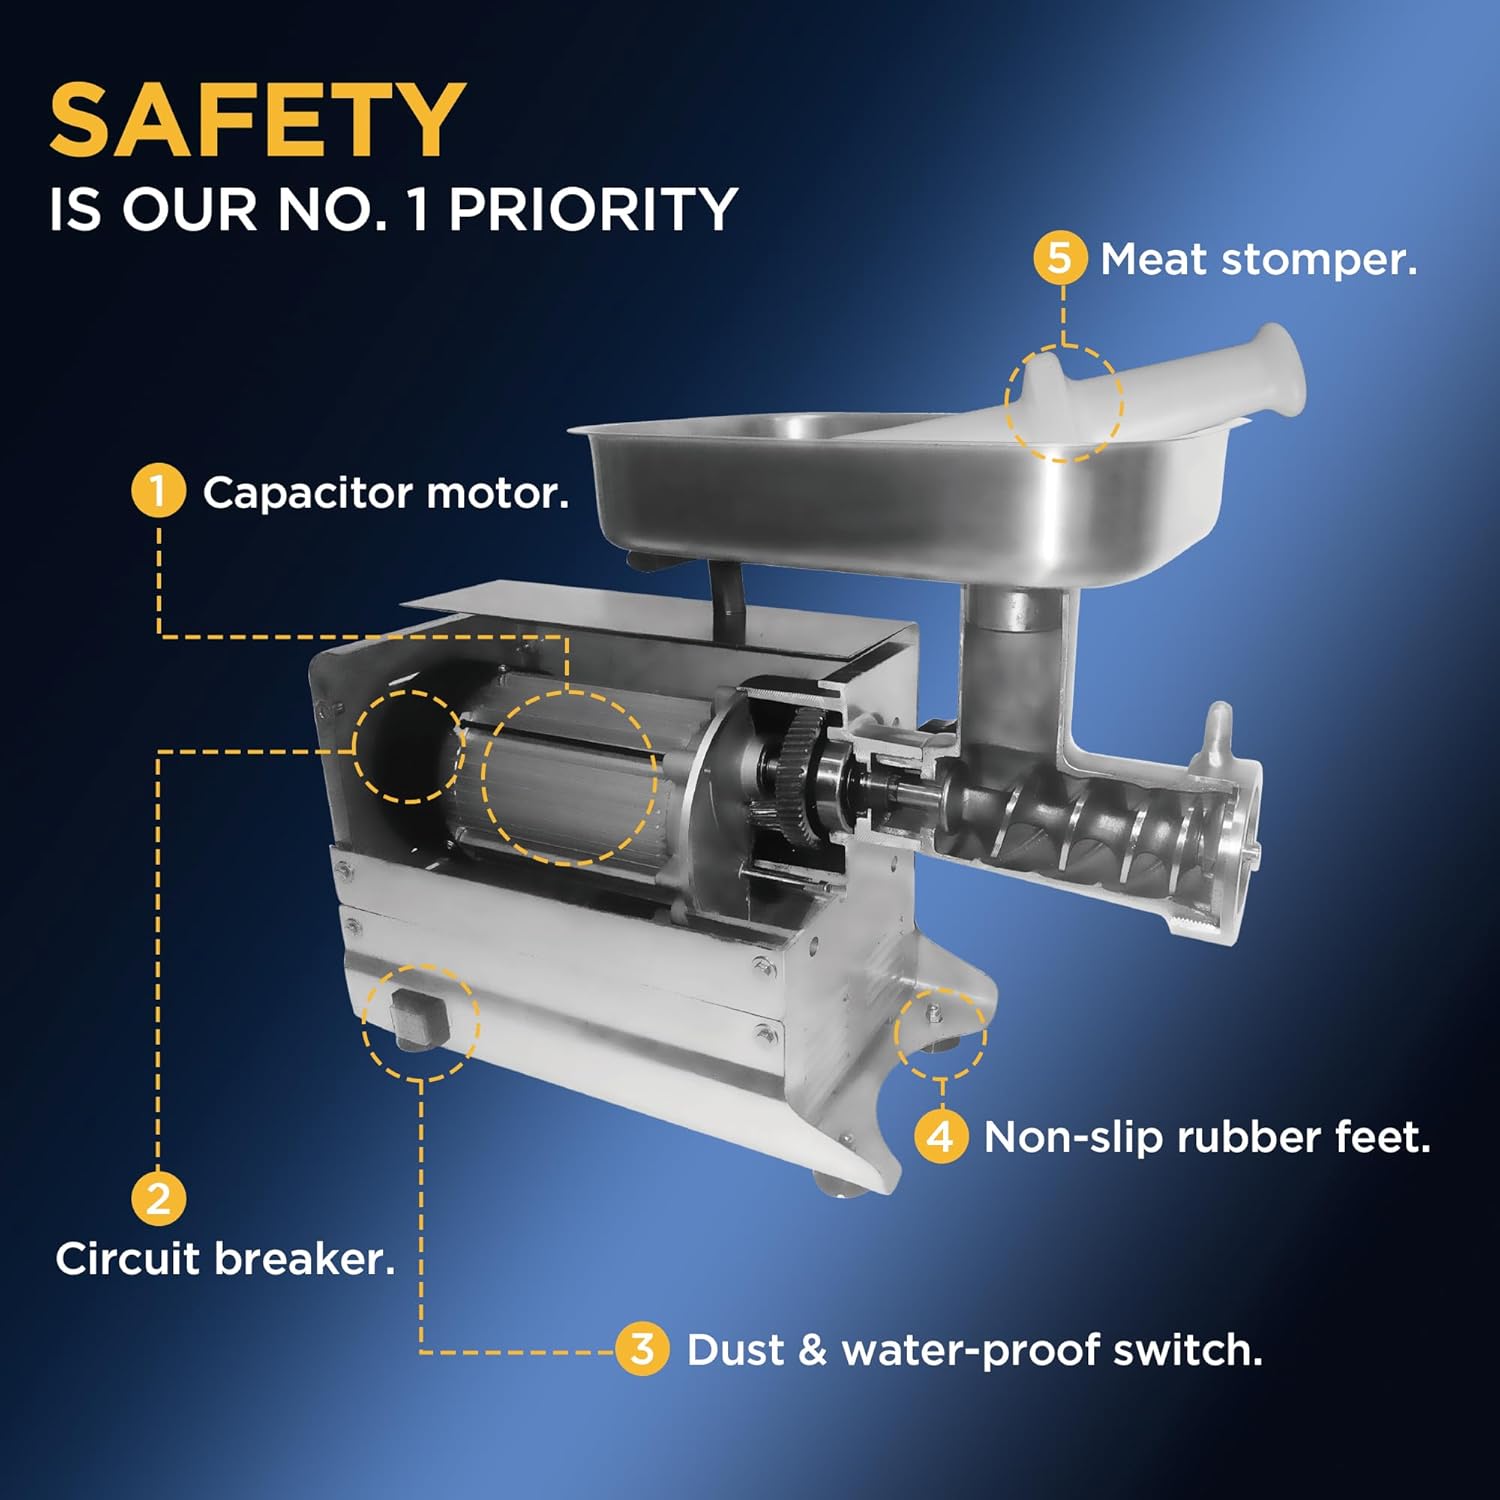
Image: A diagram highlighting key safety features including the capacitor motor, circuit breaker, dust & water-proof switch, non-slip rubber feet, and meat stomper.
Package Contents
Carefully unpack all components and ensure you have received the following items:
- 1 Stainless steel meat pan
- 1 Stainless steel knife
- 1 Meat stomper
- 1 Stainless steel stuffing plate
- 1 Stainless steel fine plate - 3/16" (4.5mm)
- 1 Stainless steel coarse plate - 3/8" (10mm)
- 3 Stuffing tubes (15mm, 25mm, 35mm OD)

Image: All individual components of the meat grinder, including the motor unit, grinding head, plates, knife, auger, meat pan, and stomper.
Assembly Instructions
Before assembly, ensure the unit is unplugged and all parts are clean.
- Attach Grinder Head: Loosen the black grinder head locking knob. Insert the grinder head into the motor housing, aligning the notch, and then tighten the knob to secure it firmly.
- Insert Auger: Slide the auger (worm gear) into the grinder head, ensuring the auger spline aligns with the drive shaft in the motor housing. Turn it slightly until it seats properly.
- Place Cutting Knife: Position the cutting knife onto the auger pin with the flat cutting edge facing outwards, against where the grinding plate will sit.
- Place Grinder Plate: Select your desired grinding plate (fine 4.5mm or coarse 10mm) and align it onto the auger pin, ensuring it fits properly over the knife and against the grinder head.
- Attach Front Ring Nut: Screw the front ring nut clockwise onto the grinder head until it is snug against the grinding plate. Do not overtighten.
- Secure Meat Tray: Insert the stainless steel meat pan into the feed chute opening on top of the grinder head and press down until it is secure.
Operating Instructions
Follow these steps for safe and effective meat grinding:
- Prepare Meat: Cut meat into pieces that fit easily into the feed chute (approximately 1-inch cubes). Remove any bones, large pieces of gristle, or tough tendons. For best results, chill the meat and grinder parts (grinder head, auger, knife, plates) in the freezer for 30 minutes before grinding.
- Position Container: Place a suitable container under the grinder head to collect the ground meat.
- Power On: Plug the grinder into a grounded electrical outlet. Turn the power switch to the "ON" position.
- Feed Meat: Place prepared meat into the meat pan. Use the provided meat stomper to gently push the meat down the feed chute. NEVER use your fingers or any other utensil to push meat into the grinder.
- Grinding Process: The grinder will process the meat through the selected plate. Continue feeding meat until all is ground.
- Sausage Stuffing (Optional): To stuff sausages, replace the grinding plate and knife with the stuffing plate and one of the stuffing tubes. Prepare your sausage casing and feed the seasoned ground meat through the grinder, guiding it into the casing.
- Power Off: Once grinding is complete, turn the power switch to the "OFF" position and unplug the unit from the wall outlet.

Image: Illustration of the grinder's versatility, showing fine (4.5mm) and coarse (7mm) grinding plates, and the sausage stuffing attachment, along with examples of ground meat and sausages.
Cleaning and Maintenance
Proper cleaning and maintenance ensure the longevity and hygienic operation of your meat grinder.
- Immediate Cleaning: Clean all parts immediately after each use. Do not allow meat residue to dry on the components.
- Disassembly: Unplug the unit. Disassemble the grinder head, auger, knife, and grinding plate by reversing the assembly steps.
- Washing: Wash all removable parts (grinder head, auger, knife, plates, meat pan, stomper, stuffing tubes) with warm, soapy water. Use a brush to remove any stubborn meat particles.
- Rinsing: Rinse all parts thoroughly with clean water.
- Drying: Dry all parts completely with a soft cloth to prevent rust, especially for the cutting knife and plates. Air dry if necessary.
- Motor Unit: Wipe the motor housing with a damp cloth. NEVER immerse the motor unit in water or any other liquid.
- Lubrication: Apply a thin layer of food-grade mineral oil or silicone spray to the cutting knife and grinding plates after drying to prevent rust and ensure smooth operation.
- Storage: Store the cleaned and dried parts in a dry place.
Troubleshooting
Refer to the table below for common issues and their solutions.
| Problem | Possible Cause | Solution |
|---|---|---|
| Grinder does not start. | Not plugged in; Power switch off; Overload protection activated. | Ensure unit is plugged in; Turn power switch ON; Unplug, wait 30 minutes for motor to cool, then restart. |
| Meat is not grinding properly or clogs. | Meat is too warm; Meat pieces are too large; Grinding plate or knife is dull/incorrectly assembled; Too much gristle/bone. | Chill meat and grinder parts; Cut meat into smaller pieces; Check assembly of knife and plate; Disassemble and clean out obstructions; Sharpen or replace knife/plate if dull. |
| Excessive noise during operation. | Loose parts; Foreign object in grinder head; Motor issue. | Check all parts are securely assembled; Disassemble and check for foreign objects; If problem persists, contact customer support. |
| Rust spots on stainless steel parts. | Parts not dried completely after washing; Improper storage. | Ensure all parts are thoroughly dried after cleaning; Apply food-grade mineral oil for protection; Store in a dry environment. |
Specifications
| Feature | Detail |
|---|---|
| Model | #12 |
| Wattage/HP | 500W / 0.75 HP |
| Capacity | Up to 450 lbs/hr |
| Voltage | 120 Volts |
| Material | Stainless Steel |
| Product Dimensions (L x W x H) | 21.3" x 8.66" x 16.2" |
| Included Grinding Plates | 4.5mm (fine), 10mm (coarse) |
| Included Stuffing Tubes | 15mm, 25mm, 35mm OD |

Image: A visual representation of the meat grinder with its key dimensions: 21.3 inches length, 8.66 inches width, and 16.2 inches height.
Warranty and Customer Support
Valley Sportsman stands behind the quality of its products.
- 6-Year Limited Warranty: This product is backed by a 6-year limited warranty from Valley Sportsman.
- Seller-Provided Warranty: Additionally, a one-year seller-provided warranty is offered.
- Customer Support: For any product-related questions, concerns, or warranty claims, please contact our customer support team via Amazon Messages. We are committed to providing lifetime access to customer support and are always happy to assist you.