Introduction
This manual provides essential instructions for the safe and effective operation, setup, and maintenance of your Preciva 935D Pyrography and Soldering Station. Please read this manual thoroughly before first use and retain it for future reference.
Safety Instructions
WARNING: Always follow basic safety precautions when using this product to reduce the risk of fire, electric shock, or injury to persons.
- Ensure the work area is well-ventilated to avoid inhaling fumes from burning materials.
- Always wear appropriate personal protective equipment, including safety glasses and heat-resistant gloves.
- Do not touch the hot tips or heating elements. They can reach temperatures up to 750°C and cause severe burns.
- Place the pyrography pens in their designated holders when not in use to prevent accidental contact or damage.
- Keep the device out of reach of children and pets.
- Unplug the station from the power outlet when not in use or before cleaning and maintenance.
- Do not operate the station if the power cord or plug is damaged.
- Use only original Preciva accessories and replacement parts.
- This device is designed for pyrography and soldering on appropriate materials (wood, leather, etc.). Do not use it for unintended purposes.
Package Contents
Verify that all items are present and in good condition upon opening the package:
- Preciva 935D Pyrography Station (Main Unit)
- Pyrography Pen (Quantity: 2)
- Wire Pyrography Tips (Quantity: 20 different shapes)
- Tip Storage Box
- Screwdriver for Tip Replacement
- Pen Holders (Integrated with the station)
- Power Cord

Figure 1: The 935D station with its dual pens and 20 assorted wire tips. These tips are designed for various pyrography and soldering applications on materials like wood and leather. A dedicated storage box is included for organization.
Product Overview
Familiarize yourself with the components and controls of the Preciva 935D Pyrography Station.

Figure 2: Key components of the Preciva 935D Pyrography Station. The digital display shows the current temperature, which can be adjusted using the central knob. Two pyrography pen joints allow for simultaneous connection of two pens, each with its own penholder. The main power switch controls the unit.
- Digital Temperature Display: Shows the current operating temperature in Celsius.
- Temperature Adjustment Knob: Used to set the desired temperature from 250°C to 750°C.
- Power Switch: Turns the station ON/OFF.
- Pyrography Pen Joints (Tool A / Tool B): Connectors for the two pyrography pens.
- Penholders: Integrated stands to safely rest the hot pens when not in use.
- Burning Pens: Ergonomically designed pens with thermal protection for comfortable and safe use.
Setup
Follow these steps to set up your pyrography station for first use:
- Prepare Work Area: Ensure your workspace is clean, well-ventilated, and free from flammable materials. Place the station on a stable, heat-resistant surface.
- Insert Tip: Select the desired wire tip. Using the provided screwdriver, loosen the screws on the pyrography pen. Insert the tip fully into the pen's terminals and tighten the screws securely to ensure good electrical contact.
- Connect Pen: Connect the pyrography pen cable to one of the "TOOL A" or "TOOL B" joints on the main unit. Ensure the connection is firm.
- Power Connection: Plug the power cord into the station's power inlet and then into a suitable electrical outlet.
- Initial Power On: Turn the main power switch to the "ON" position. The digital display will illuminate.
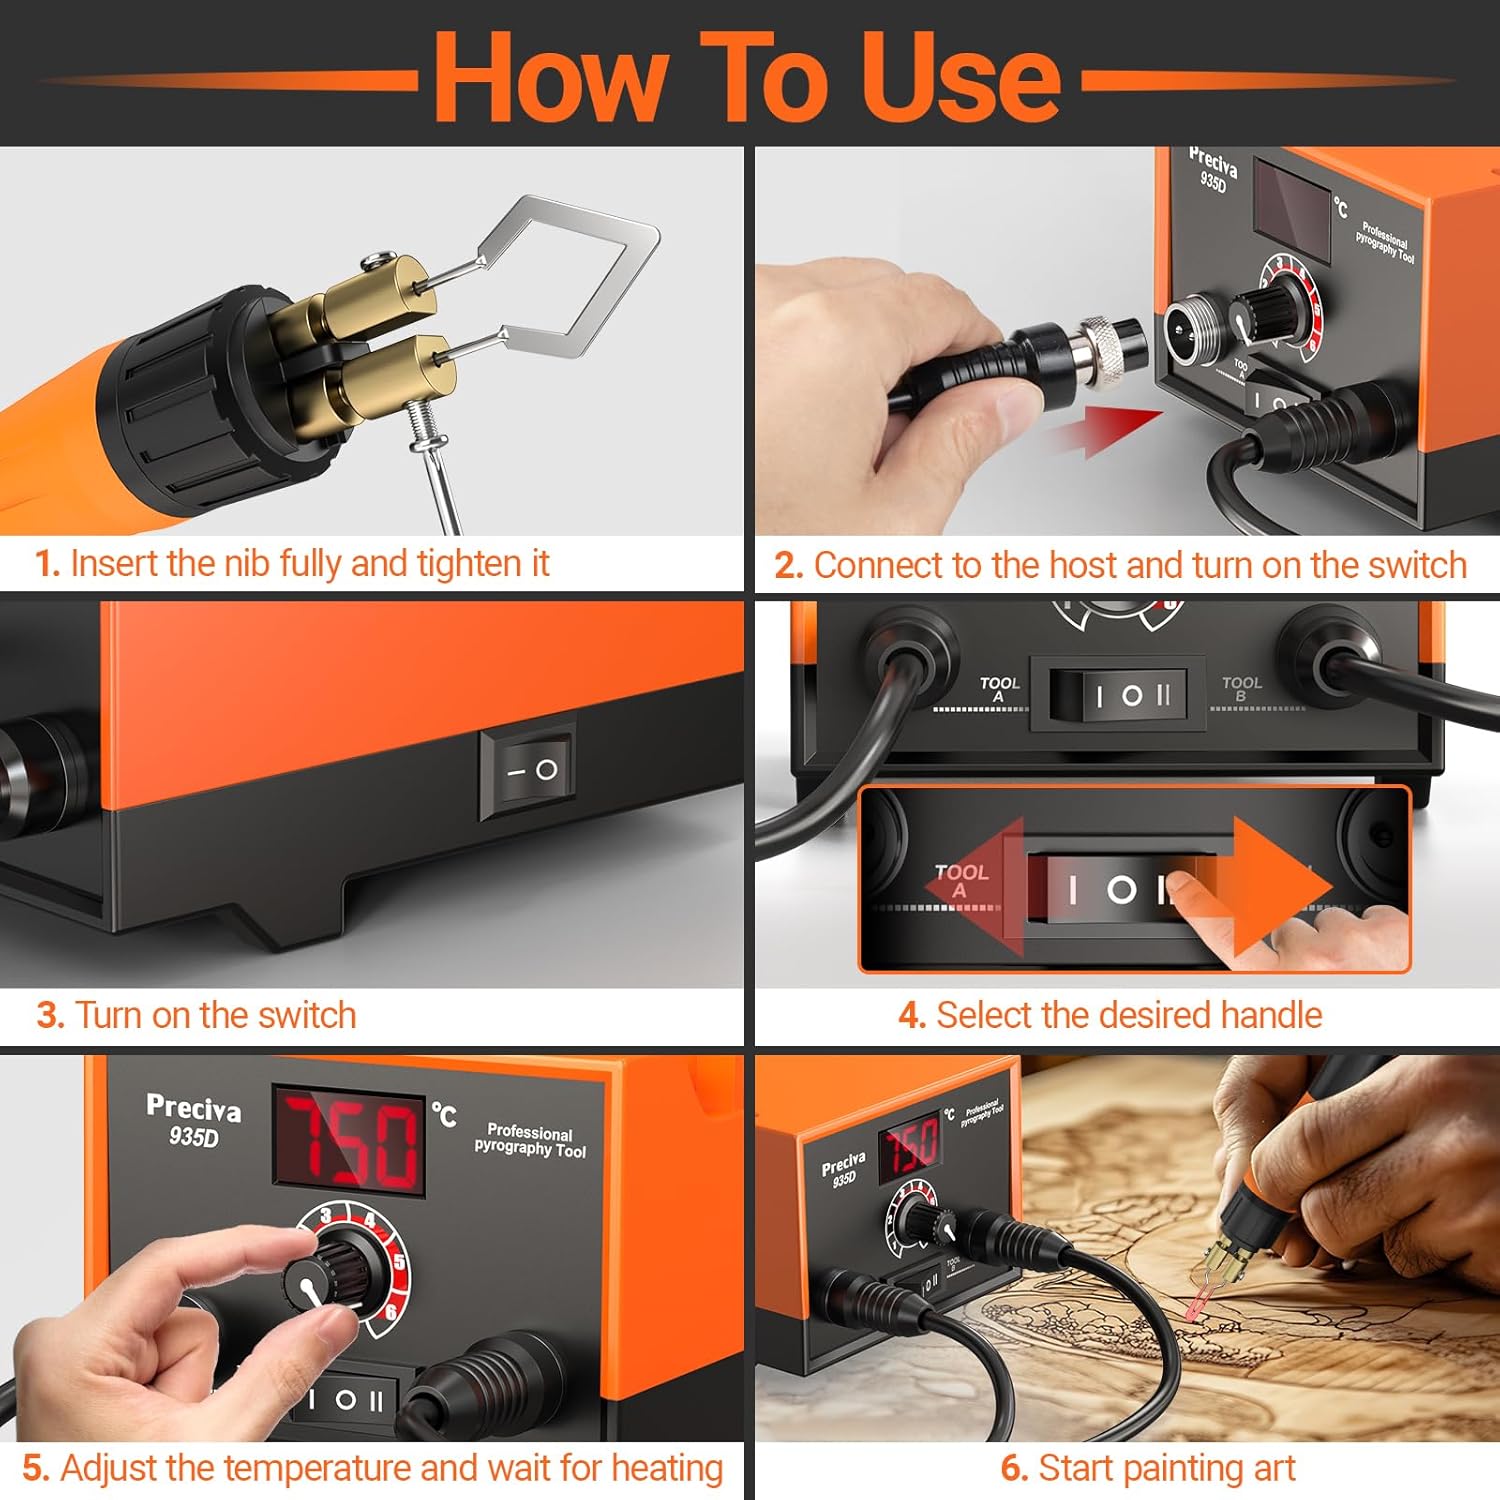
Figure 3: Visual guide for the setup process. This image illustrates how to correctly insert a tip into the pen, connect the pen to the station, power on the unit, select a tool, and adjust the temperature.
Operating Instructions
Once the station is set up, follow these steps for operation:
- Select Tool: If two pens are connected, use the "TOOL A / TOOL B" switch to select which pen you intend to use. The selected pen will begin to heat.
- Adjust Temperature: Rotate the temperature adjustment knob to set the desired temperature. The digital display will show the set temperature. The station heats rapidly, typically reaching the set temperature within seconds. The adjustable range is 250°C to 750°C.
- Wait for Heating: Allow the pen tip to reach the set temperature. The digital display will indicate when the temperature is stable.
- Begin Work: Carefully pick up the heated pen from its holder and begin your pyrography or soldering work. Apply gentle, consistent pressure.
- Dual Pen Advantage: The dual pen design allows you to have two different tips or temperatures ready simultaneously, reducing downtime for tip changes or temperature adjustments.
- Concentrated Heating: The design ensures concentrated heating at the tip, optimizing power consumption and efficiency.
- Resting the Pen: Always return the pen to its designated holder when not actively in use.
- Power Off: When finished, turn the main power switch to "OFF" and unplug the station from the power outlet. Allow the tips to cool completely before handling.

Figure 4: The station in operation, demonstrating the adjustable temperature range and the digital display.

Figure 5: Illustrates the concentrated heating feature of the pyrography pen, ensuring efficient power consumption and precise burning.
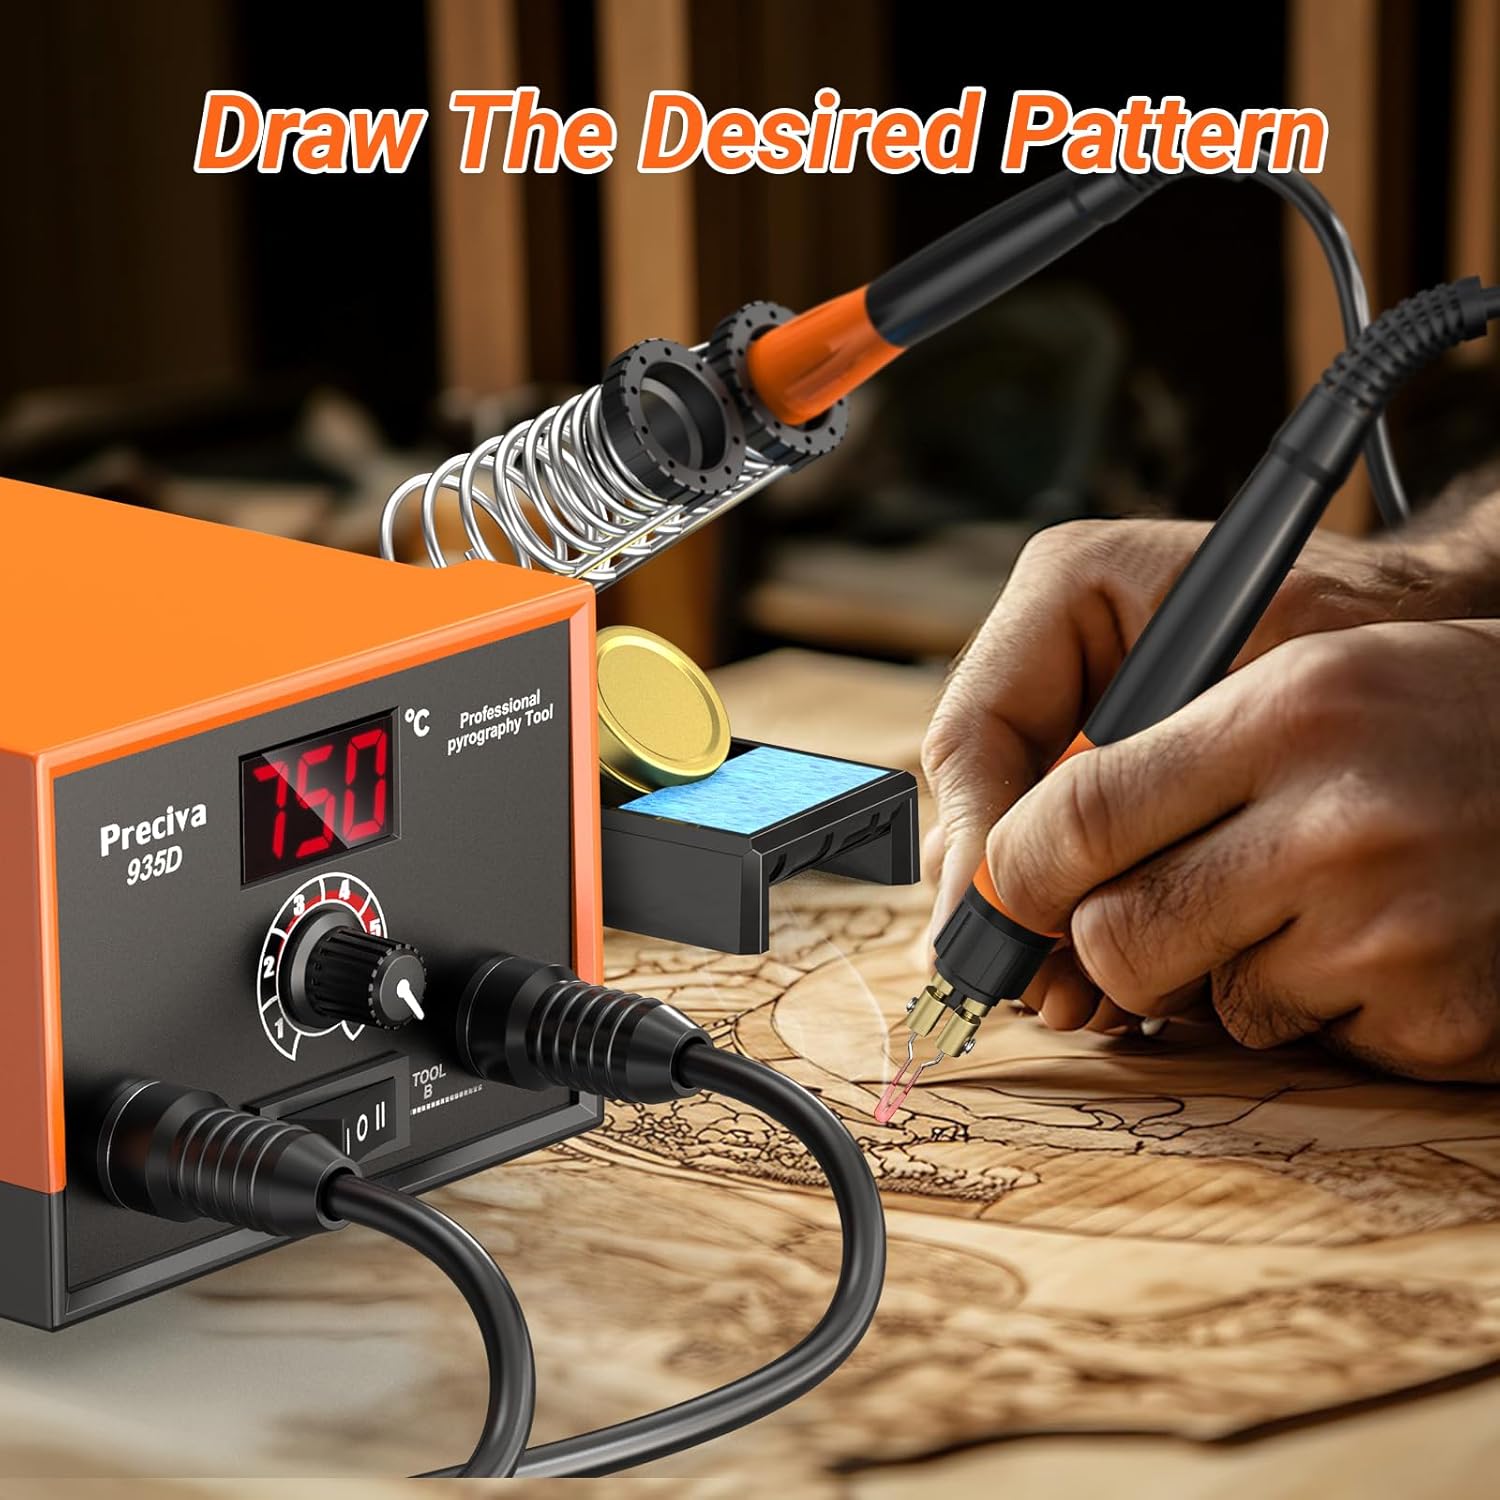
Figure 6: Demonstrates the pyrography pen in action, creating intricate designs on wood.
Maintenance
Proper maintenance ensures the longevity and optimal performance of your pyrography station.
- Cleaning Tips: After use, and once cooled, gently clean the pyrography tips with a fine-grit sandpaper or a specialized cleaning sponge to remove carbon buildup. Do not use water or abrasive chemicals.
- Replacing Tips: To replace a tip, ensure the station is off and unplugged, and the pen is completely cool. Use the provided screwdriver to loosen the screws, remove the old tip, insert the new tip fully, and tighten the screws securely.
- Cleaning the Unit: Wipe the main unit with a soft, dry cloth. Do not use liquid cleaners or allow moisture to enter the unit.
- Storage: Store the station and its accessories in a dry, dust-free environment, out of reach of children. Use the provided tip storage box for organizing tips.
Troubleshooting
Refer to this section for common issues and their solutions.
| Problem | Possible Cause | Solution |
|---|---|---|
| Station does not power on. | Power cord not connected; Power switch off; Outlet issue. | Ensure power cord is securely plugged in. Turn power switch ON. Test outlet with another device. |
| Pen tip not heating. | Tip not properly inserted; Loose connection at pen joint; Incorrect tool selected. | Ensure tip screws are tightened. Check pen cable connection to the station. Verify correct tool (A or B) is selected. |
| Temperature fluctuates or is unstable. | Loose tip connection; Environmental factors. | Ensure tip screws are tightened. Operate in a stable room temperature environment. |
| Poor burning/soldering performance. | Tip is dirty or worn; Incorrect temperature setting. | Clean or replace the tip. Adjust temperature to suit the material and task. |
Specifications
| Feature | Detail |
|---|---|
| Model Number | 935D (Reference: CS97001) |
| Brand | Preciva |
| Power | 25 Watts |
| Temperature Range | 250°C - 750°C (482°F - 1382°F) |
| Display Type | Digital |
| Included Components | Pyrography Station, 2 Pens, 20 Wire Tips, Tip Storage Box, Screwdriver |
| Dimensions (Package) | 29.7 x 17.7 x 11 cm |
| Weight (Package) | 1.74 kg |
Warranty and Support
Preciva is committed to providing high-quality products and customer satisfaction. While specific warranty details are not provided in this manual, please retain your proof of purchase for any warranty claims.
For technical support, troubleshooting assistance, or inquiries regarding replacement parts, please contact Preciva customer service. Contact information can typically be found on the product packaging or the official Preciva website.
If you encounter any after-sales issues, do not hesitate to contact us. We are dedicated to providing a satisfactory solution.


