Introduction
Thank you for choosing the BONANO 0.5 Cubic Digital Safe. This safe is designed to provide enhanced security for your valuables with its robust construction, electronic keypad, and dual alarm system. This manual provides detailed instructions for setup, operation, maintenance, and troubleshooting to ensure optimal performance and security.

Image: The BONANO 0.5 Cubic Digital Safe, open to reveal its interior, which contains gold bars and a watch. A fireproof and waterproof bag is placed in front of the safe.
Package Contents
Please verify that all items listed below are included in your package:
- 1x BONANO 0.5 Cubic Feet Safe
- 1x Fireproof Waterproof Bag
- 2x Expansion Bolts (for mounting)
- 1x Detailed User Manual
- 4x Non-slip Mats
- 2x Emergency Keys
- 1x External Battery Box
- 1x Memory Sponge
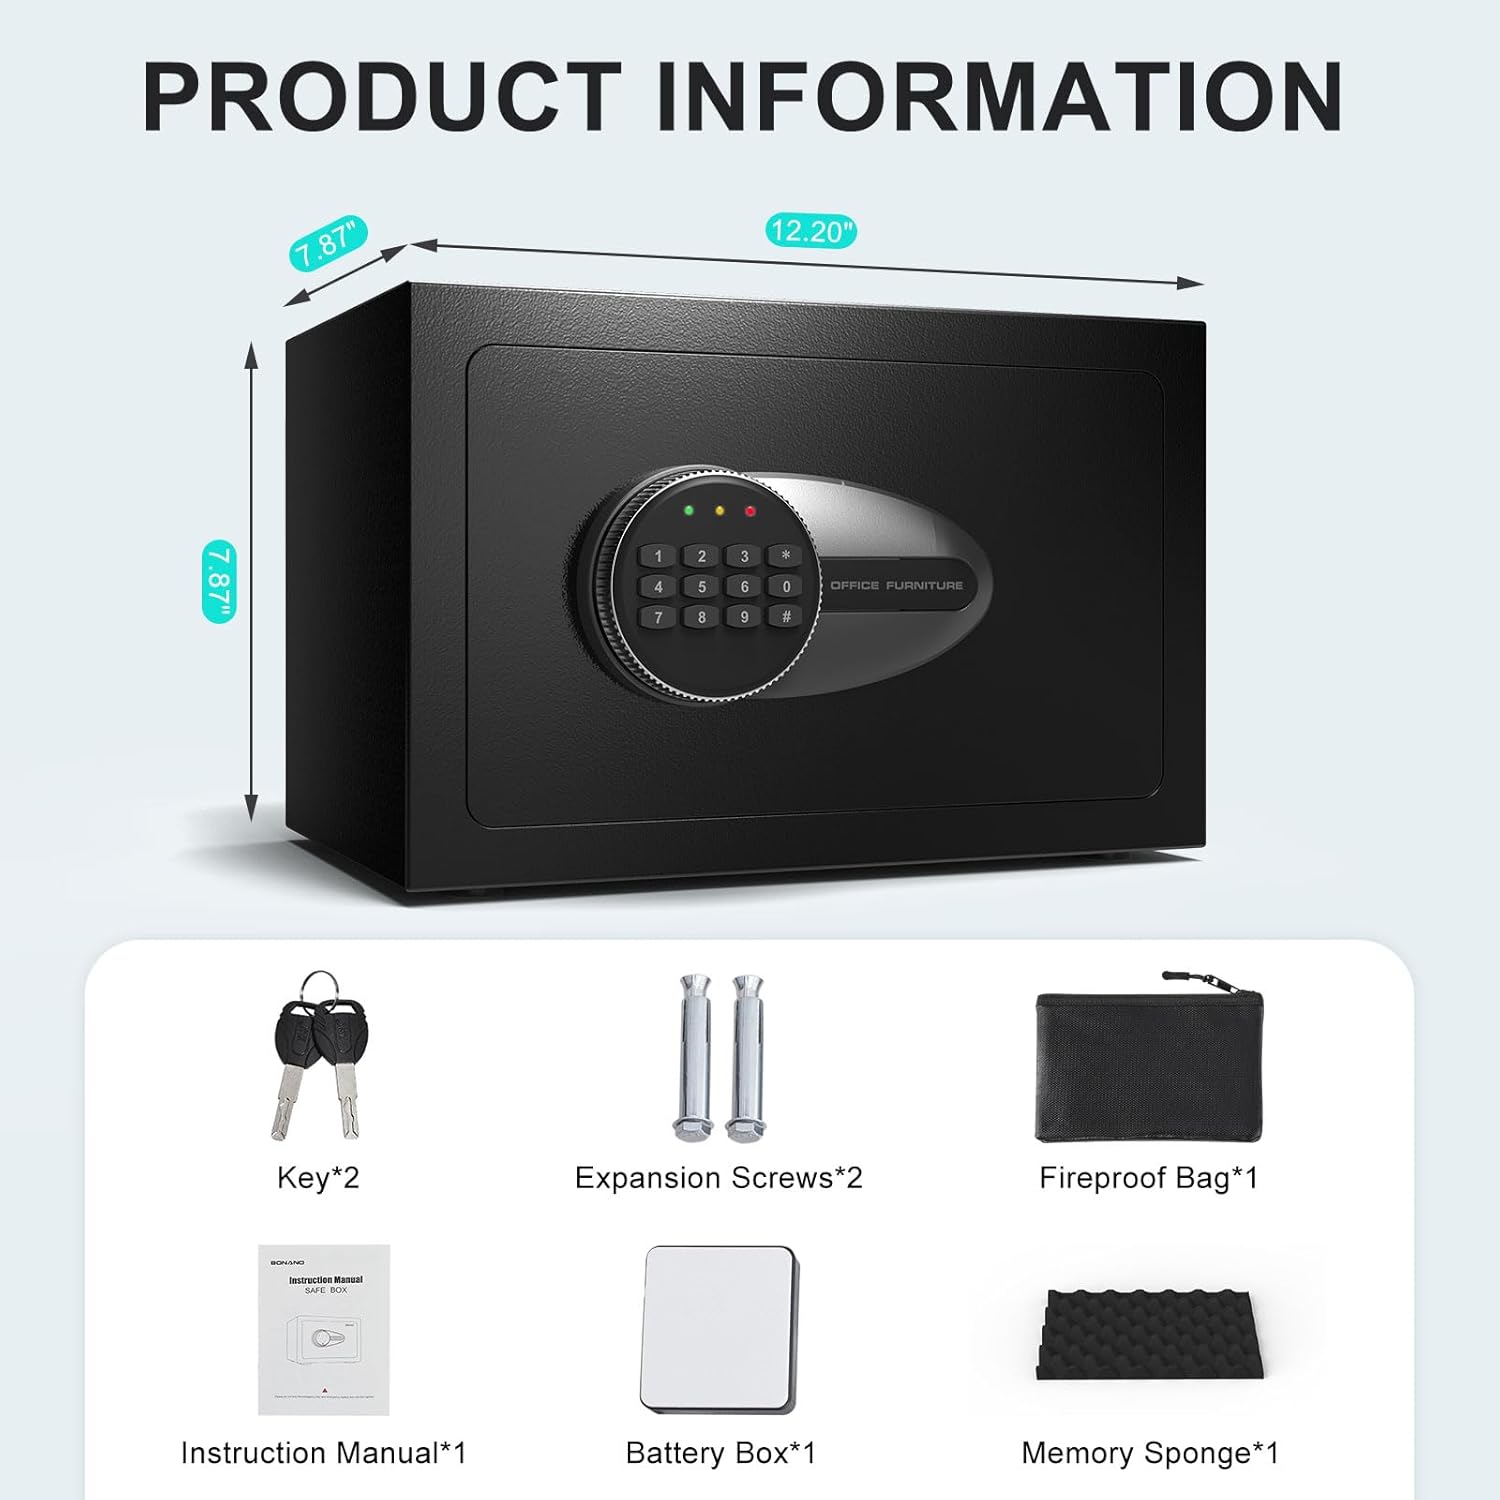
Image: A visual representation of the safe's dimensions and all components included in the package, such as keys, expansion bolts, fireproof bag, manual, battery box, and memory sponge.
Setup
1. Installing Batteries
The safe's electronic keypad requires 4 AA batteries (not included) for operation. Locate the battery compartment inside the safe door. Insert the batteries, ensuring correct polarity. Close the compartment cover.
2. Initial Code Setting
Upon first use, or after battery replacement, you will need to set your personal 3-8 digit passcode. Ensure the safe door is open during this process.
- With the door open, press the red reset button located on the inside of the safe door, near the hinge. You will hear a beep, and the yellow light on the keypad will illuminate.
- Within 5 seconds, enter your desired 3-8 digit code on the keypad.
- Press the '#' (pound) button to confirm your code. You will hear a confirmation beep, and the yellow light will turn off.
- Test your new code with the door open: Enter your code, then press '#'. The green light should illuminate, and you should be able to turn the knob to open the safe.
Note: If the code is not set correctly, the safe will not open. If you encounter issues, refer to the Troubleshooting section.
3. Mounting the Safe
The BONANO safe can be mounted to a wall or floor for added security. Two pre-drilled mounting holes are located on the back of the safe, and two expansion bolts are included.
- Choose a suitable location for mounting.
- Mark the drilling points through the pre-drilled holes on the safe's back onto the wall or floor.
- Drill holes at the marked points using an appropriate drill bit.
- Align the safe with the drilled holes and insert the expansion bolts.
- Tighten the bolts securely to fix the safe in place.

Image: A step-by-step guide illustrating the process of mounting the safe to a wall or inside a closet, emphasizing secure installation.
Operation
1. Opening the Safe
The safe offers three methods for opening:
- Using Digital Code: Enter your 3-8 digit passcode, then press '#'. The green light will illuminate. Within 5 seconds, turn the knob clockwise to open the door.
- Using Emergency Key: Insert one of the emergency keys into the keyhole located behind the keypad cover (if applicable, or directly on the lock). Turn the key clockwise while simultaneously turning the knob clockwise to open the door.
- Using External Battery Box (if internal batteries are dead): If the internal batteries are depleted, connect the external battery box (with 4 AA batteries installed) to the emergency power port on the keypad. Then, enter your digital code and press '#' to open the safe as usual.

Image: A visual guide demonstrating the three methods for opening the safe: using the emergency key, the digital passcode, or the external battery box in conjunction with the passcode.
2. Changing the Digital Code
To change your passcode, follow the same steps as the initial code setting:
- Open the safe door.
- Press the red reset button on the inside of the door. The yellow light will illuminate.
- Within 5 seconds, enter your new 3-8 digit code.
- Press the '#' (pound) button to confirm.
- Test the new code with the door open before closing.
3. Dual Alarm System
The safe is equipped with a dual alarm system for enhanced security:
- Incorrect Passcode Alarm: If three incorrect passcodes are entered consecutively, the alarm will sound for 60 seconds, and the keypad will be locked for 5 minutes.
- Forced Entry Alarm: Any attempt at forced entry or significant vibration will trigger the alarm.
The alarm emits a sound exceeding 70 decibels. To silence the alarm, open the safe using the correct passcode or emergency key.

Image: A diagram demonstrating the dual alarm system, showing how the alarm sound (over 70dB) can be heard throughout a home, triggered by incorrect inputs or forced entry.
Maintenance
1. Battery Replacement
When the batteries are low, the red light on the keypad may flash or the keypad may become unresponsive. Replace all 4 AA batteries promptly to ensure continuous operation. Always use new, high-quality alkaline batteries.
2. Cleaning
To clean the exterior of the safe, use a soft, damp cloth. Avoid abrasive cleaners or solvents that could damage the finish. Do not spray cleaning solutions directly onto the keypad or lock mechanism.
3. Care for Accessories
- Fireproof Waterproof Bag: Store the bag in a cool, dry place when not in use. Do not expose it to extreme temperatures or sharp objects. While the bag offers protection, the safe itself does not have fireproof or waterproof features.
- Memory Sponge: The memory sponge helps protect delicate items from scratches. Ensure it is clean and free of debris before placing valuables on it.
- Non-slip Mats: Place the non-slip mats on the bottom of the safe to enhance stability and prevent scratching surfaces.

Image: Detailed views of the fireproof bag, the protective memory sponge lining the safe's interior, and the non-slip mat designed for the safe's base.
Troubleshooting
| Problem | Possible Cause | Solution |
|---|---|---|
| Keypad does not respond or lights do not illuminate. | Dead or low batteries. Incorrect battery installation. | Replace batteries with new ones, ensuring correct polarity. Use the external battery box if internal batteries are inaccessible. |
| Unable to set or change passcode. | Incorrect procedure. Not pressing '#' to confirm. Not pressing reset button. | Ensure the safe door is open. Press the red reset button. Enter the new code within 5 seconds, then press '#'. Test the code immediately. |
| Safe does not open with correct code. | Batteries low. Keypad locked due to multiple incorrect entries. Knob not turned within 5 seconds. | Replace batteries or use external battery box. Wait 5 minutes if keypad is locked. Ensure knob is turned immediately after green light illuminates. |
| Alarm triggers unexpectedly. | Safe moved or vibrated significantly. | The alarm is sensitive to movement. Ensure the safe is stable. Open with correct code or key to silence. |
| Emergency key does not work. | Key not fully inserted or turned correctly. | Ensure the key is fully inserted and turned clockwise while simultaneously turning the knob. |
Specifications
| Feature | Specification |
|---|---|
| Brand | BONANO |
| Model Number | KD20-D |
| Product Dimensions | 7.87"D x 12.2"W x 7.87"H (20cm D x 31cm W x 20cm H) |
| Capacity | 0.5 Cubic Feet |
| Lock Type | Electronic Combination Lock |
| Material | Low Carbon Steel |
| Mounting Type | Floor Mount, Wall Mount |
| Alarm System | Audible (70+ dB), triggered by 3 incorrect passcodes or forced entry |
| Item Weight | 9.98 pounds (4.53 kg) |
| Batteries Required | 4x AA (for internal keypad, not included) |

Image: Illustrations highlighting the safe's robust security features, including its anti-drilling construction, solid 20mm locking bolts, and a micro-slit door design to prevent prying.
Warranty and Support
BONANO is committed to providing high-quality products and customer satisfaction. While specific warranty details are not provided in this manual, if you encounter any issues with your BONANO safe or have questions regarding its operation, please do not hesitate to contact our customer support team. We are dedicated to assisting you and resolving any concerns you may have.
Please refer to the contact information provided on the product packaging or the official BONANO website for the most up-to-date support channels.