EarHugger EH-TM-T-1025
EarHugger Throat Mic Headset User Manual
Model: EH-TM-T-1025 | Brand: EarHugger
Introduction
This user manual provides comprehensive instructions for the proper setup, operation, and maintenance of your EarHugger Throat Mic Headset with Acoustic Tube Earpiece. Designed for clear communication in challenging environments, this headset converts larynx vibrations into audible transmissions, making it ideal for use with protective equipment and in noisy conditions. Please read this manual thoroughly before using the product to ensure optimal performance and longevity.
What's in the Box
- Throat Mic Headset (integrated microphone and earpiece)
- Radio Connector
- Push to Talk (PTT) button
- Earbud (interchangeable eartip)

Figure 1: All components included with the Throat Mic Headset.
Parts Diagram

Figure 2: Exploded view of the Throat Mic Headset components.
- Radio Connector
- Cable to Radio
- Push-to-Talk (PTT) Button
- PTT Cable
- Clothing Clip (on PTT)
- Throat Mic Transducer (Left)
- Adjustable Neck Grip
- Neck Grip Padding
- Throat Mic Transducer (Right)
- Acoustic Tube Earpiece Cable
- Acoustic Tube
- Earbud
Setup Instructions
- Connect to Radio: Locate the radio connector on your headset cable. Align it with the corresponding port on your Tait TP9300, TP9400, TP9500, or TP9600 radio and firmly insert until it clicks into place.

Figure 3: Radio connector for Tait radios.
- Position the Throat Mic: Place the throat microphone around your neck, ensuring the two transducers rest firmly against your throat, just above the Adam's apple. Adjust the neck grip for a snug, comfortable fit. The adjustable neck grip expands and contracts to fit most neck sizes.
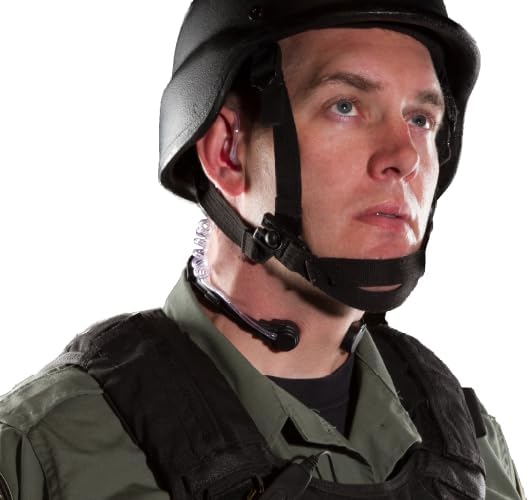
Figure 4: Proper placement of the throat microphone.
- Insert Earpiece: Gently insert the acoustic tube earpiece into your ear. The earpiece is reversible, allowing it to be worn in either ear for comfort and discretion. Ensure the earbud is securely attached to the acoustic tube.
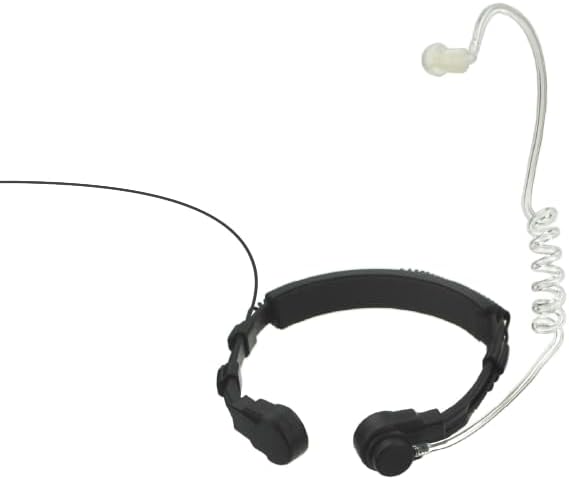
Figure 5: Acoustic tube earpiece.
- Secure PTT Button: Clip the Push-to-Talk (PTT) button to your clothing in an easily accessible location, such as a lapel or collar.
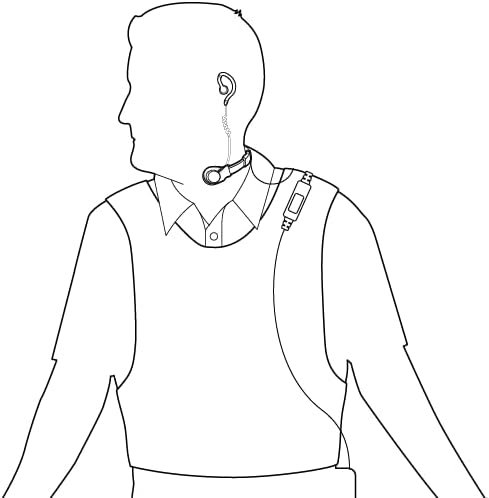
Figure 6: Overall headset setup and cable routing.
Operating Instructions
Transmitting
To transmit, press and hold the Push-to-Talk (PTT) button. Speak clearly at a normal volume. The throat microphone will pick up vibrations from your larynx, converting them into clear audio for transmission. Release the PTT button when you have finished speaking.
Receiving
Audio from your radio will be delivered privately through the acoustic tube earpiece. Ensure the earpiece is properly seated in your ear for optimal sound clarity.
Volume Adjustment
Adjust the volume directly on your connected Tait radio. The headset does not feature independent volume controls.
Care and Maintenance
- Cleaning: Wipe the throat microphone and earpiece with a damp cloth. For the acoustic tube, you may detach the earbud and clean the tube with a mild disinfectant solution. Ensure all components are dry before reassembly and storage.
- Storage: Store the headset in a cool, dry place away from direct sunlight and extreme temperatures. Avoid tangling the cables.
- Water Resistance: The headset is rated IP-56, meaning it is protected against dust and strong jets of water. While it is waterproof against rain, sweat, and incidental water contact, it is not designed for submersion.
Troubleshooting
| Problem | Possible Cause | Solution |
|---|---|---|
| No audio from earpiece. | Radio volume too low; Earpiece not properly inserted; Loose connection to radio. | Increase radio volume; Re-insert earpiece firmly; Check radio connector for secure fit. |
| Transmissions are unclear or distorted. | Throat mic not positioned correctly; Loose connection; Speaking too softly/loudly. | Ensure throat mic transducers are firmly against your throat; Check radio connector; Speak at a normal, consistent volume. |
| PTT button not activating transmission. | Loose connection to radio; Faulty PTT button. | Ensure radio connector is fully inserted; Contact customer support if issue persists. |
Specifications
| Feature | Detail |
|---|---|
| Model Name | Throat Mic Headset |
| Model Number | EH-TM-T-1025 |
| Connectivity Technology | Wired |
| Compatible Devices | Tait TP9300, TP9400, TP9500, TP9600, TP9700, TP9800, TP9900 radios; Tait TP7100, TP8100 radios; Tait TP3300, TP3350 radios; Tait TP9000 portable radios |
| Water Resistance Level | Waterproof (IP-56 rated) |
| Item Weight | 3.2 ounces (0.2 Pounds) |
| Cable Feature | Retractable |
| Earpiece Type | Acoustic Tube with interchangeable eartips |
| Microphone Type | Ultra-sensitive induction mic (throat mic) |
| Certifications | IS compliant, CE and RoHS Certified |
Warranty Information
The EarHugger Throat Mic Headset is covered by a one-year, no-hassle warranty from the date of purchase. This warranty covers defects in materials and workmanship under normal use. For warranty claims or service, please retain your proof of purchase and contact EarHugger customer support.
Customer Support
For technical assistance, troubleshooting, or warranty inquiries, please visit the official EarHugger store or contact our customer support team.
- Online Store: EarHugger Official Store on Amazon
- Manufacturer: EarHugger
Ask a question about this manual
Ask about setup, troubleshooting, compatibility, parts, safety, or missing instructions. Manuals+ will review the question and use this page’s manual context to help answer it.