1. Product Overview
The TXL 14.2-inch Large Digital Wall Clock is a versatile, battery-operated timepiece designed for clear visibility and multi-functional use in various indoor settings such as offices, classrooms, living rooms, and warehouses. It features a large, easy-to-read display that shows time, day, date, and temperature. The clock is designed for both wall mounting and tabletop placement, offering flexibility in its application.

Figure 1: The TXL Digital Wall Clock in a typical office environment.
Key Features:
- 14.2-inch Large Digital Display: Features large, easy-to-read numbers visible from various angles.
- Battery Operated: Powered by 6 AAA batteries (included), providing approximately one year of operation without replacement.
- Multi-function Modes: Includes Timer, Alarm, and Clock modes, easily switchable with a mode button.
- Multiple Alarm Settings: Offers 3 alarm settings for weekdays, weekends, or everyday use.
- Timer Function: Adjustable timing period from 0 to 29 hours, 59 minutes, 59 seconds.
- Temperature & Date Display: Shows indoor temperature in Celsius or Fahrenheit and date (month/day). Supports 12 or 24-hour time formats.
- Flexible Placement: Can be wall-mounted or placed on a desktop using the integrated stand.
2. What's in the Box
- TXL 14.2-inch Large Digital Wall Clock
- 6 AAA Batteries
- Wall Mounting Bracket
- Cardboard Mounting Template
- User Manual
3. Setup
3.1. Battery Installation
The clock requires 6 AAA batteries for operation (included). Locate the battery compartment on the back of the clock. Insert the batteries, ensuring correct polarity (+/-). The clock display will activate once batteries are correctly installed.

Figure 2: Rear view of the clock with battery compartment and foldable stand.
3.2. Placement Options
The TXL Digital Wall Clock offers two primary placement options:
- Tabletop Placement: Extend the integrated stand on the back of the clock to place it securely on any flat surface.
- Wall Mounting:
- Use the provided cardboard mounting template to mark the desired screw positions on the wall.
- Install two screws (not included, but small plastic anchors may be suitable for drywall) into the marked positions, leaving a small portion of the screw head exposed.
- Align the clock's hanging holes with the installed screws and slide the clock down to secure it.
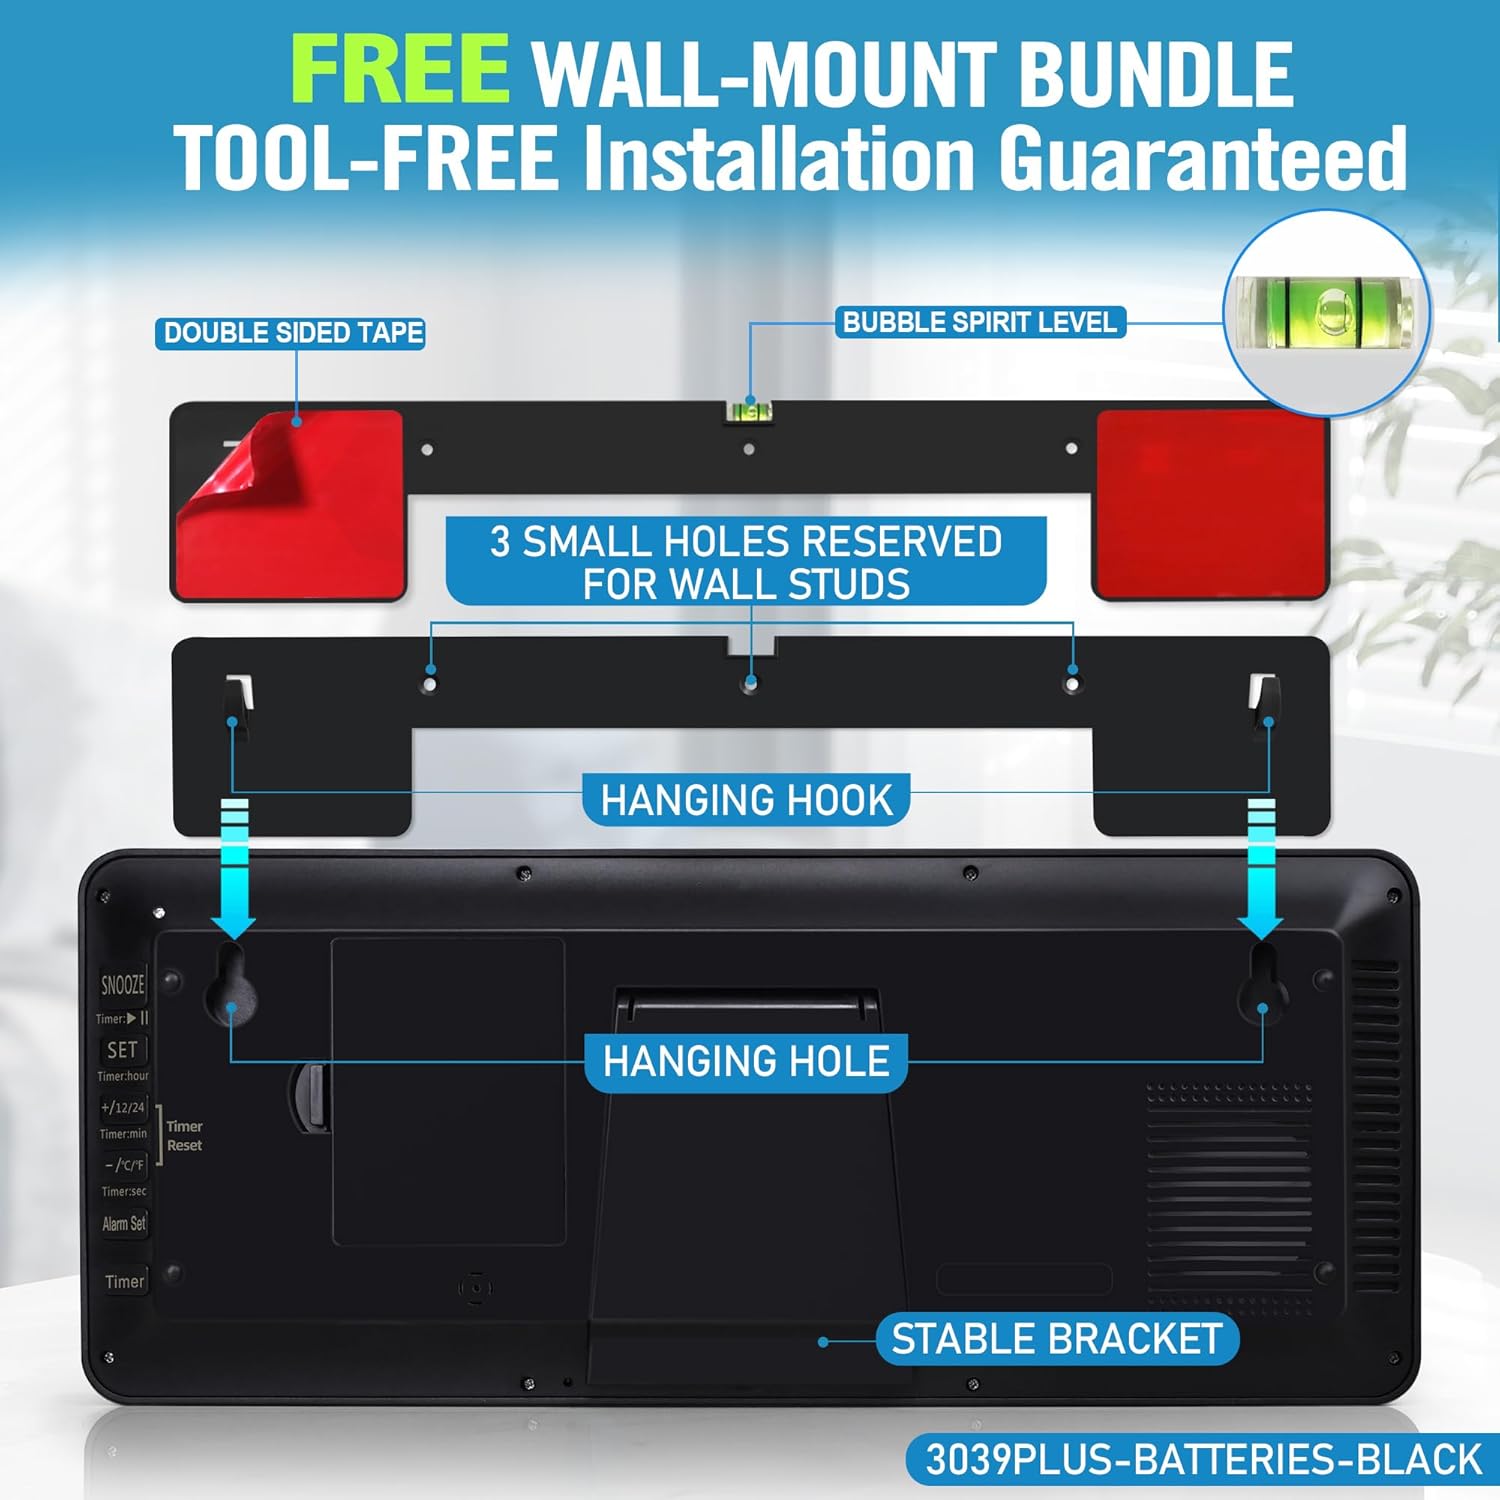
Figure 3: Wall mounting instructions using the provided template and hanging holes.

Figure 4: Example of the clock wall-mounted in an indoor environment.
4. Operating Instructions
4.1. Basic Time and Date Setting
Refer to the detailed instructions provided in the included manual for specific button functions. Generally, the clock features buttons on the back for setting time, date, and other functions. Look for buttons labeled "MODE", "SET", "+/12/24", and "-/℃/℉".
- Time Format (12H/24H): Press the "+/12/24" button to switch between 12-hour and 24-hour time display.
- Temperature Unit (℃/℉): Press the "-/℃/℉" button to toggle between Celsius and Fahrenheit temperature display.
- Setting Time/Date: Typically, press and hold the "SET" button to enter setting mode. Use the "+/12/24" and "-/℃/℉" buttons to adjust values, and "SET" again to confirm and move to the next setting (e.g., hour, minute, year, month, day).

Figure 5: Clear display of time, day, date, and temperature.
4.2. Alarm Function
The clock supports up to 3 alarm settings. Use the "MODE" button to cycle through modes until you reach the alarm setting. Follow the on-screen prompts and use the adjustment buttons to set your desired alarm times and frequency (weekdays, weekends, or everyday).

Figure 6: The clock's three functional modes: Timer, Clock, and Alarm.
4.3. Timer Function
Activate the timer mode by pressing the "MODE" button. Set the desired countdown period using the adjustment buttons. The timer can be set for up to 29 hours, 59 minutes, and 59 seconds.

Figure 7: The clock in Timer Mode, showing a countdown.
4.4. Viewing Angle
The clock is designed with a 180-degree full view display, ensuring clear readability from wide angles.

Figure 8: The clock's display offers a wide 180-degree viewing angle.
5. Maintenance
- Cleaning: Wipe the clock's display and casing with a soft, dry cloth. Avoid using abrasive cleaners or solvents.
- Battery Replacement: Replace all batteries when the display dims or functions become erratic. Ensure to use fresh batteries of the correct type (AAA).
- Storage: If storing the clock for an extended period, remove all batteries to prevent leakage.
6. Troubleshooting
- Display is blank or dim:
- Check if batteries are installed correctly with proper polarity.
- Replace old or depleted batteries with new ones.
- Incorrect Time/Date:
- Manually set the time and date following the instructions in Section 4.1.
- Ensure the correct time zone is implicitly considered if the clock has an atomic feature (though this model is not explicitly stated as atomic in the main description, some variants are).
- Temperature reading is inaccurate:
- Ensure the clock is not placed near heat sources or in direct sunlight, which can affect the sensor.
- Alarm not sounding:
- Verify that the alarm is enabled and set to the correct time.
- Check battery levels.
7. Specifications
| Feature | Detail |
|---|---|
| Brand | TXL |
| Model Number | 3039 Classic |
| Color | Black |
| Display Type | Digital LCD (Multi-display) |
| Product Dimensions | 14.2"W x 5.9"H |
| Power Source | Batteries (6 AAA required, included) |
| Mounting Type | Wall Mount and Tabletop |
| Material | Plastic |
| Item Weight | 1.98 pounds (0.9 Kilograms) |
| Special Feature | Cordless, Temperature Display, Date Display, Alarm Clock, Timer |
8. Warranty and Support
For warranty information and customer support, please refer to the contact details provided on the product packaging or visit the official TXL website. Keep your purchase receipt for warranty claims.