Introduction
This manual provides essential instructions for the safe and effective operation of your pinkking 1:16 Amphibious Remote Control Car. This versatile vehicle is designed for both land and water environments, featuring a shooting water gun and gesture sensing control. Please read this manual thoroughly before use to ensure proper setup, operation, and maintenance.

Image: The pinkking Amphibious RC Car operating on a sandy beach near water, demonstrating its water shooting capability and dual control options.
Product Overview
Components Included:
- Amphibious 4WD RC Truck
- Remote Control
- Charging Cable
- Product Manual (this document)
- 2 Rechargeable Batteries
Key Features:
- 3-in-1 Functionality: Operates as an RC car, RC boat, and features a water gun.
- Amphibious Design: Capable of driving on land and floating/moving in water.
- Gesture Control: Responsive to hand gestures for intuitive operation.
- Water Shooting: Integrated water blaster with a range of up to 15 feet.
- 360° Rotation: Performs stunts and rotations on both land and water.
- All-Terrain Capability: Designed for various surfaces including rocky trails, sand, mud, grass, and water.
- Waterproof Design: Both the vehicle and controllers are designed for water use.
- Dual Batteries: Includes two rechargeable batteries for extended play.

Image: Visual representation of the product's three primary functions: RC car, RC boat, and water gun.
Setup
1. Battery Installation (RC Car):
- Locate the battery compartment on the underside of the RC car.
- Open the battery compartment cover.
- Connect one of the rechargeable batteries to the car's power connector.
- Place the battery inside the compartment and close the cover securely.
2. Battery Installation (Remote Control & Gesture Controller):
- Remote Control: Requires 2 x 1.5V "AA" batteries (not included). Open the battery cover on the back of the remote, insert batteries with correct polarity, and close the cover.
- Gesture Controller: Requires 2 x 1.5V "AA" batteries (not included). Open the battery cover, insert batteries with correct polarity, and close the cover.

Image: Diagram illustrating the battery compartments and required battery types for both the remote and gesture controllers.
3. Charging the RC Car Batteries:
- Connect the charging cable to the rechargeable battery.
- Plug the USB end of the charging cable into a suitable USB power adapter (not included).
- Allow the battery to charge fully before first use. Charging time may vary.
4. Filling the Water Gun:
- For Land Use: Open the back cover of the water gun turret on the RC car and fill with clean water (capacity 150ml).
- For Water Use: When the car is in water, it can automatically absorb water through a bottom intake for continuous shooting.

Image: Illustration of the water gun's filling methods for both land and water operation.
Operating Instructions
1. Power On:
- Turn on the power switch on the RC car.
- Turn on the power switch on your chosen controller (remote or gesture).
- The car and controller will automatically pair.
2. Using the Remote Control:
- Forward/Backward: Use the left joystick.
- Turn Left/Right: Use the right joystick.
- Water Spray: Press the designated water spray button.
- Speed Adjustment: Use the high/low speed button.
3. Using the Gesture Controller:
- Wear the gesture controller on your wrist.
- Specific hand movements will control the car's direction and stunts. Refer to the detailed gesture guide in the included manual for precise movements.
- Water Spray: Press the water spray button on the gesture controller.
4. Land Operation:
The RC car is designed for off-road performance. Drive on various terrains such as dirt, grass, and pavement. It can perform 360° rotations and other stunts.

Image: The RC car demonstrating its 360-degree rotation capability on both land and water surfaces.
5. Water Operation:
The car is fully waterproof and can float and move in water. Its wheels act as propellers for aquatic propulsion. Ensure all compartments are securely closed before entering water.
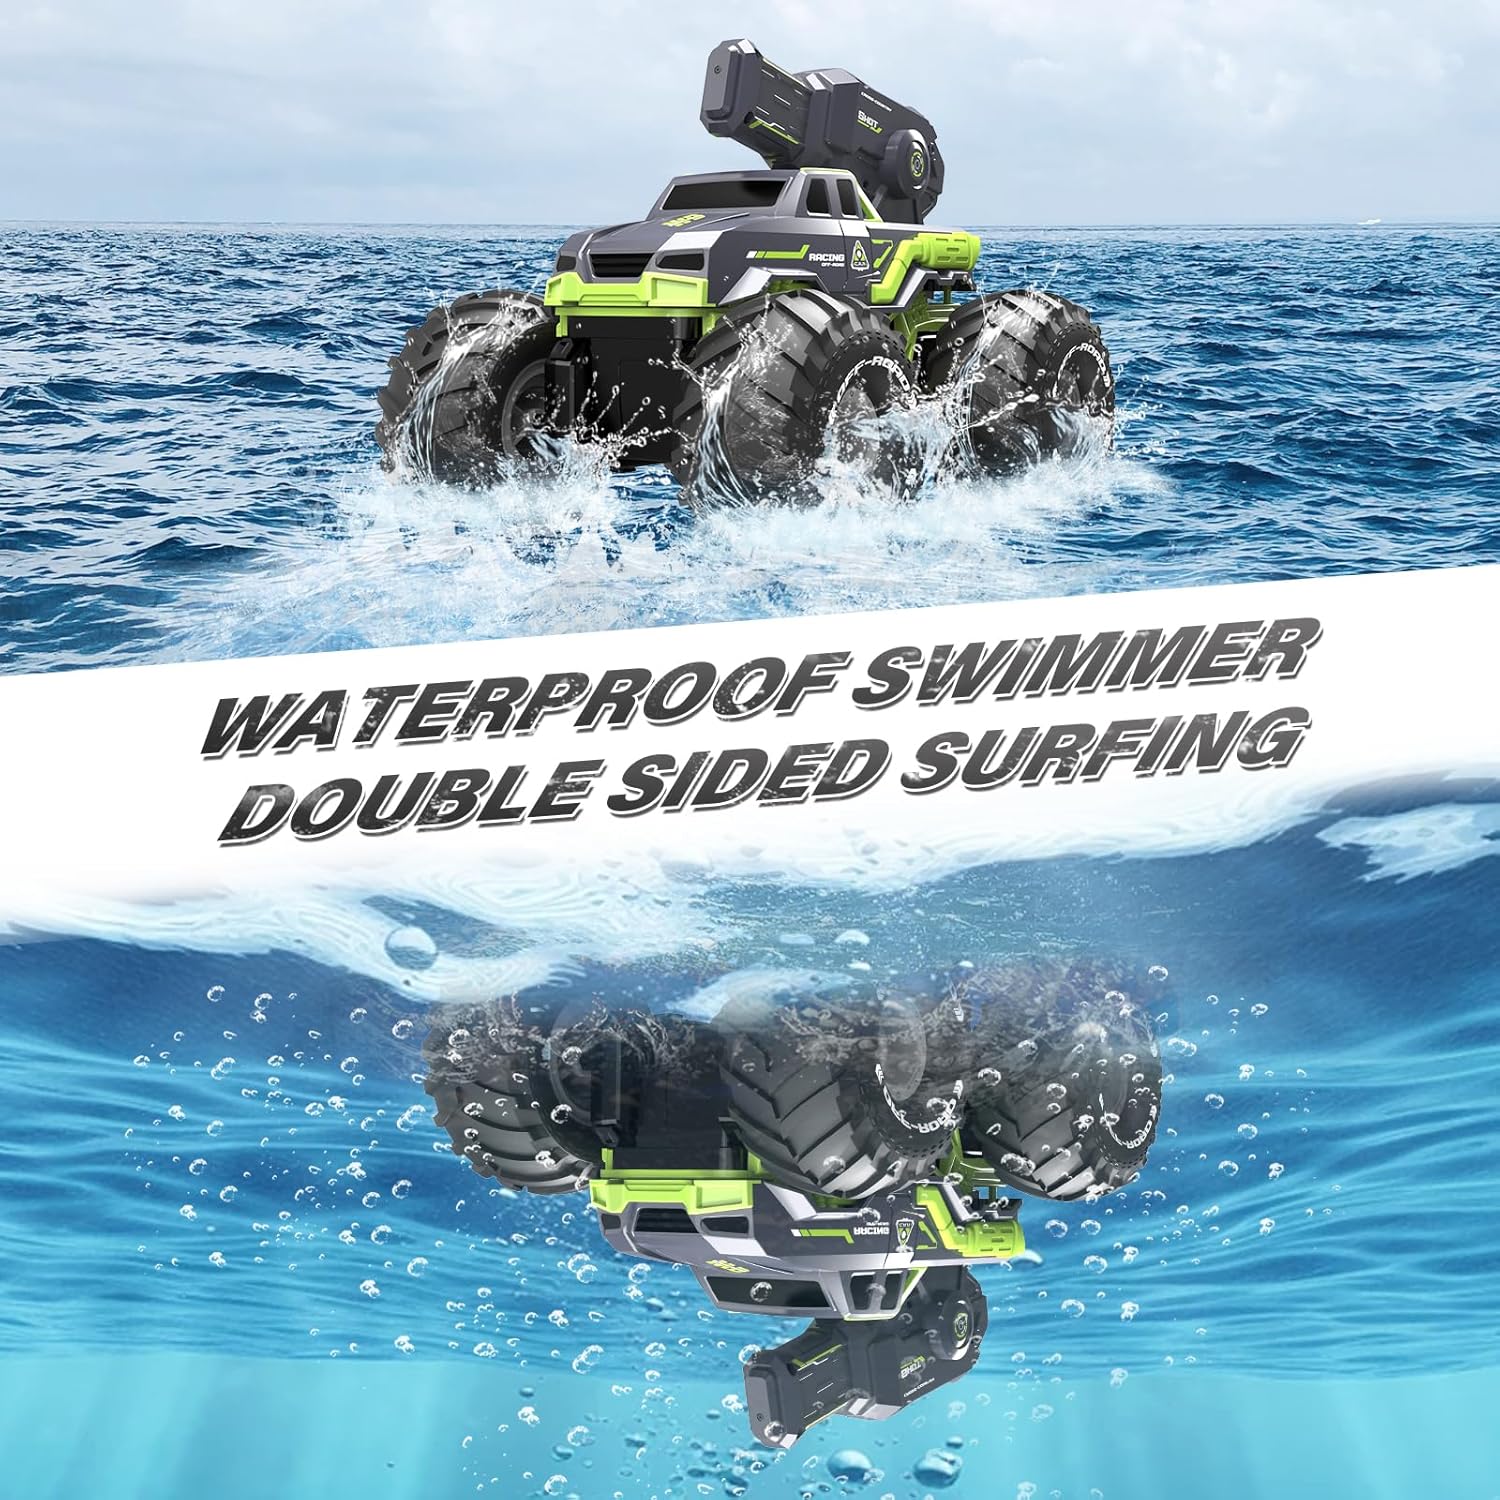
Image: The RC car demonstrating its waterproof capabilities while operating in water.
6. Water Gun Usage:
Once the water tank is filled, activate the water gun using the dedicated button on either controller. The water gun can shoot streams up to 15 feet.
Video: Demonstration of the pinkking Amphibious RC Car's capabilities, including land and water driving, and water gun operation.
Video: The pinkking Amphibious RC Car demonstrating its water squirt tank feature in a pool environment.
Video: A detailed look at the 1:16 pinkking Amphibious Remote Control Car and its water gun functionality.
Maintenance
- Cleaning: After use, especially in water or dirty environments, wipe the car clean with a damp cloth. Do not submerge the entire car in water for cleaning if not explicitly designed for it (though this model is amphibious, avoid harsh chemicals).
- Battery Care: Always remove batteries from the car and controllers when not in use for extended periods. Store batteries in a cool, dry place. Do not overcharge or completely drain rechargeable batteries.
- Storage: Store the RC car and its components in a dry, cool place away from direct sunlight.
- Water Gun: Empty any remaining water from the water gun after use to prevent algae buildup or blockages.
Troubleshooting
| Problem | Possible Cause | Solution |
|---|---|---|
| Car does not move or respond. |
|
|
| Water gun does not shoot. |
|
|
| Poor performance in water. |
|
|
Specifications
| Feature | Detail |
|---|---|
| Product Dimensions | 9.65 x 6.9 x 7.1 inches |
| Item Weight | 2.3 pounds |
| Item Model Number | Amphibious 4WD RC Truck |
| Manufacturer Recommended Age | 6 years and up |
| Batteries (Car) | 2 Nonstandard Rechargeable Batteries (included) |
| Batteries (Controllers) | 2 x 1.5V "AA" batteries each (not included) |
| Water Gun Range | Up to 15 feet |
| Water Gun Capacity | 150ml |
Warranty and Support
For warranty information or technical support, please refer to the contact details provided with your purchase documentation or visit the official pinkking website. Keep your proof of purchase for any warranty claims.