1. Product Overview
The Pxton S1 Walkie Talkie is a versatile two-way radio designed for reliable communication across various environments. It features 16 communication channels, 155 privacy codes, and a range of functions including VOX, TOT, emergency alarm, and an LED flashlight, making it suitable for both personal and professional use.
Key Features:
- 16 Communication Channels
- 155 Privacy Codes (CTCSS/DCS)
- 5-level VOX Sensitivity Adjustment for hands-free operation
- TOT (Time-Out Timer) to prevent accidental prolonged transmissions
- Emergency Alarm function
- Auto Squelch for clear audio
- Low Battery Alert and Power-Saving Mode
- Channel Scan and Monitoring functions
- Integrated LED Flashlight
- Custom Programming Support (programming cable sold separately)
- Durable 1500mAh Li-ion Battery

Image 1.1: Pxton S1 Walkie Talkies in use, highlighting key features.
2. Package Contents
Verify that all items listed below are included in your package:
- 2 x Pxton S1 Walkie Talkies
- 2 x Charging Bases
- 2 x 1500mAh Lithium Batteries
- 2 x Belt Clips
- 2 x Earpieces
- 1 x User Manual

Image 2.1: Included components in the Pxton S1 Walkie Talkie package.
3. Product Diagram
Familiarize yourself with the various parts and controls of your Pxton S1 Walkie Talkie:

Image 3.1: Labeled diagram of the Pxton S1 Walkie Talkie components.
- Integrated Sensitive Antenna: For transmitting and receiving signals.
- Flashlight: Built-in LED light for illumination.
- LED Indicator: Shows status (e.g., transmitting, receiving, low battery).
- PTT Button (Push-to-Talk): Press and hold to transmit, release to receive.
- Clear Speaker: For audio output.
- Built-in Microphone: For voice input.
- SP/MIC Jacks: For connecting earpieces or external microphones.
- MONI Button (Monitor): Temporarily disables squelch to listen to weak signals.
- Flashlight Button: Activates the LED flashlight.
- Channel Switch: Rotary knob to select communication channels.
- Power Switch/Volume Control: Rotary knob to turn the radio on/off and adjust volume.
4. Setup
4.1 Battery Installation and Charging
Before initial use, fully charge the battery.
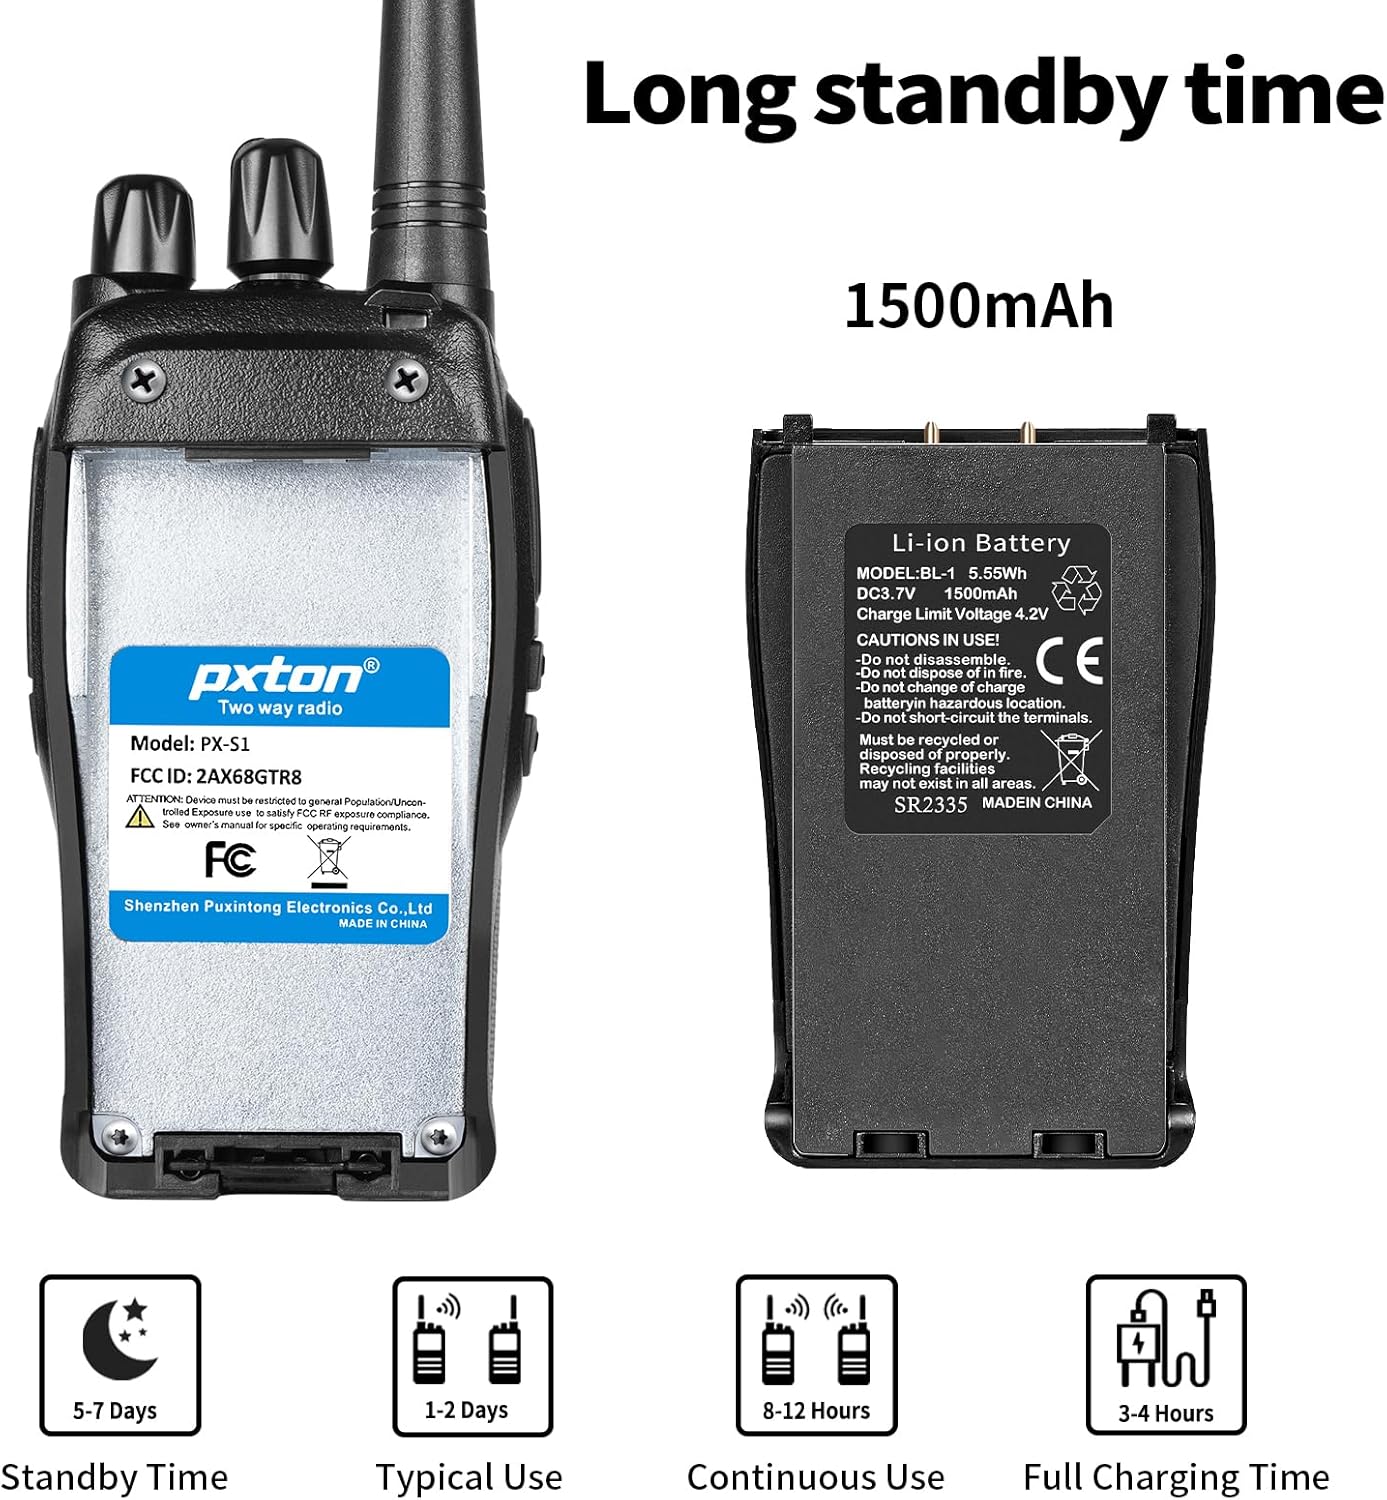
Image 4.1: Battery details and charging information.
- Install Battery: Align the 1500mAh Li-ion battery with the battery compartment on the back of the walkie talkie and slide it into place until it clicks securely.
- Place in Charging Base: Insert the walkie talkie (with battery installed) into the charging base. Ensure the charging contacts on the radio align with those on the base.
- Connect Power: Plug the charging base's adapter into a standard wall outlet. The LED indicator on the charging base will typically show red while charging and turn green when fully charged.
- Charging Time: A full charge typically takes 3-4 hours.
4.2 Attaching the Belt Clip and Earpiece
- Belt Clip: Secure the belt clip to the designated slot on the back of the walkie talkie using the provided screws.
- Earpiece: Insert the earpiece plug into the SP/MIC jacks on the side of the walkie talkie. Ensure it is fully inserted for proper connection.
5. Operating Instructions
5.1 Power On/Off and Volume Control
- Power On: Rotate the Power Switch/Volume Control knob clockwise until you hear a click. The radio will emit a tone, and the LED indicator may flash.
- Adjust Volume: Continue rotating the Power Switch/Volume Control knob clockwise to increase volume, or counter-clockwise to decrease volume.
- Power Off: Rotate the Power Switch/Volume Control knob counter-clockwise until you hear a click.
5.2 Channel Selection
The Pxton S1 has 16 channels. To select a channel:
- Rotate the Channel Switch knob to select your desired channel (1-16).
- Ensure all radios you wish to communicate with are set to the same channel and privacy code.
5.3 Transmitting and Receiving
- To Transmit: Press and hold the PTT (Push-to-Talk) button on the side of the radio. Speak clearly into the microphone. The LED indicator will typically glow red.
- To Receive: Release the PTT button. The radio will automatically switch to receive mode. The LED indicator will typically glow green when receiving a signal.
5.4 VOX (Voice Operated Exchange) Function
VOX allows for hands-free transmission. When VOX is enabled, the radio will automatically transmit when it detects your voice, without needing to press the PTT button.

Image 5.1: Illustration of VOX/Hands-free function.
- VOX sensitivity can be adjusted (5 levels) to suit your environment and voice volume. This feature typically requires programming software to enable and adjust.
5.5 TOT (Time-Out Timer)
The TOT function limits the duration of a single transmission to prevent accidental prolonged transmissions and conserve battery life. If the PTT button is held down for longer than the preset time, the radio will stop transmitting and emit a warning tone.
5.6 Emergency Alarm
The emergency alarm function can be activated to send out an alert signal. The method of activation may vary depending on programming, but it is typically assigned to a programmable side button.
5.7 Scan Function
The scan function allows the radio to automatically scan through all programmed channels to detect active conversations. When an active channel is found, the radio will stop on that channel until the transmission ends.
5.8 Flashlight
The built-in LED flashlight provides convenient illumination.

Image 5.2: Walkie Talkie flashlight in use.
- Press the dedicated Flashlight Button (refer to Product Diagram) to turn the flashlight on or off.
6. Communication Range
The actual communication range of the Pxton S1 Walkie Talkie can vary significantly based on terrain, obstacles, and electromagnetic interference. General estimates are:
- Flat or Unobstructed Areas: Up to 3 miles (approximately 4.8 km)
- Suburban or Rural Areas: Approximately 1.2 miles (approximately 1.9 km)
- Urban Settings: Approximately 0.6 miles (approximately 1 km)

Image 6.1: Communication range in various environments.
7. Maintenance
7.1 Battery Care
- Avoid fully discharging the battery frequently to prolong its lifespan.
- Charge the battery in a cool, dry place.
- If storing the radio for an extended period, charge the battery to about 50% and remove it from the radio. Recharge every 3-6 months.
- Dispose of old batteries responsibly according to local regulations.
7.2 Cleaning
- Wipe the radio's exterior with a soft, damp cloth. Do not use harsh chemicals or abrasive cleaners.
- Ensure the radio is powered off and the charging port cover is securely closed before cleaning.
8. Troubleshooting
| Problem | Possible Cause | Solution |
|---|---|---|
| Radio does not power on | Battery is dead or not installed correctly. | Charge the battery. Reinstall the battery ensuring proper contact. |
| Cannot transmit or receive | Incorrect channel or privacy code. Volume too low. Battery low. | Verify channel and privacy code settings. Increase volume. Charge battery. |
| Poor audio quality / Static | Out of range. Interference. Squelch level too low. | Move closer to other radios. Avoid sources of interference. Adjust squelch level. |
| Battery drains quickly | Frequent transmissions. VOX sensitivity too high. Battery nearing end of life. | Reduce transmission time. Adjust VOX sensitivity. Consider replacing battery if old. |
9. Specifications
| Feature | Detail |
|---|---|
| Model Number | PX-S1-0001 |
| Brand | pxton |
| Color | Black |
| Number of Channels | 16 |
| Frequency Range | UHF |
| Talking Range Maximum | 3 Miles (unobstructed) |
| Battery Type | 1500mAh Lithium Ion (included) |
| Voltage | 3.7 Volts (DC) |
| Battery Average Life | 7 days (standby) / 12 hours (continuous use) |
| Charging Time | 3-4 hours |
| Water Resistance Level | Water Resistant |
| Product Dimensions (D x W x H) | 9.9" x 2.2" x 6.9" (including antenna) |
| Item Weight | 1.4 Pounds |
| Operating Temperature Range | -10°C to 40°C |
| FCC ID | 2AX68GTR8 |

Image 9.1: Pxton S1 Walkie Talkie dimensions.
10. Compatibility
The Pxton S1 walkie talkie is compatible with the following models:
- PX-888S
- PX-777S
- PX-666S
- PX-888S Pro
These models can work together and utilize the same programming tools and cables. Note that the programming cable must be purchased separately and is not included with the PX-S1.
11. Warranty and Support
11.1 Warranty Information
Pxton offers a 30-day unconditional exchange and refund policy from the date of purchase. Additionally, the product comes with lifetime after-sales service.
11.2 Customer Support
If you encounter any issues or have questions regarding your Pxton S1 Walkie Talkie, please contact Pxton customer support. You can reach us via Amazon messages for assistance.