1. Introduction
This manual provides detailed instructions for the installation, operation, and maintenance of your AISENS ASDS-M2SATA04B Dockstation. This device is designed to facilitate data transfer and cloning for M.2 NVMe and SATA SSD/HDD drives, offering versatile connectivity and ease of use.
The dockstation features an On/Off switch, LED indicators for power and activity, and supports Plug and Play functionality for convenient setup.
2. Package Contents
Please verify that all items are present in your package:
- AISENS ASDS-M2SATA04B Dockstation
- AC Adapter (EU plug)
- USB Type-A to USB Type-C Cable
- USB Type-C to USB Type-C Cable
- User Manual (this document)

Figure 2.1: Product packaging illustrating the dockstation and its key features.
3. Product Overview
The AISENS ASDS-M2SATA04B Dockstation is a compact and versatile device designed for external access to M.2 NVMe and SATA drives. It features a robust ABS material construction and offers a USB 3.2 interface for high-speed data transfer.

Figure 3.1: Top view of the dockstation, showing the M.2 and SATA slots, power button, and LED indicators.
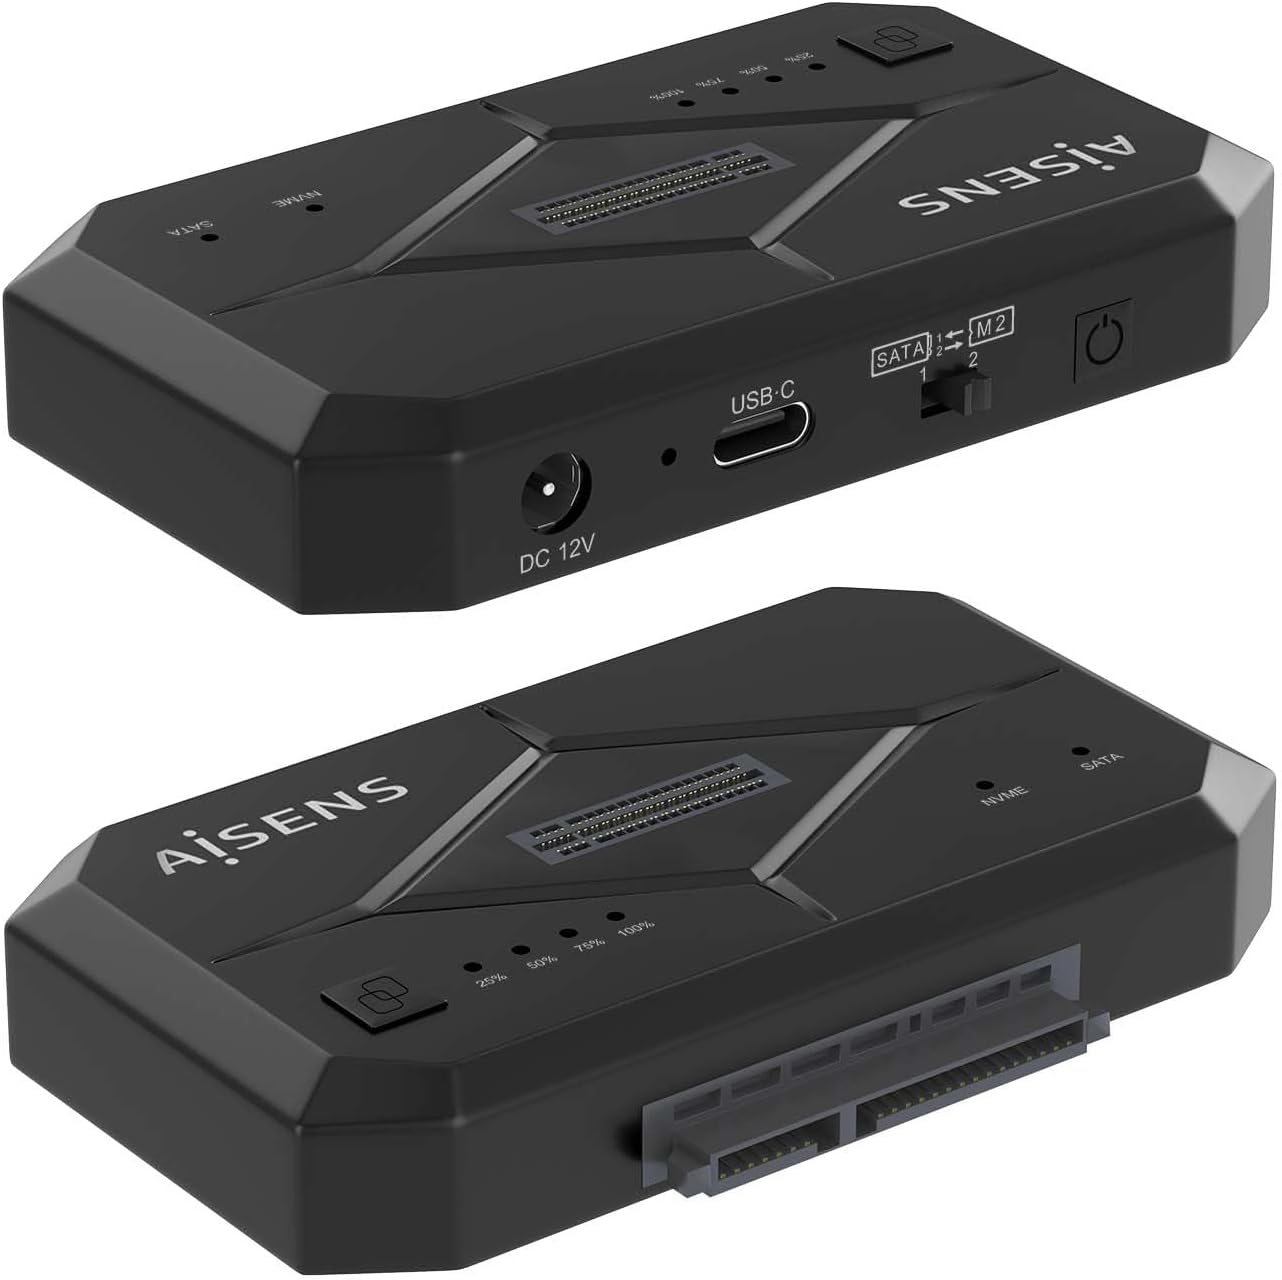
Figure 3.2: Side view of the dockstation, highlighting the DC 12V power input, USB-C port, and the SATA/M.2 selection switch.

Figure 3.3: Detailed view of the SATA/M.2 switch, used to select the active drive interface.
4. Setup Instructions
Follow these steps to set up your AISENS ASDS-M2SATA04B Dockstation:
- Connect Power: Connect the provided AC adapter to the DC 12V port on the dockstation and then plug it into a power outlet.
- Connect to Computer: Use one of the provided USB cables (USB Type-A to USB Type-C or USB Type-C to USB Type-C) to connect the dockstation's USB-C port to an available USB port on your computer.
- Install Drive:
- For SATA drives: Slide the SATA SSD/HDD into the designated SATA slot until it is firmly seated.
- For M.2 NVMe drives: Insert the M.2 NVMe SSD into the M.2 slot at an angle, then gently push down and secure it with the provided fastener (if applicable).

Figure 4.1: Illustration of an M.2 NVMe SSD and a SATA drive ready for installation into the dockstation.

Figure 4.2: The dockstation connected and ready for use with both M.2 NVMe and SATA drives.
- Select Drive Type: Use the SATA/M.2 switch on the side of the dockstation to select the type of drive you wish to access (SATA or M.2). Ensure the switch corresponds to the installed drive.
- Power On: Press the On/Off switch on the dockstation. The LED indicators will illuminate, signifying power and activity.
The dockstation supports Plug and Play, so your operating system should automatically detect the connected drive.
5. Operating Instructions
Once the dockstation is set up and powered on, you can begin using it:
- Accessing Data: The installed drive will appear as an external storage device on your computer. You can access, transfer, and manage files as you would with any other external drive.
- LED Indicators: The dockstation features LED indicators that show power status and drive activity. Refer to the product overview for their locations.
- Cloning Function: The dockstation supports cloning hard drives without requiring a PC connection. Refer to the specific cloning instructions provided on the product packaging or the official AISENS website for detailed steps.
- Switching Drives: To switch between an M.2 NVMe drive and a SATA drive, ensure the dockstation is powered off, then adjust the SATA/M.2 switch to the desired position, and power the dockstation back on.
6. Maintenance
To ensure the longevity and optimal performance of your dockstation:
- Keep the device clean and free from dust. Use a soft, dry cloth for cleaning.
- Avoid exposing the dockstation to extreme temperatures, humidity, or direct sunlight.
- Do not attempt to disassemble or repair the device yourself. This may void the warranty.
7. Troubleshooting
If you encounter issues with your AISENS ASDS-M2SATA04B Dockstation, please refer to the following common solutions:
- Device Not Detected:
- Ensure the power adapter is securely connected and the dockstation is powered on.
- Verify that the USB cable is properly connected to both the dockstation and your computer. Try a different USB port or cable.
- Check if the SATA/M.2 switch is set to the correct position for the installed drive.
- Ensure the drive is properly seated in its slot.
- Test the dockstation with a different drive to rule out drive issues.
- Slow Data Transfer:
- Ensure you are connected to a USB 3.0 (or higher) port on your computer for optimal speeds.
- Verify the drive itself is capable of high-speed transfer.
- Drive Not Appearing in 'My Computer' / 'File Explorer':
- For new drives, they may need to be initialized and formatted in Disk Management (Windows) or Disk Utility (macOS) before they can be used.
8. Specifications
| Brand | AISENS |
| Model | ASDS-M2SATA04B |
| Hardware Interface | Solid State Drive, USB |
| Material | Acrylonitrile Butadiene Styrene (ABS) |
| Compatible Devices | Desktop, Laptop, Tablet |
| Supported Devices Quantity | 1 |
| Data Transfer Rate | 1000 Megabits Per Second (10 Gbps) |
| Plug Type | EU plug |
| Features | On/Off switch, Plug and play, LED indicator |
| Item Weight | 0.36 Kilograms |
9. Warranty Information
The AISENS ASDS-M2SATA04B Dockstation comes with a 3-year warranty. Please retain your proof of purchase for warranty claims. The warranty covers manufacturing defects and malfunctions under normal use. It does not cover damage caused by misuse, accidents, unauthorized modifications, or improper installation.
10. Support
For further assistance, technical support, or to access additional resources, please visit the official AISENS website or scan the QR code below:
You can also find contact information for customer service on the official AISENS website.