1. Introduction
Thank you for choosing the Dragro Cordless Electric Weed Wacker. This manual provides essential information for the safe operation, assembly, maintenance, and troubleshooting of your new tool. Please read this manual thoroughly before first use and keep it for future reference.
Important Safety Information
Always wear safety glasses and gloves when operating. Keep bystanders and pets at a safe distance. Do not operate on wet or slippery surfaces. Keep hands and feet away from the cutting area. Read and follow all safety instructions in the manual.
2. Package Contents
Verify that all items listed below are included in your package. If any parts are missing or damaged, please contact customer service.
- 1 x Cordless Electric Weed Wacker
- 2 x 21V 2000mAh Lithium Batteries
- 1 x Battery Charger
- 2 x Saw Blades
- 4 x Metal Blades
- 10 x Double Nylon Blades (Plastic Blades)
- 1 x Work Gloves
- 1 x Safety Glasses
- 2 x Installation Tools Kit
- 1 x User Manual

Figure 2.1: Complete Package Contents. This image displays the weed wacker, two batteries, charger, various blades (saw, metal, plastic), gloves, safety glasses, and tools.
3. Setup and Assembly
Follow these steps to assemble your weed wacker before first use.
3.1 Charging the Battery
- Ensure the battery is fully charged before initial use for optimal performance.
- Connect the charger to a power outlet.
- Insert the battery into the charger. The indicator light on the charger will show the charging status.
- Once fully charged, remove the battery from the charger.

Figure 3.1: 21V 2.0Ah Lithium Battery. This image highlights the battery's temperature, current, short circuit, and overcharge protection features.
3.2 Assembling the Weed Wacker
Refer to the diagram below for visual guidance during assembly.
- Install the grass guard by rotating it to the right until secure.
- Tighten the grass guard with the provided wrench.
- Align the notch of the aluminum cap to install it correctly.
- Mount the desired blade (saw, metal, or plastic) using the nuts and washers. Ensure the blade is centered and flat.
- Tighten the blade with the wrench head.
- Adjust the three heights according to your situation.
- Press the nut on the left while turning the wheel on the right to secure the wheel assembly.
- Install the front iron guardrail.
- Ensure all components are properly tightened before operation.

Figure 3.2: Installation Steps. This image provides a step-by-step visual guide for assembling the weed wacker, including attaching the grass guard, blades, and wheels.
4. Operating Instructions
Familiarize yourself with the controls and features for effective and safe operation.

Figure 4.1: Product Details. This image labels key components such as the Safety Lock Switch, Adjustable Handle, Folding Buckle, Edging Guide, Switch Trigger, 21V 2.0Ah Battery, Adjusting Telescopic Button, 90° Pivoting Head, Grass Guard, and Cutter Head Support Wheels.
4.1 Starting and Stopping
- Insert a charged battery into the battery slot.
- To start the weed wacker, press the safety lock button and simultaneously press the switch trigger.
- To stop the weed wacker, release the switch trigger.
4.2 Blade Selection and Usage
The weed wacker comes with three types of blades for different cutting tasks:
- Metal Blade: Suitable for cutting thick weeds and hedges.
- Saw Blade: Ideal for pruning branches or bushes.
- Plastic Blades (Double Nylon Blades): Only suitable for cutting tender grass. Avoid using on hard objects to prevent damage.

Figure 4.2: Multifunctional Weed Wacker Blades. This image illustrates the plastic blade for lawn mowing, the metal blade for brush cutting and pruning, and the saw disc for thick brush cutting and pruning.
4.3 Adjusting Height and Angle
- The telescopic pole can be adjusted from 45 to 56 inches using the one-key adjustable telescopic button, allowing for comfortable use without bending over.
- The head of the electric weed trimmer features a 90-degree adjustable design, enabling easy care for hard-to-reach areas, edges, and corners.
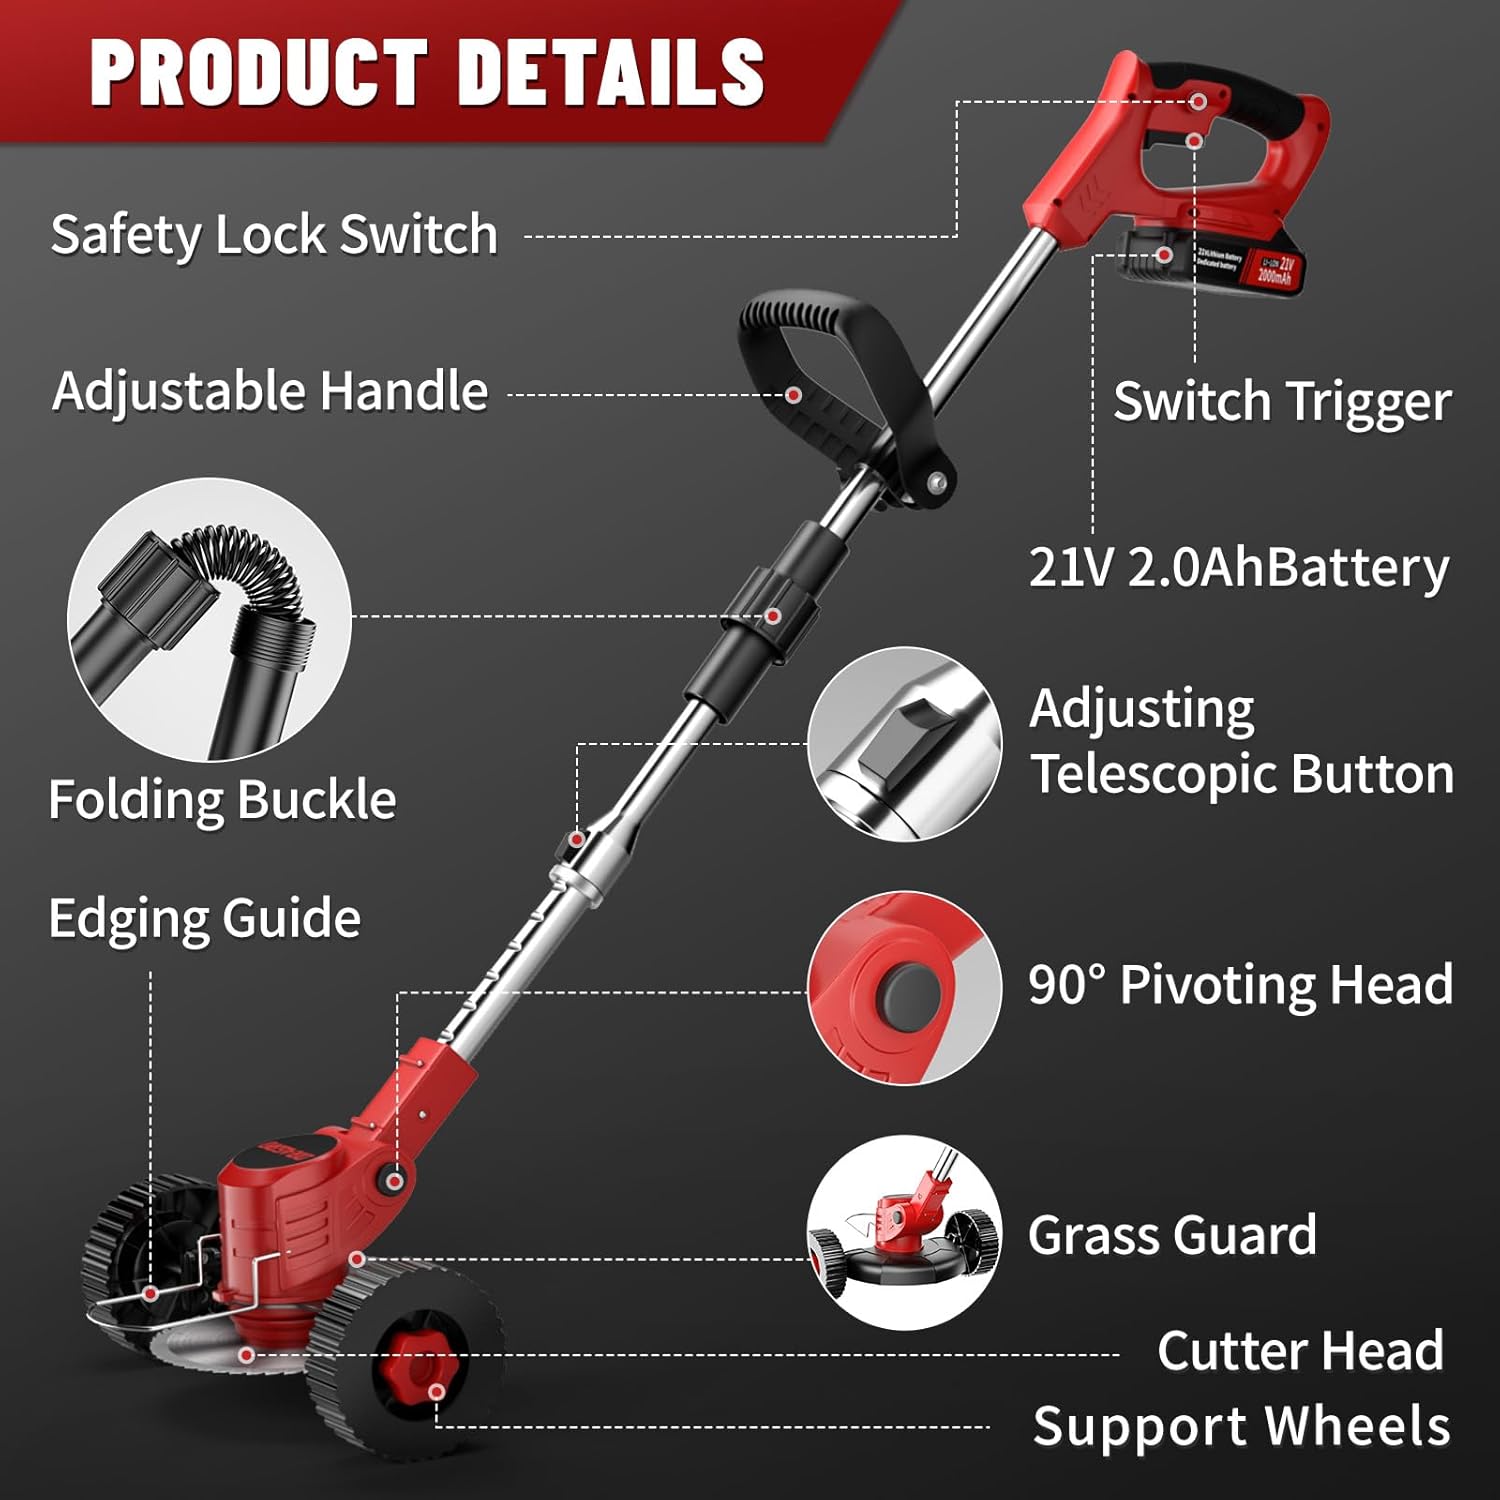
Figure 4.3: Adjustable Telescopic Rod Length. This image shows the weed wacker's length before stretching (45 inches) and after stretching (56 inches), demonstrating its adjustable height feature.

Figure 4.4: 90° Adjustable Cutting Head. This image illustrates how the head can tilt up and down for trimming at multiple angles, useful for fences and sidewalks.

Figure 4.5: Adjustable Handle. This image demonstrates the multi-position handle that provides more control and reduces fatigue during operation.
4.4 Anti-Collision Protection
The anti-collision metal protection ring prevents the cutting blade from colliding with and breaking on hard objects like rocks, and also protects plants, landscape features, and lawn decorations during trimming.

Figure 4.6: Anti-Collision Protection. This image highlights the metal protection ring designed to prevent damage to the blade and surrounding objects.
5. Maintenance
Regular maintenance ensures the longevity and optimal performance of your weed wacker.
- Cleaning: After each use, remove any grass, dirt, or debris from the cutting head, guard, and motor housing. Use a dry cloth or soft brush. Do not use water or harsh chemicals.
- Blade Inspection and Replacement: Regularly inspect blades for wear, damage, or dullness. Replace worn or damaged blades immediately to maintain cutting efficiency and safety. Always use genuine replacement parts.
- Battery Care: Store batteries in a cool, dry place away from direct sunlight and extreme temperatures. Do not store fully discharged batteries for extended periods.
- Storage: When not in use, store the weed wacker in a clean, dry, and secure location, out of reach of children. The foldable design allows for easy storage.
6. Troubleshooting
This section addresses common issues you might encounter. For problems not listed here, please contact customer service.
| Problem | Possible Cause | Solution |
|---|---|---|
| Weed wacker does not start. | Battery not charged or improperly inserted. Safety lock not engaged with trigger. | Ensure battery is fully charged and correctly inserted. Press safety lock button and trigger simultaneously. |
| Reduced cutting performance. | Blades are dull, damaged, or incorrect type for material. Debris wrapped around blade. | Replace dull/damaged blades. Ensure correct blade type is used. Clear any debris from the cutting head. |
| Excessive vibration or noise. | Blade is loose or unbalanced. Damaged component. | Check and tighten blade securely. Inspect for any visible damage to the tool. If problem persists, discontinue use and contact support. |
| Battery runtime is short. | Battery not fully charged. Battery nearing end of life. Operating in very dense material. | Ensure battery is fully charged before use. Consider replacing old batteries. Avoid continuously cutting extremely dense material. |
7. Specifications
| Feature | Detail |
|---|---|
| Brand | Dragro |
| Model Number | DO002 |
| Power Source | Battery Powered |
| Battery Type | 21V 2.0Ah Lithium Ion (2 included) |
| Motor Power | 650W Pure Copper Motor |
| Engine Speed | 20000 RPM |
| Cutting Width | 6 Inches |
| Adjustable Length | 45 to 56 Inches |
| Head Adjustment | 90 Degree Pivoting |
| Item Weight | 6.59 pounds |
| Product Dimensions | 22.83"L x 8.27"W (folded/compact) |
8. Warranty and Support
Dragro is committed to providing high-quality products and excellent customer service. Your product is covered by a standard warranty against manufacturing defects.
- For any questions regarding assembly, operation, maintenance, or troubleshooting, please refer to this manual first.
- If you require further assistance or have warranty claims, please contact Dragro customer service.
- Please have your model number (DO002) and purchase information ready when contacting support.
We provide 24-hour friendly customer service to keep you away from after-sales worries.