Introduction
Welcome to your new Luzhengyang Digital LED Projection Alarm Clock. This manual provides detailed instructions for setting up and operating your device, ensuring you can fully utilize its features, including time projection, AM/FM radio, and dual alarms.
Package Contents
- 1 x Alarm Clock Unit
- 1 x Power Wire (USB-A to DC barrel jack)
- 1 x User Manual (this document)
Note: A USB power adapter (e.g., phone charger) is not included. Batteries are not required for primary operation as the device uses DC 5V power. The memory function retains settings during power outages.
Product Features
- LED Display: Clear digital time display.
- 90-Degree Rotating Time Projector: Projects time onto walls or ceilings.
- Dual Alarm Function: Set two independent alarms.
- Snooze Function: Provides extra sleep time after an alarm sounds.
- AM/FM Radio: Built-in radio with an enhanced speaker for audio playback.
- Adjustable Brightness: Five levels for the main LED display.
- Memory Function: Retains time and alarm settings during power interruptions.

Image: Front view of the alarm clock with its blue LED display showing 10:38.
Setup
- Power Connection: Connect the provided power wire to the DC 5V input port on the back of the alarm clock. Plug the USB-A end into a compatible USB power adapter (not included) or a powered USB port. The clock will power on, and the LED display will illuminate.
- Initial Power-On: Upon first power-on or after a prolonged power outage, the display may show a default time. The memory function will help retain settings after initial setup.

Image: Angled view of the alarm clock, showing the projector module extending from the side.
Operating Instructions
Button Overview

Image: Top view of the alarm clock, illustrating the layout of control buttons.
- VOL: Volume control for radio; used for adjustment in settings.
- RADIO SLEEP: Turns radio on/off, sets sleep timer; used for adjustment in settings; functions as SNOOZE when alarm sounds.
- SET: Enters/confirms time settings.
- AL1: Enters/confirms Alarm 1 settings; activates/deactivates Alarm 1.
- AL2: Enters/confirms Alarm 2 settings; activates/deactivates Alarm 2.
- PROJECT: Turns time projection on/off.
- Sun Icon Button: Adjusts LED display brightness.
Setting Time
- Press and hold the SET button. The hour digits will flash.
- Use the VOL or RADIO SLEEP buttons to adjust the hour.
- Press SET again to confirm the hour and move to minute adjustment. The minute digits will flash.
- Use the VOL or RADIO SLEEP buttons to adjust the minutes.
- Press SET to confirm and exit time setting.
Setting Alarm 1 (AL1)
- Press and hold the AL1 button. The alarm hour digits will flash.
- Use the VOL or RADIO SLEEP buttons to adjust the alarm hour.
- Press AL1 again to confirm the hour and move to minute adjustment. The minute digits will flash.
- Use the VOL or RADIO SLEEP buttons to adjust the alarm minutes.
- Press AL1 to confirm and exit Alarm 1 setting.
- To activate/deactivate Alarm 1, short press AL1. An alarm icon (bell 1) will appear/disappear on the display.
Setting Alarm 2 (AL2)
- Press and hold the AL2 button. The alarm hour digits will flash.
- Use the VOL or RADIO SLEEP buttons to adjust the alarm hour.
- Press AL2 again to confirm the hour and move to minute adjustment. The minute digits will flash.
- Use the VOL or RADIO SLEEP buttons to adjust the alarm minutes.
- Press AL2 to confirm and exit Alarm 2 setting.
- To activate/deactivate Alarm 2, short press AL2. An alarm icon (bell 2) will appear/disappear on the display.
Snooze Function
When an alarm sounds, press the RADIO SLEEP button (often marked with 'Zz' or 'SLEEP' icon). The alarm will pause and sound again after a set interval (e.g., 9 minutes). To cancel the snooze and turn off the alarm for the day, press any other button (e.g., AL1, AL2, SET).
AM/FM Radio Operation
- Turn On/Off: Press the RADIO SLEEP button to turn the radio on or off.
- Frequency Tuning: When the radio is on, use the VOL or RADIO SLEEP buttons to scan or manually tune frequencies.
- Volume Adjustment: Use the VOL button to increase or decrease the radio volume.
- Antenna: Extend the built-in wire antenna for better reception.
Time Projection Function
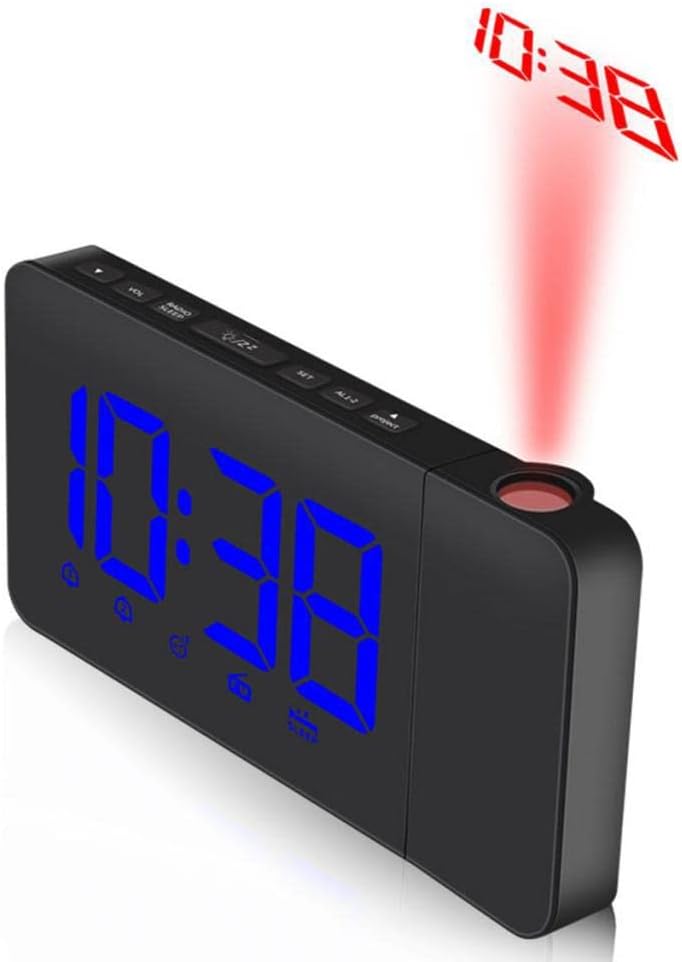
Image: The alarm clock projecting the time onto a surface.
- Activate/Deactivate: Press the PROJECT button to turn the time projection on or off.
- Rotation: The projector lens can be rotated up to 90 degrees to adjust the projection angle on your wall or ceiling.
Display Brightness Adjustment
Repeatedly press the Sun Icon Button (located on the top panel) to cycle through the five available brightness levels for the main LED display.
Maintenance
- Cleaning: Wipe the clock with a soft, dry cloth. Do not use abrasive cleaners or solvents.
- Placement: Place the clock on a stable, flat surface. Avoid direct sunlight, extreme temperatures, and high humidity.
- Power: Disconnect power during extended periods of non-use.
Troubleshooting
- Clock not powering on:
- Ensure the power wire is securely connected to both the clock and a working USB power adapter/port.
- Verify the power outlet or USB port is functional.
- Display is dim or unreadable:
- Adjust the display brightness using the Sun Icon Button.
- Alarm not sounding:
- Ensure the alarm is activated (bell icon visible on display).
- Check that the alarm time is set correctly.
- Verify the volume is not set to zero if the alarm is set to radio.
- Radio reception is poor:
- Extend and reposition the wire antenna.
- Try moving the clock to a different location to reduce interference.
- Projection is blurry or not visible:
- Ensure the projector lens is clean.
- Adjust the distance of the clock from the projection surface.
- Verify the projection function is activated using the PROJECT button.
Specifications
| Feature | Detail |
|---|---|
| Model Number | kb65yxqt7pklkh829uf8w663evv3zzb |
| Dimensions | 6.69 x 3.30 x 1.51 inches (17 x 8.4 x 3.85 cm) |
| Weight | 9 ounces |
| Power Supply | DC 5V (USB power adapter not included) |
| Display | LED with 5-level brightness adjustment |
| Projection | 90-degree rotating time projector |
| Alarm Functions | Dual alarms, Snooze function |
| Radio | AM/FM Radio with enhanced speaker |
| Memory | Settings retention during power interruptions |
| Manufacturer | PinVi |

Image: Bottom view of the alarm clock, showing the speaker and base.
Warranty and Support
For warranty information and customer support, please refer to the retailer where the product was purchased or contact the manufacturer directly. Specific warranty details are not provided in this manual.