1. Introduction
The STABCL ST-302 is a professional dual-channel UHF wireless microphone system designed for clear and reliable audio transmission. This system features 2x100 selectable frequencies per microphone, an auto-scan function for easy setup, and a robust metal construction for both the receiver and handheld microphones. It is suitable for various applications including singing, karaoke, church events, performances, DJ stages, and conferences.
1.1 What's in the Box
- Wireless Receiver x1
- Handheld Microphone x2
- Antennas x2
- Anti-slip Ring x2
- 1/4'' Audio Cable x1
- Power Adapter x1
- Instruction Manual x1

Figure 1.1: Contents of the STABCL ST-302 package, including the receiver, two microphones, antennas, anti-slip rings, audio cable, and power adapter.
2. Setup
2.1 Receiver Antenna Installation
Attach the two included antennas to the ANT-A and ANT-B connectors on the rear panel of the wireless receiver. Ensure they are securely fastened to provide optimal signal reception.

Figure 2.1: Rear view of the receiver showing the ANT-A and ANT-B connectors for antenna installation.
2.2 Power Connection
Connect the provided power adapter to the DC INPUT port on the rear of the receiver, then plug the adapter into a suitable power outlet. The receiver's display will illuminate upon successful power connection.

Figure 2.2: The receiver's rear panel indicating the DC INPUT for the power adapter.
2.3 Microphone Battery Installation
Unscrew the bottom part of each handheld microphone to reveal the battery compartment. Insert two AA batteries (not included) into each microphone, ensuring correct polarity. Securely reattach the bottom part.

Figure 2.3: Illustration of battery installation in the handheld microphone.
2.4 Connecting to an Audio System
Connect the receiver to your audio mixer, karaoke machine, PA system, or amplifier using either the two separate XLR balanced outputs (BALANCED-A, BALANCED-B) or the single 1/4'' mixed output (MIX OUT) on the receiver's rear panel. Use the appropriate cable for your audio system.

Figure 2.4: The system is compatible with various audio devices such as power amplifiers, karaoke machines, outdoor speakers, PA systems, car audio systems, and mixers.
3. Operating Instructions
3.1 Powering On/Off
- Receiver: Press the POWER button on the front panel of the receiver to turn it on or off. The LCD display will show frequency and volume information.
- Microphones: Press and hold the power button on each handheld microphone to turn it on or off. The microphone's display will show its current status.
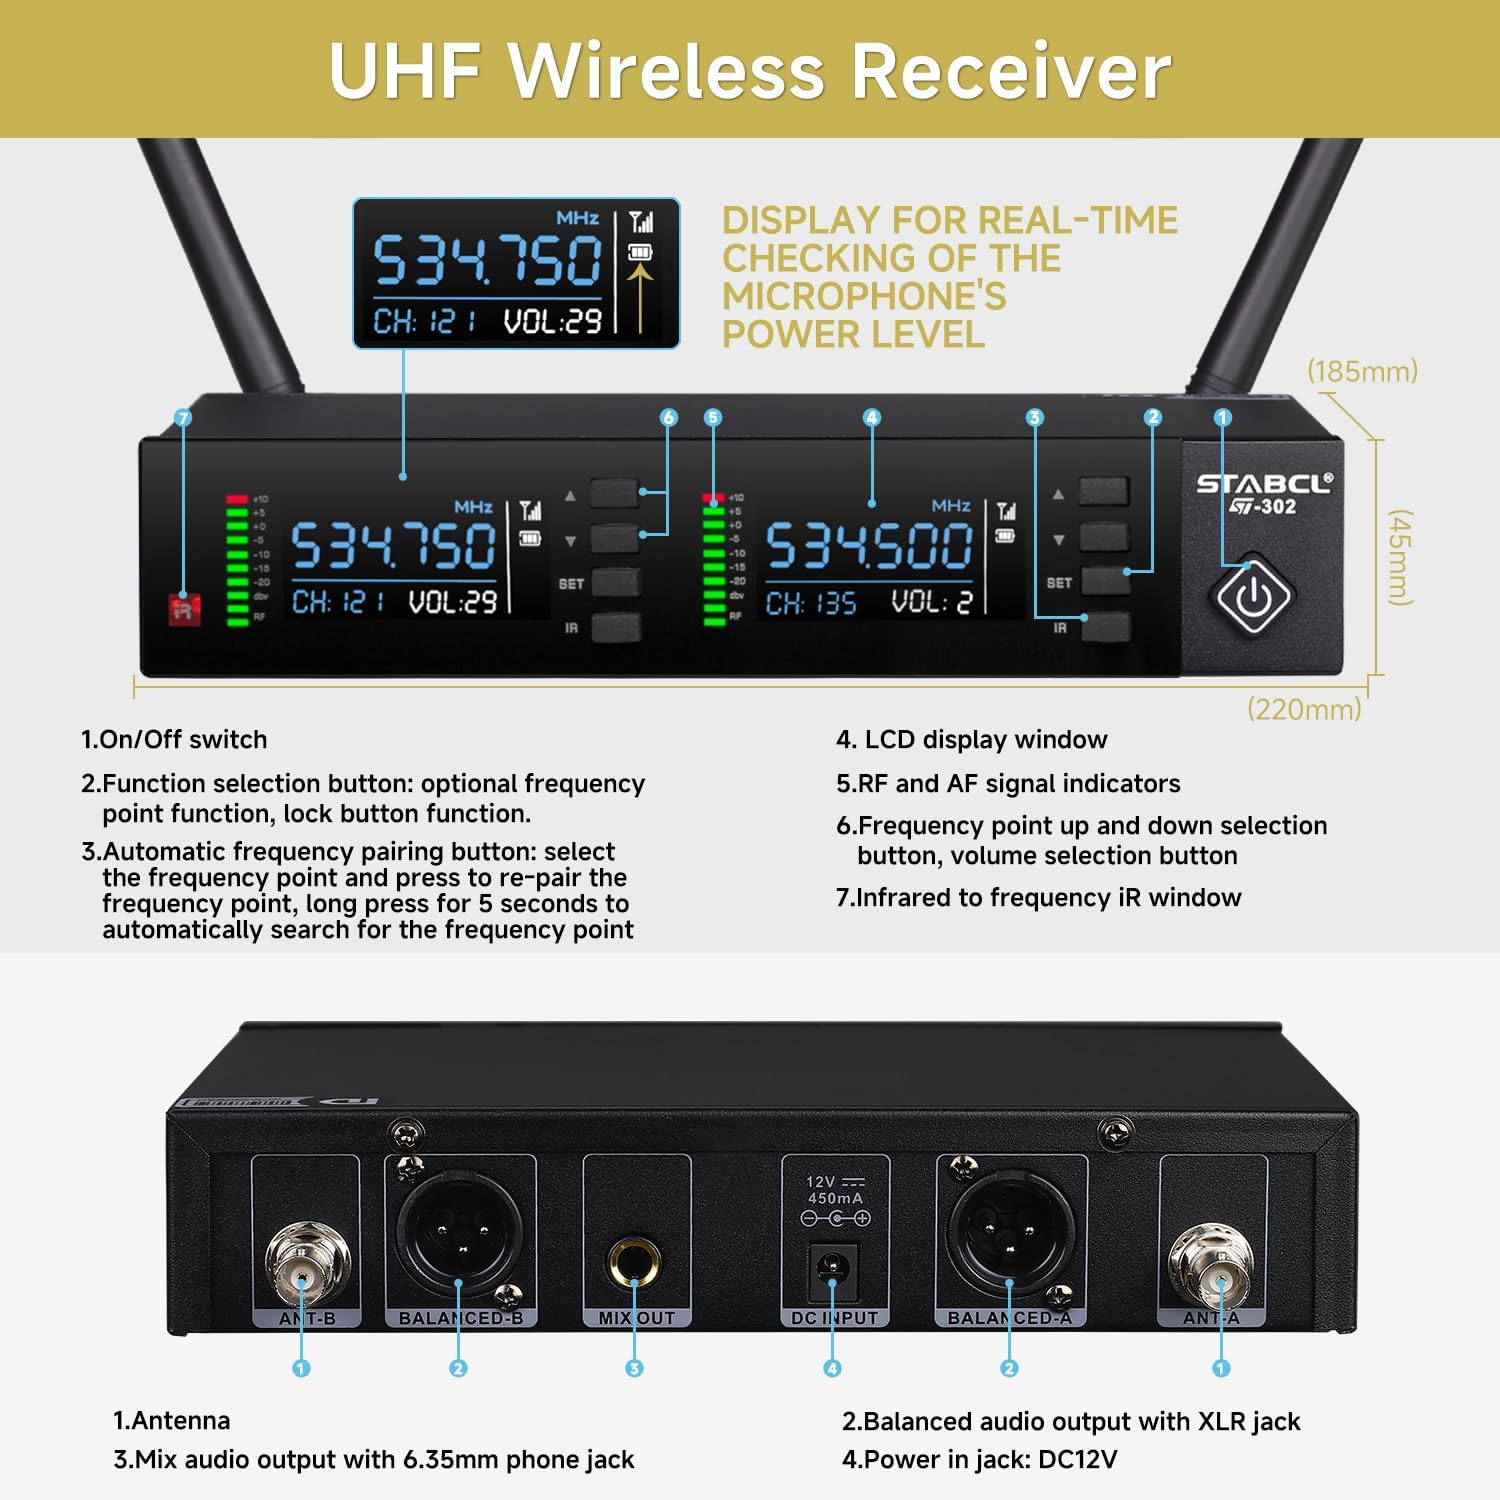
Figure 3.1: Front panel of the receiver showing the power button and LCD screens for each channel.
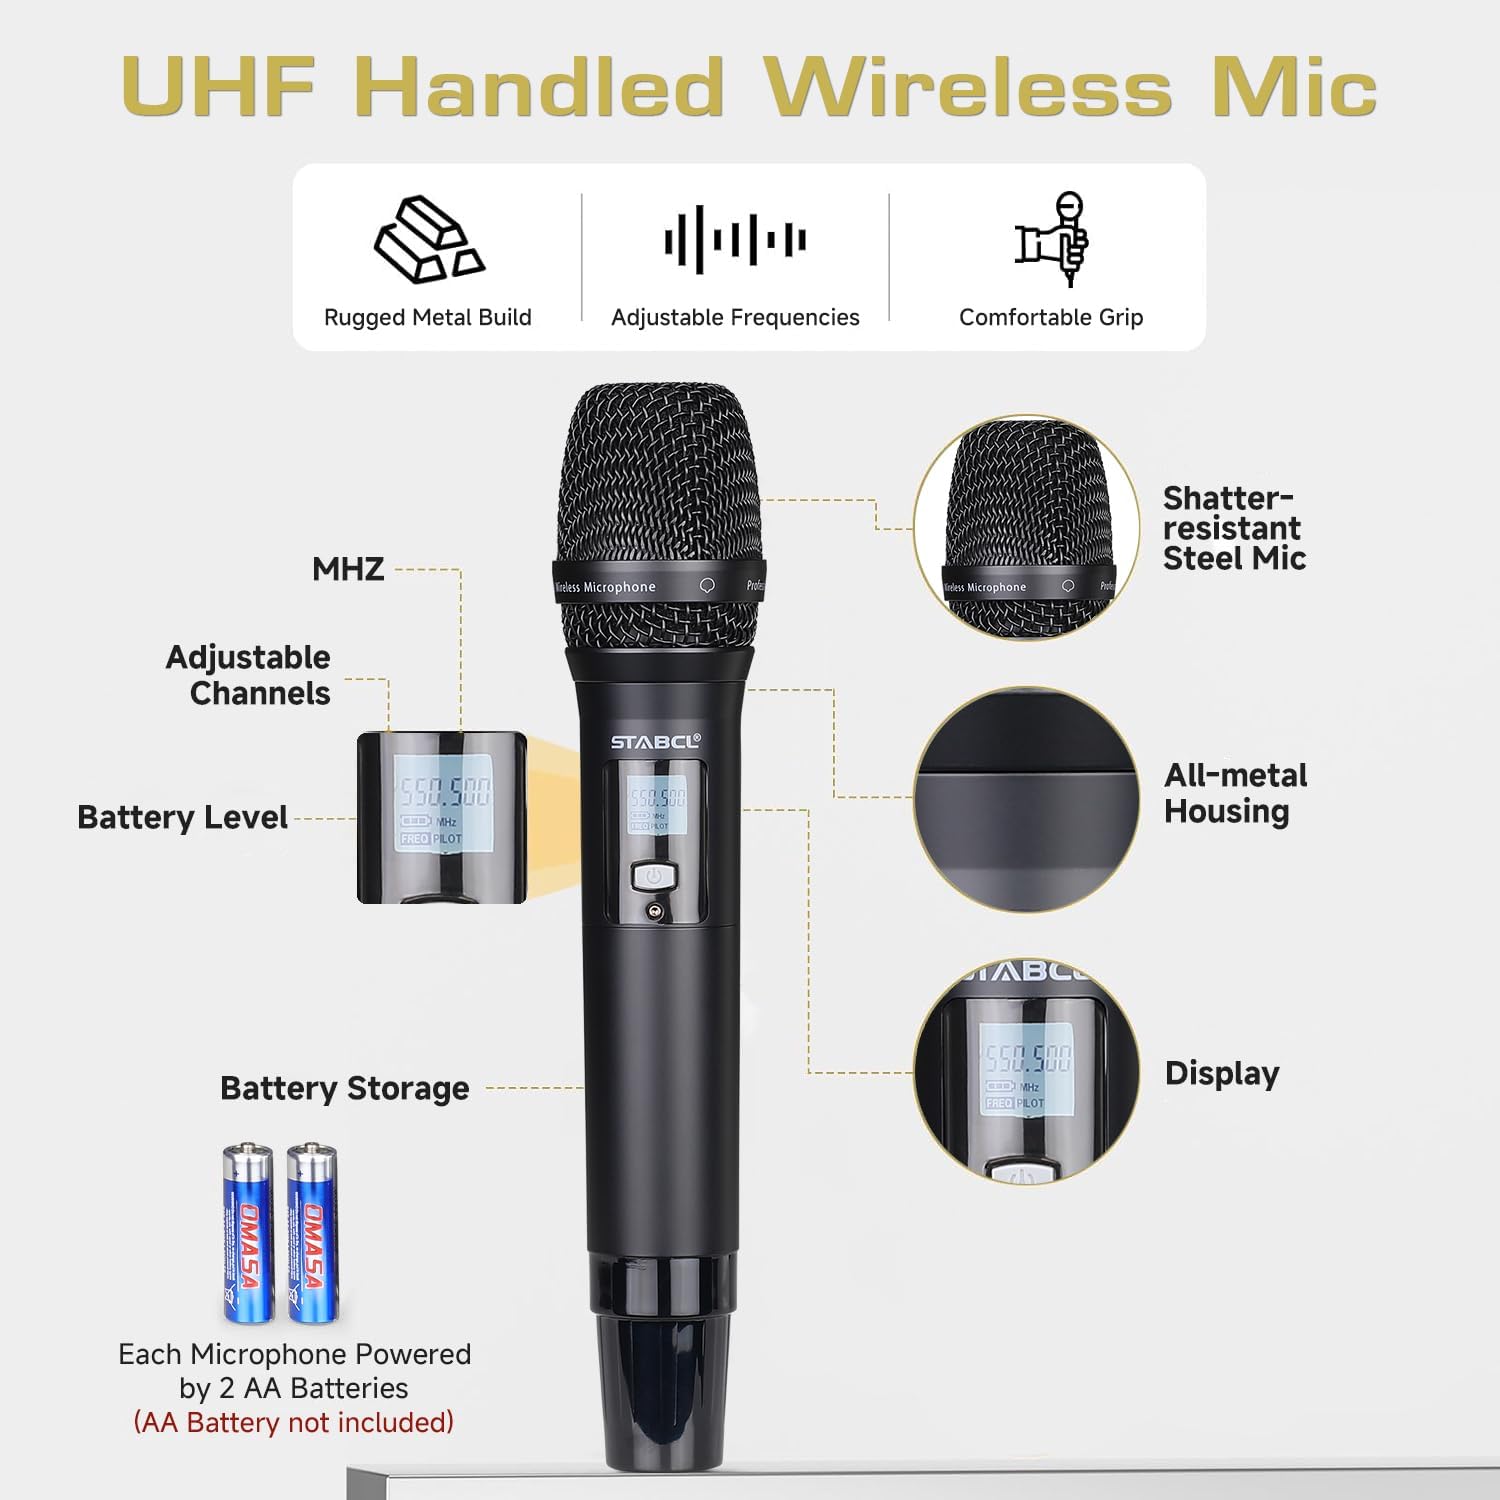
Figure 3.2: Handheld microphone showing the power button and display.
3.2 Automatic Frequency Matching (Auto Scan)
The system features an auto-scan function to find the best available frequency. Press the 'SET' button on the receiver twice. The display will show 'SCAN' as it searches for an idle frequency. Once a new frequency appears, align the infrared window of the microphone with the infrared window of the receiver to pair them. This ensures optimal performance and avoids interference.

Figure 3.3: Steps for automatic frequency scanning and IR synchronization.
3.3 Manual Frequency Adjustment
To manually adjust the frequency, press the 'SET' key once. Then, use the up or down arrow keys to select your desired frequency. After selecting, align the microphone's IR window with the receiver's IR window to synchronize the new frequency.
3.4 Volume Adjustment
Each channel on the receiver has independent volume controls. Use the up and down arrow buttons next to each channel's display to adjust the volume for the corresponding microphone.
3.5 Lock Function
To prevent accidental changes during use, the receiver features a lock function. Press the 'SET' key three times. The display will show 'LoC ON' or 'LoC OFF'. Use the up/down keys to toggle the lock status. Press 'SET' again to confirm.
3.6 Microphone Mute
Briefly press the power button on the handheld microphone to mute or unmute it. The microphone's display will indicate its mute status.
3.7 Official Product Videos
ST-302 Function Introduction
This video provides a detailed introduction to the functions of the STABCL ST-302 wireless microphone system, including power on, frequency matching, and other operational features.
Professional 2 Channel Wireless Microphones System Overview
An overview video showcasing the professional features and capabilities of the STABCL 2-channel wireless microphone system.
4. Maintenance
4.1 Battery Replacement
When the microphone's battery indicator shows low power, replace the two AA batteries promptly to ensure uninterrupted performance. Always use fresh, high-quality AA batteries.
Figure 4.1: Battery compartment of the handheld microphone for battery replacement.
4.2 General Care
Keep the receiver and microphones clean and dry. Avoid exposing them to extreme temperatures, humidity, or direct sunlight. Use a soft, dry cloth for cleaning. Do not use harsh chemicals or abrasive cleaners. Store the system in a safe place when not in use to prevent damage.
5. Troubleshooting
- No Sound:
- Ensure the receiver and microphones are powered on.
- Check all cable connections between the receiver and your audio system.
- Verify microphone batteries are correctly installed and charged.
- Confirm microphone volume levels on the receiver are not set to zero.
- Ensure microphones are not muted.
- Interference/Poor Sound Quality:
- Perform an automatic frequency scan (Section 3.2) to find a clear channel.
- Manually adjust frequencies if necessary (Section 3.3).
- Ensure antennas are properly connected and positioned for optimal reception.
- Keep the receiver away from other electronic devices that may cause interference.
- Ensure the operating distance is within the specified 300ft range.
- Microphone Not Pairing:
- Ensure the microphone batteries are fresh.
- Re-sync the microphone with the receiver using the IR function as described in Section 3.2.
6. Specifications
| Feature | Specification |
|---|---|
| Model Number | ST-302 |
| Number of Channels | 2 (2x100 frequency optional) |
| Frequency Range | 512.50-536.75 MHz and 537.00-561.75 MHz |
| Wireless Transmission Distance | Up to 300 ft (91 meters) |
| Microphone Form Factor | Handheld Dynamic |
| Material | Metal (Receiver and Microphones) |
| Power Source (Microphones) | 2 AA batteries per microphone (not included) |
| Connectivity Technology | UHF |
| Connector Type | XLR, 1/4" (Mix Out) |
| Special Feature | Noise Reduction, Auto Scan, Frequency Lock |
| Compatible Devices | Amplifier, Audio Mixer, Karaoke Machine, PA System |
| Item Weight | 4.66 pounds (2.11 kg) |
| Package Dimensions | 16.57 x 12.4 x 2.87 inches (42.09 x 31.5 x 7.29 cm) |

Figure 6.1: Overview of the system's key features and specifications.
7. Warranty and Support
For warranty information and technical support, please refer to the contact details provided with your purchase documentation or visit the official STABCL website. Keep your purchase receipt as proof of purchase for warranty claims.